What are the next gen. projects in the Jira cloud?

Hi, my loving friends. Welcome to this course. In this article, I will explain to you about the next-gen project. This is the new feature of Jira and atlas Sian introduced it in the year 2018 so, let’s have a look at the agenda of this content. In this, we will learn what are the next-gen projects, how to create next-gen projects? How can we create issues and add issue types in next-gen projects and how to configure the board? So. Let’ start.

What are the next-gen projects?

Next-gen projects are the newest projects in Jira software and it is only available on the cloud platform to the server one. If you are using a server the server platform and you wouldn’t be able to sit. The third one is configured by project team members. Any team member with the project’s admin role can modify the setting of their next-gen projects. There is no need to take the help of the Jira administrator to add the issue types and to add some fields to your screen. The Fourth one is it is easier and faster to configure than classic projects. You can easily configure setting like issue types and fields with drag-and-drop editing and reordering all in a single place because the best part of next-gen projects is the ability to enable and disable the features and it allows you to scale your projects as your team grows and tailor your projects to your team changing needs so, this is the best thing in the next-gen projects. And before going forward, I would like to tell you one more thing like atlas Sian is building the next-gen Jira software from the ground up.

How to create next-gen projects?

So, it doesn’t yet have all the features that classic projects have. And they are a lot of differences between the next-gen and the classic projects like if I’m talking about the configurations then in the classic projects. We are able to share the configurations from one project to another. But in the next gen, you can’t share it. If you did some configurations for the particular projects in the next-gen, you wouldn’t be able to share that configuration with another project. And there are many more like estimations in the classic projects, you have the options, you can give the estimations in story point in your basis but in the next-gen, there is only one option is available and that is a story point. If you will go to the next-gen cloud instance and see how can you create the next-gen projects and configure them? There will be your cloud instance and you will create the next-gen projects from there. You will see that there will be two options are available one is classic and the other is next-gen. if that particular option is created out for you then this is the permission issue so, before creating the next-gen project. I would like to tell you about the permission so, once you will click on the Jira setting and go to the global permissions, there will be your global permission schema, and create next-gen project option will be there. At the time, you will have permission to create the next-gen project. You will click on the next-gen project and you will see the interface is similar to the classic.

You can simply change the template from there but you will see only two templates are available one is scrum and another one is Kanban. If you will go with Kanban and name the project, you will see the access option (open, limited, private) and project key as a classic one. If you want to change the project key then you can do it there. You will go forward to clicking the create button then the next-gen project board will appear which would be similar to the classic one but what is the difference and how can you identify that this is the next-gen project but what will happen? If you will haven’t created it yet you didn’t create it. Maybe, you are using the project which is created by another one. You will see in the bottom line that you are in the next-gen project. You can find out and identify that you are using the next-gen project. You will see there are the options which are roadmap, board, pages, add an item, and project setting. A Roadmap is a good option which is given by the next-gen project. I will discuss this later in the course. I hope this will give you exact direction in the way of your Jira learning and about its next-gen project. So, you will stay tuned with this course for further next information regarding Jira next-gen project.

Related Video:

Tagged : / / / / / / / / /

Using Ant to build J2EE Applications

Apache Ant (Another Neat Tool) is a build tool, mainly for Java projects. A build tool can be used to automate certain repetitive tasks, e.g. compiling source code, running software tests, creating jar files, javadocs, etc.

A build process typically includes:

  • the compilation of the Java source code into Java bytecode
  • creation of the .jar file for the distribution of the code
  • creation of the Javadoc documentation

Ant uses a xml file for its configuration. This file is usually called “build.xml”. Within this build file you specify the targets for ant. A target is a step which ant will perform. You also can specific dependencies. If target A depends on target B, ant will first do B and then A. Also you specify the main target. This target is the target ant will try to execute per default. If this target depends on other targets then ant will automatically perform these task first and so on and so on.

Tagged : / / / / / /

Perforce Server Installation and Configuration

p4d – Perforce Server
p4 – Perforce Client
p4win – Perforce Windows Client

Install P4 Server in Unix

  • Copy p4d & p4 in /usr/local/bin
  • Give permission such as chmod +x p4 & chmod +xp4d
  • Create Perforce ROOT directory such as P4ROOT=/usr/local/p4_directory
  • Give permission to P4 root directory and sub directory
  • Tell perforce server to use which port such as P4PORT=servername:1666 or p4d -p 1666
  • Startting Server with Command Line Setup. p4d -r /usr/local/p4root -J /var/log/journal -L /var/log/p4err -p 1666 &
  • Tellin perforce client to which port to listen such as p4_server_hostname:1666
  • Stopping Server e.g. p4 admin stop
Tagged : / / /

Important Configuration Definitions

  • Source code— Files written in high-level languages such as C# that need to be compiled (for example, foo.cs).
  • Source(s)— All the files involved in building a product (for example, C, CPP, VB, DOC, HTM, H, and CS). This term is used mostly as a catch-all phrase that is specific not only to source code files but to all the files that are stored in version tracking systems.
  • Codeline— A tree or branch of code that has a specific purpose, such as the mainline, release line, or hotfix line that grows collectively.
  • Mainline or trunk (“The Golden Tree”)— The main codeline of the product that contains the entire source code, document files, and anything else necessary to build and release the complete product.
  • Snapshot— A specific point in time in which the sources and build are captured and stored, usually on a release or build machine.
  • Milestone— A measurement of work items that includes a specified number of deliverables for a given project scheduled for a specified amount of time that are delivered, reviewed, and fixed to meet a high quality bar. The purpose of a milestone is to understand what is done, what is left to do, and how that fits with the given schedule and resources. To do this, the team must complete a portion of the project and review it to understand where the project is in the schedule and to reconcile what is not done with the rest of the schedule. A milestone is the best way to know how much time a portion of the project will take.
  • Code freeze— A period when the automatic updates and build processes are stopped to take the final check-ins at a milestone.
  • Public build— A build using the sources from the mainline or trunk.
  • Private build (also referred to as a sandbox build)— A build using a project component tree to build more specific pieces of the product. This is usually done prior to checking in the code to the mainline.
  • Branching— A superset of files off the mainline taken at a certain time (snapshot) that contains new developments for hotfixes or new versions. Each branch continues to grow independently or dependently on the mainline.
  • Forking— Cloning a source tree to allow controlled changes on one tree while allowing the other tree to grow at its own rate. The difference between forking and branching is that forking involves two trees, whereas branching involves just one. It is also important to note that forking or cloning makes a copy (snapshot) of the tree and does not share the history between the two trees, whereas branching does share the history.
  • Virtual Build Labs (VBLs)— A Virtual Build Lab is a build lab that is owned by a specific component or project team. The owner is responsible for propagating and integrating his code into the mainline or public build. Each VBL performs full builds and installable releases from the code in its source lines and the mainline. Although the term virtual is used in the name of the labs, don’t confuse it with Virtual PC or Virtual Machines because the labs are real physical rooms and computer boxes. It is not recommended that you use Virtual software for build machines except possibly for an occasional one-off or hotfix build. , “The Build Lab and Personnel.” There is usually a hierarchy of VBLs so that code “rolls up” to the mainline or trunk. For example, let’s say that you have a mainline, Project A is a branch off of the mainline, and Developer 1 has a branch off the project branch. Developer 1 has several branches off his branch, with each branch representing a different component of the product. If he wants to integrate one of his branches into main, he should first merge his changes with all the levels above the branch to make sure he gets all the changes. Alternatively, he can just roll the changes into main, which sits higher in the hierarchy. This will become clearer in the next couple of pages.
  • Reverse integration (RI)— The process of moving sources from one branch or tree to another that is higher in the VBL hierarchy.
  • Forward integration (FI)— The process of moving sources from one branch or tree to another that is lower in the VBL hierarchy.
  • Buddy build— A build performed on a machine other than the machine that the developer originally made changes on. This is done to validate the list of changed files so that there are no unintended consequences to the change in the mainline build.
Tagged : / / / / / / / /

Windows Installer Configuration EVERY TIME!!

InstallerExpert created the topic: Windows Installer Configuration EVERY TIME!!
Ok, so I am sure this sounds pretty familiar. Every time I open an office
application, or an office document, I get a pop up of the windows installer
and it starts running some mystery configuration process. I have tried
uninstalling/reinstalling. I have tried repairing the registry permissions.
I have ripped all office traces out by force and done a clean install. I
have rebuilt the registry, modified it, added some conditional entries, but
to no avail. I have done it in the user account, and the built in
administrator account. I have done both custom and full installs. I have
googled, forumed, knowledge-based, and done every other form of research you
can imagine. I have found several “solutions” but none of them has worked.
I am at an absolute loss for any possible cause for this problem, let alone
how to fix it.

I’m running Office 2007, on a Dell Inspiron 1440 running Vista (32 bit) SP2.

Please help!

Tagged :

How to configure Sonatype Nexus repository with Maven?

configure-sonatype-nexus-repository-with-maven

How to configure Sonatype Nexus repository with Maven?


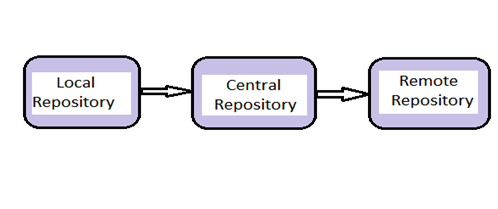
Automatic dependencies is one of the powerful feature of Apache maven and its one of the reason Maven is very popular in developer community. Maven resolve the dependent library from local repository which is again connected with central repository or remote repository. thus we can say that Maven has 3 kinds of repository concept.


1. Local repostory e.g $USER_HOME/.m2
2. Central repostory e.g http://repo.maven.apache.org/maven2/
3. Private repostory e.g Sonatype Nexus, Artifactory, Archiva etc.
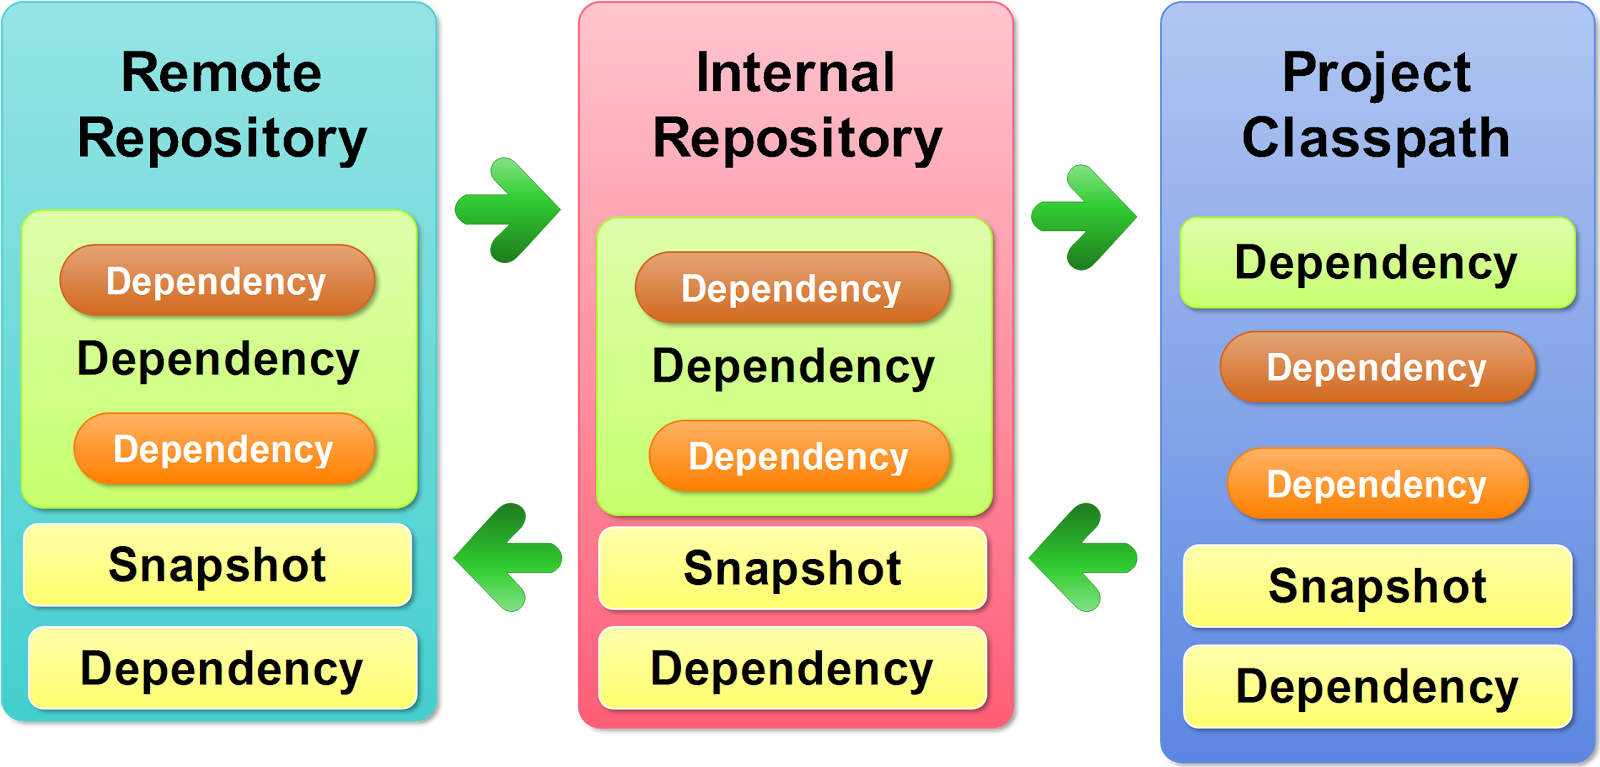
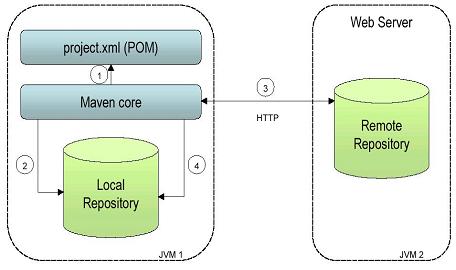
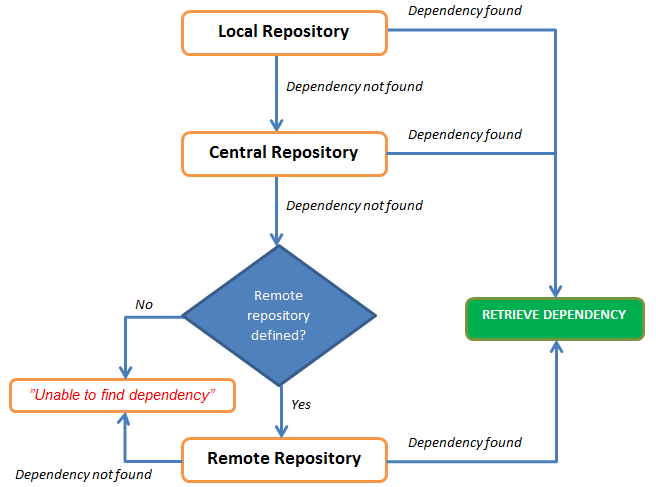
The diagram shown below represent how maven resolve the dependendency.

 
High Level Interaction between Local Repository, Central Repository and Remote Repository.


Dependency Management using Local Repository, Central Repository and Remote Repository.

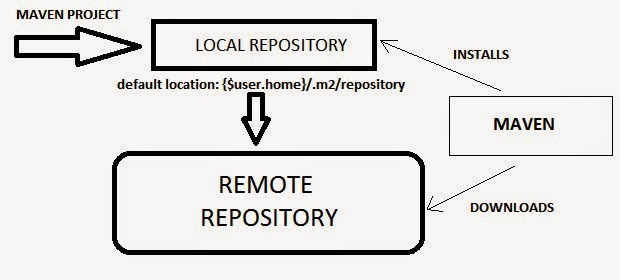
This is How maven interact with Repository!


This is a diagram which shows the define flow in which maven try to resolve the dependency.


Now, We have understood that Central rrepository is in built but next questions is, How to inform the maven about the location of remote repository? In order to configure maven with remote repostory, in our case SonaType Nexus, we need to configuring host machine setting.xml and projects pom.xml to use your Nexus repos.


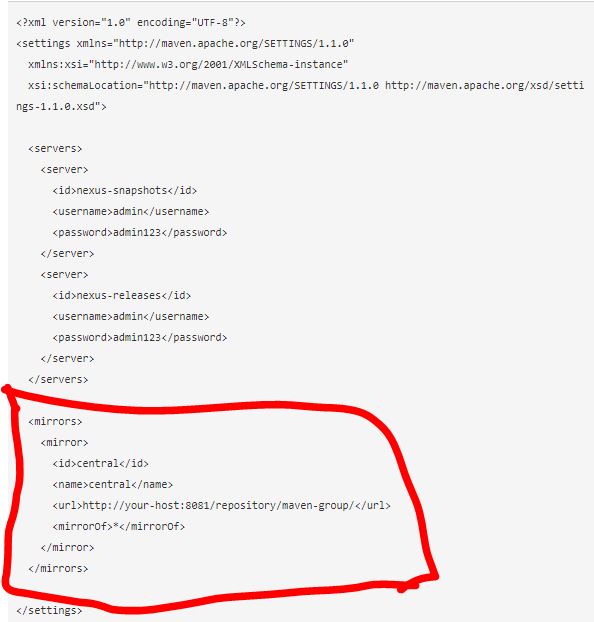
Put this in your ~/.m2/settings.xml file. This will configure the credentials to publish to your hosted repos, and will tell your mvn to use your repo as a mirror of central:

And now configure your projects.

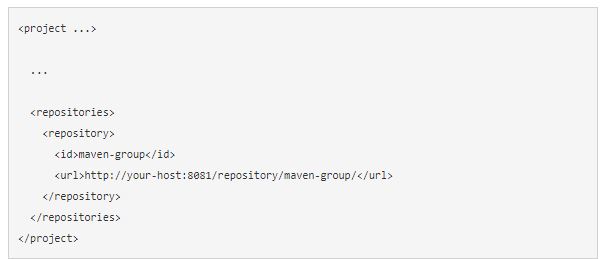
If you want only to download dependencies from Nexus, put this in the pom.xml:

and

Add the following at the end of setting.xml

<activeProfiles>

    <!–make the profile active all the time –>

    <activeProfile>nexus</activeProfile>

  </activeProfiles>


Reference

https://maven.apache.org/guides/mini/guide-mirror-settings.html

Tagged : / / / / /

Generate Jenkins Job Configuration Automatically | Jenkins Tutorials

generate-jenkins-job-configuration-automatically
Generate Jenkins Job Configuration Automatically?
Job DSL Plugin
The job-dsl-plugin allows the programmatic creation of projects using a DSL. Pushing job creation into a script allows you to automate and standardize your Jenkins installation, unlike anything possible before.
More –
Multi-Branch Project Plugin
This plugin adds additional project types that create sub-projects for each branch using a shared configuration.
Job Generator Plugin
This plugin adds a new job type “Job Generator” which can generate new projects when executed.
Jenkins Job Builder
Jenkins Job Builder takes simple descriptions of Jenkins jobs in YAML or JSON format and uses them to configure Jenkins. You can keep your job descriptions in human readable text format in a version control system to make changes and auditing easier. It also has a flexible template system, so creating many similarly configured jobs is easy.
More –
Generating New Jenkins Jobs From Templates and Parameterised Builds
We use Jenkins to run our builds in a continuously. This is great, but you still have to do a fair bit of configuration each time you set up a new job. If you have a fairly static set of builds this isn’t a problem. We found ourselves in a situation where we had to create a lot of very similar builds quite regularly. Creating a new job by hand and manually changing the 10 or so tiny little things in each build is a pain and error prone. So…automate that too!
More
Tagged : / / / / / / /

Top 25 Chef configuration management interview questions and answers
chef-interview-questions-and-answers

Source – learn.chef.io

What is a resource?
Answer- A resource represents a piece of infrastructure and its desired state, such as a package that should be installed, a service that should be running, or a file that should be generated.

Question: What is a recipe?
Answer- A recipe is a collection of resources that describes a particular configuration or policy. A recipe describes everything that is required to configure part of a system. Recipes do things such as:

install and configure software components.
manage files.
deploy applications.
execute other recipes.

Question: What happens when you don’t specify a resource’s action?
Answer- When you don’t specify a resource’s action, Chef applies the default action.

Question: Are these two recipes the same?

package 'httpd'
service 'httpd' do    action [:enable, :start]  end

&&

service 'httpd' do    action [:enable, :start]    end
package 'httpd'

Answer-
No, they are not. Remember that Chef applies resources in the order they appear. So the first recipe ensures that the httpd package is installed and then configures the service. The second recipe configures the service and then ensures the package is installed.

Question: The second recipe may not work as you’d expect because the service resource will fail if the package is not yet installed.

Are these two recipes the same?

package 'httpd'
service 'httpd' do    action [:enable, :start]    end
package 'httpd'
service 'httpd' do    action [:start, :enable]    end

Answer-
No, they are not. Although both recipes ensure that the httpd package is installed before configuring its service, the first recipe enables the service when the system boots and then starts it. The second recipe starts the service and then enables it to start on reboot.

Are these two recipes the same?

file ‘/etc/motd’ do
owner ‘root’
group ‘root’
mode ‘0755’
action :create
end

file ‘/etc/motd’ do
action :create
mode ‘0755’
group ‘root’
owner ‘root’
end

Answer-
Yes, they are! Order matters with a lot of things in Chef, but you can order resource attributes any way you want.

Question –
Write a service resource that stops and then disables the httpd service from starting when the system boots.

Answer –
service ‘httpd’ do
action [:stop, :disable]
end

How does a cookbook differ from a recipe?
A recipe is a collection of resources, and typically configures a software package or some piece of infrastructure. A cookbook groups together recipes and other information in a way that is more manageable than having just recipes alone.

For example, in this lesson you used a template resource to manage your HTML home page from an external file. The recipe stated the configuration policy for your web site, and the template file contained the data. You used a cookbook to package both parts up into a single unit that you can later deploy.

How does chef-apply differ from chef-client?

chef-apply applies a single recipe; chef-client applies a cookbook.

For learning purposes, we had you start off with chef-apply because it helps you understand the basics quickly. In practice, chef-apply is useful when you want to quickly test something out. But for production purposes, you typically run chef-client to apply one or more cookbooks.

You’ll learn in the next module how to run chef-client remotely from your workstation.

What’s the run-list?

The run-list lets you specify which recipes to run, and the order in which to run them. The run-list is important for when you have multiple cookbooks, and the order in which they run matters.

What are the two ways to set up a Chef server?

Install an instance on your own infrastructure.
Use hosted Chef.

What’s the role of the Starter Kit?
The Starter Kit provides certificates and other files that enable you to securely communicate with the Chef server.

Where can you get reusable cookbooks that are written and maintained by the Chef community?
Chef Supermarket, https://supermarket.chef.io.

What’s the command that enables you to interact with the Chef server?
knife

What is a node?
A node represents a server and is typically a virtual machine, container instance, or physical server – basically any compute resource in your infrastructure that’s managed by Chef.

What information do you need to in order to bootstrap?
You need:

your node’s host name or public IP address.
a user name and password you can log on to your node with.
Alternatively, you can use key-based authentication instead of providing a user name and password.

What happens during the bootstrap process?
During the bootstrap process, the node downloads and installs chef-client, registers itself with the Chef server, and does an initial checkin. During this checkin, the node applies any cookbooks that are part of its run-list.

Which of the following lets you verify that your node has successfully bootstrapped?

The Chef management console.
knife node list
knife node show
You can use all three of these methods.

What is the command you use to upload a cookbook to the Chef server?
knife cookbook upload

How do you apply an updated cookbook to your node?
We mentioned two ways.

Run knife ssh from your workstation.
SSH directly into your server and run chef-client.
You can also run chef-client as a daemon, or service, to check in with the Chef server on a regular interval, say every 15 or 30 minutes.

Update your Apache cookbook to display your node’s host name, platform, total installed memory, and number of CPUs in addition to its FQDN on the home page.

Update index.html.erb like this.
<html>
<body>
<h1>hello from <%= node[‘fqdn’] %></h1>

<pre>
<%= node[‘hostname’] %>
<%= node[‘platform’] %> – <%= node[‘platform_version’] %>
<%= node[‘memory’][‘total’] %> RAM
<%= node[‘cpu’][‘total’] %> CPUs
</pre>
</body>
</html>

Then upload your cookbook and run it on your node.

What would you set your cookbook’s version to once it’s ready to use in production?

According to Semantic Versioning, you should set your cookbook’s version number to 1.0.0 at the point it’s ready to use in production.

What is the latest version of the haproxy community cookbook?

To know the latest version of any cookbook on Chef Supermarket, browse to its page and view the latest version from the version selection box.

Or, get the info from the knife cookbook site command, like this.

knife cookbook site show haproxy | grep latest_version
latest_version: http://cookbooks.opscode.com/api/v1/cookbooks/haproxy/versions/1.6.6

Create a second node and apply the awesome_customers cookbook to it. How long does it take?

You already accomplished the majority of the tasks that you need. You wrote the awesome_customers cookbook, uploaded it and its dependent cookbooks to the Chef server, applied the awesome_customers cookbook to your node, and verified that everything’s working.

All you need to do now is:

Bring up a second Red Hat Enterprise Linux or CentOS node.
Copy your secret key file to your second node.
Bootstrap your node the same way as before. Because you include the awesome_customers cookbook in your run-list, your node will apply that cookbook during the bootstrap process.
The result is a second node that’s configured identically to the first one. The process should take far less time because you already did most of the work.

Now when you fix an issue or add a new feature, you’ll be able to deploy and verify your update much more quickly!

What’s the value of local development using Test Kitchen?

Local development with Test Kitchen:

enables you to use a variety of virtualization providers that create virtual machine or container instances locally on your workstation or in the cloud.
enables you to run your cookbooks on servers that resemble those that you use in production.
speeds up the development cycle by automatically provisioning and tearing down temporary instances, resolving cookbook dependencies, and applying your cookbooks to your instances.

What is VirtualBox? What is Vagrant?

VirtualBox is the software that manages your virtual machine instances.

Vagrant helps Test Kitchen communicate with VirtualBox and configures things like available memory and network settings.

Verify that your motd cookbook runs on both CentOS 6.6 and CentOS 6.5.

Your motd cookbook is already configured to work on CentOS 6.6 as well as CentOS 6.5, so you don’t need to modify it.

To run it on CentOS 6.5, add an entry to the platforms section of your .kitchen.yml file like this.

---       driver:       name: vagrant
provisioner:       name: chef_zero
platforms:       - name: centos-6.6       driver:       box: opscode-centos-6.6       box_url: http://opscode-vm-bento.s3.amazonaws.com/vagrant/virtualbox/opscode_centos-6.6_chef-provisionerless.box       - name: centos-6.5       driver:       box: opscode-centos-6.5       box_url: http://opscode-vm-bento.s3.amazonaws.com/vagrant/virtualbox/opscode_centos-6.5_chef-provisionerless.box
suites:       - name: default       run_list:       - recipe[motd::default]       attributes:

In many cases, Test Kitchen can infer the box and box_url parameters, which specify the name and location of the base image, or box. We specify them here to show you how to use them.

Run kitchen list to see the matrix of test instances that are available. Here, we have two platforms – CentOS 6.5 and CentOS 6.6 – multiplied by one suite – default.

$kitchen list

Instance           Driver   Provisioner  Verifier  Transport  Last Action default-centos-66  Vagrant  ChefZero     Busser    Ssh        <Not Created> default-centos-65  Vagrant  ChefZero     Busser    Ssh        <Not Created>

Run kitchen converge to create the instances and apply the motd cookbook.

$kitchen converge    -----> Starting Kitchen (v1.4.0)    -----> Creating <default-centos-66>...    Bringing machine 'default' up with 'virtualbox' provider...    [...]    Running handlers:    Running handlers complete    Chef Client finished, 1/1 resources updated in 10.372334751 seconds    Finished converging <default-centos-66> (3m52.59s).    -----> Creating <default-centos-65>...    Bringing machine 'default' up with 'virtualbox' provider...    [...]    Running handlers:    Running handlers complete    Chef Client finished, 1/1 resources updated in 5.32753132 seconds    Finished converging <default-centos-65> (10m12.63s).  -----> Kitchen is finished. (19m47.71s)

Now to confirm that everything’s working, run kitchen login. But this time, you need to provide the instance name so that Test Kitchen knows which instance to connect to.

$kitchen login default-centos-66       Last login: Wed May 13 20:15:00 2015 from 10.0.2.2              hostname:  default-centos-66       fqdn:      default-centos-66       memory:    469392kB       cpu count: 1       [vagrant@default-centos-66 ~]$ logout       Connection to 127.0.0.1 closed.$kitchen login default-centos-65       Last login: Wed May 13 20:28:18 2015 from 10.0.2.2              hostname:  default-centos-65       fqdn:      default-centos-65       memory:    469452kB       cpu count: 1       [vagrant@default-centos-65 ~]$ logout       Connection to 127.0.0.1 closed.
Tagged : / / / / / / / / / / / / / / /

Chef configuration management interview questions and answers | Chef Interview Q&A

chef-interview-questions-and-answers

Source – learn.chef.io

What is a resource?
Answer- A resource represents a piece of infrastructure and its desired state, such as a package that should be installed, a service that should be running, or a file that should be generated.

Question: What is a recipe?
Answer- A recipe is a collection of resources that describes a particular configuration or policy. A recipe describes everything that is required to configure part of a system. Recipes do things such as:

install and configure software components.
manage files.
deploy applications.
execute other recipes.

Question: What happens when you don’t specify a resource’s action?
Answer- When you don’t specify a resource’s action, Chef applies the default action.

Question: Are these two recipes the same?

package 'httpd'
service 'httpd' do    action [:enable, :start]  end

&&

service 'httpd' do    action [:enable, :start]    end
package 'httpd'

Answer-
No, they are not. Remember that Chef applies resources in the order they appear. So the first recipe ensures that the httpd package is installed and then configures the service. The second recipe configures the service and then ensures the package is installed.

Question: The second recipe may not work as you’d expect because the service resource will fail if the package is not yet installed.

Are these two recipes the same?

package 'httpd'
service 'httpd' do    action [:enable, :start]    end
package 'httpd'
service 'httpd' do    action [:start, :enable]    end

Answer-
No, they are not. Although both recipes ensure that the httpd package is installed before configuring its service, the first recipe enables the service when the system boots and then starts it. The second recipe starts the service and then enables it to start on reboot.

Are these two recipes the same?

file ‘/etc/motd’ do
owner ‘root’
group ‘root’
mode ‘0755’
action :create
end

file ‘/etc/motd’ do
action :create
mode ‘0755’
group ‘root’
owner ‘root’
end

Answer-
Yes, they are! Order matters with a lot of things in Chef, but you can order resource attributes any way you want.

Question –
Write a service resource that stops and then disables the httpd service from starting when the system boots.

Answer –
service ‘httpd’ do
action [:stop, :disable]
end

How does a cookbook differ from a recipe?
A recipe is a collection of resources, and typically configures a software package or some piece of infrastructure. A cookbook groups together recipes and other information in a way that is more manageable than having just recipes alone.

For example, in this lesson you used a template resource to manage your HTML home page from an external file. The recipe stated the configuration policy for your web site, and the template file contained the data. You used a cookbook to package both parts up into a single unit that you can later deploy.

How does chef-apply differ from chef-client?

chef-apply applies a single recipe; chef-client applies a cookbook.

For learning purposes, we had you start off with chef-apply because it helps you understand the basics quickly. In practice, chef-apply is useful when you want to quickly test something out. But for production purposes, you typically run chef-client to apply one or more cookbooks.

You’ll learn in the next module how to run chef-client remotely from your workstation.

What’s the run-list?

The run-list lets you specify which recipes to run, and the order in which to run them. The run-list is important for when you have multiple cookbooks, and the order in which they run matters.

What are the two ways to set up a Chef server?

Install an instance on your own infrastructure.
Use hosted Chef.

What’s the role of the Starter Kit?
The Starter Kit provides certificates and other files that enable you to securely communicate with the Chef server.

Where can you get reusable cookbooks that are written and maintained by the Chef community?
Chef Supermarket, https://supermarket.chef.io.

What’s the command that enables you to interact with the Chef server?
knife

What is a node?
A node represents a server and is typically a virtual machine, container instance, or physical server – basically any compute resource in your infrastructure that’s managed by Chef.

What information do you need to in order to bootstrap?
You need:

your node’s host name or public IP address.
a user name and password you can log on to your node with.
Alternatively, you can use key-based authentication instead of providing a user name and password.

What happens during the bootstrap process?
During the bootstrap process, the node downloads and installs chef-client, registers itself with the Chef server, and does an initial checkin. During this checkin, the node applies any cookbooks that are part of its run-list.

Which of the following lets you verify that your node has successfully bootstrapped?

The Chef management console.
knife node list
knife node show
You can use all three of these methods.

What is the command you use to upload a cookbook to the Chef server?
knife cookbook upload

How do you apply an updated cookbook to your node?
We mentioned two ways.

Run knife ssh from your workstation.
SSH directly into your server and run chef-client.
You can also run chef-client as a daemon, or service, to check in with the Chef server on a regular interval, say every 15 or 30 minutes.

Update your Apache cookbook to display your node’s host name, platform, total installed memory, and number of CPUs in addition to its FQDN on the home page.

Update index.html.erb like this.
<html>
<body>
<h1>hello from <%= node[‘fqdn’] %></h1>

<pre>
<%= node[‘hostname’] %>
<%= node[‘platform’] %> – <%= node[‘platform_version’] %>
<%= node[‘memory’][‘total’] %> RAM
<%= node[‘cpu’][‘total’] %> CPUs
</pre>
</body>
</html>

Then upload your cookbook and run it on your node.

What would you set your cookbook’s version to once it’s ready to use in production?

According to Semantic Versioning, you should set your cookbook’s version number to 1.0.0 at the point it’s ready to use in production.

What is the latest version of the haproxy community cookbook?

To know the latest version of any cookbook on Chef Supermarket, browse to its page and view the latest version from the version selection box.

Or, get the info from the knife cookbook site command, like this.

knife cookbook site show haproxy | grep latest_version
latest_version: http://cookbooks.opscode.com/api/v1/cookbooks/haproxy/versions/1.6.6

Create a second node and apply the awesome_customers cookbook to it. How long does it take?

You already accomplished the majority of the tasks that you need. You wrote the awesome_customers cookbook, uploaded it and its dependent cookbooks to the Chef server, applied the awesome_customers cookbook to your node, and verified that everything’s working.

All you need to do now is:

Bring up a second Red Hat Enterprise Linux or CentOS node.
Copy your secret key file to your second node.
Bootstrap your node the same way as before. Because you include the awesome_customers cookbook in your run-list, your node will apply that cookbook during the bootstrap process.
The result is a second node that’s configured identically to the first one. The process should take far less time because you already did most of the work.

Now when you fix an issue or add a new feature, you’ll be able to deploy and verify your update much more quickly!

What’s the value of local development using Test Kitchen?

Local development with Test Kitchen:

enables you to use a variety of virtualization providers that create virtual machine or container instances locally on your workstation or in the cloud.
enables you to run your cookbooks on servers that resemble those that you use in production.
speeds up the development cycle by automatically provisioning and tearing down temporary instances, resolving cookbook dependencies, and applying your cookbooks to your instances.

What is VirtualBox? What is Vagrant?

VirtualBox is the software that manages your virtual machine instances.

Vagrant helps Test Kitchen communicate with VirtualBox and configures things like available memory and network settings.

Verify that your motd cookbook runs on both CentOS 6.6 and CentOS 6.5.

Your motd cookbook is already configured to work on CentOS 6.6 as well as CentOS 6.5, so you don’t need to modify it.

To run it on CentOS 6.5, add an entry to the platforms section of your .kitchen.yml file like this.

---       driver:       name: vagrant
provisioner:       name: chef_zero
platforms:       - name: centos-6.6       driver:       box: opscode-centos-6.6       box_url: http://opscode-vm-bento.s3.amazonaws.com/vagrant/virtualbox/opscode_centos-6.6_chef-provisionerless.box       - name: centos-6.5       driver:       box: opscode-centos-6.5       box_url: http://opscode-vm-bento.s3.amazonaws.com/vagrant/virtualbox/opscode_centos-6.5_chef-provisionerless.box
suites:       - name: default       run_list:       - recipe[motd::default]       attributes:

In many cases, Test Kitchen can infer the box and box_url parameters, which specify the name and location of the base image, or box. We specify them here to show you how to use them.

Run kitchen list to see the matrix of test instances that are available. Here, we have two platforms – CentOS 6.5 and CentOS 6.6 – multiplied by one suite – default.

$kitchen list

Instance           Driver   Provisioner  Verifier  Transport  Last Action default-centos-66  Vagrant  ChefZero     Busser    Ssh        <Not Created> default-centos-65  Vagrant  ChefZero     Busser    Ssh        <Not Created>

Run kitchen converge to create the instances and apply the motd cookbook.

$kitchen converge    -----> Starting Kitchen (v1.4.0)    -----> Creating <default-centos-66>...    Bringing machine 'default' up with 'virtualbox' provider...    [...]    Running handlers:    Running handlers complete    Chef Client finished, 1/1 resources updated in 10.372334751 seconds    Finished converging <default-centos-66> (3m52.59s).    -----> Creating <default-centos-65>...    Bringing machine 'default' up with 'virtualbox' provider...    [...]    Running handlers:    Running handlers complete    Chef Client finished, 1/1 resources updated in 5.32753132 seconds    Finished converging <default-centos-65> (10m12.63s).  -----> Kitchen is finished. (19m47.71s)

Now to confirm that everything’s working, run kitchen login. But this time, you need to provide the instance name so that Test Kitchen knows which instance to connect to.

$kitchen login default-centos-66       Last login: Wed May 13 20:15:00 2015 from 10.0.2.2              hostname:  default-centos-66       fqdn:      default-centos-66       memory:    469392kB       cpu count: 1       [vagrant@default-centos-66 ~]$ logout       Connection to 127.0.0.1 closed.$kitchen login default-centos-65       Last login: Wed May 13 20:28:18 2015 from 10.0.2.2              hostname:  default-centos-65       fqdn:      default-centos-65       memory:    469452kB       cpu count: 1       [vagrant@default-centos-65 ~]$ logout       Connection to 127.0.0.1 closed.
Tagged : / / / / / / / / / / / / / / /