How to write html code in PHP

When developing a web application with PHP, we frequently need to print or echo a few HTML results. This work can be accomplished in a variety of ways. Here are a few examples of methods:

Using “echo or print”:– HTML markup, javascript, text, and variables may all be shown with PHP echo or print.

Example 1: This example uses PHP echo to display the result.

Output:-

Example 2: This example uses PHP print to display the result.

Output :

Using echo shorthand or separating HTML: Any expression, variable value, or HTML markup can be shown with the PHP echo shortcut.

Example 1: This example uses PHP echo shorthand to display the result.

Output:

Example 2: Separating HTML from PHP

Output:-

Tagged : / / / / / /

How to Resolve Windows Installer Problem

Installation of a program means inserting that particular program in your computer so that it can be executed properly. Some of the software programs can be simply copied to the computer and executed without doing anything further; they don’t require any kind of installation process. Many programs come with an executable suite, which requires to be installed. Installation is the process where you will have to unpack some files, copy them to desired locations, tailor the software to suite your hardware and give the desired information to the operating system.

Installation often means that once a program is installed, the user can run the program over and over again, without reinstalling it again before using each time. Until one does not uninstall the program or the program does not allow further execution, you will have to install it again. However, sometimes one can encounter problems while installing a program. Here are some simple steps that will help you in resolving windows installer problems:

teps:

  • First thing to do for resolving windows installer problem is identifying it. When you are trying to install or uninstall something, you might get a warning message like:

“The windows installer cannot be accessed”

“Windows installer service cannot be started”

“Could not start the windows installer service on Local computer. Error 5:

access is denied.”

  • These error messages will often appear on the screen when the installation of the MSI package has failed or when the windows installer service is disabled.
  • Method 1: first unregister windows installer, and then you will have to register it again. For resolving windows installer problems of such a nature, just do the following things. Go on the ’start’ menu and click on the ‘run’ option. In the dialog box start typing ‘msiexec/unreg’, and then press the enter key.
  • Go on the ’start’ menu again and click on the ‘run’ option. In the dialog box start typing, ‘msiexec/regserver’ and then press the ‘enter’ key.
  • Method 2: you can upgrade the windows installer to a higher version or a newer version. For this, open the internet explorer page, and go to the Microsoft website. Go to the link, http://msdn.microsoft.com/downloads. On the left side you will get an option of ’setup and system administration’ and now click on the ’setup’ option.
  • Select the ‘windows installer’, and then choose the appropriate link for your operating system. Now click on the ‘download’ option and install the new version or install the higher version of windows installer.
  • Method 3: for resolving windows installer problem, you might have to uninstall the failed product with the help of an installer cleanup. The description for the windows installer cleanup utility is, http://support.microsoft.com/default.aspx?scid=kb;en-us;290301
  • Method 4: if the windows service is disabled on your computer, then go to the ’start’ menu, select ‘run’ option and type ’services.msc’ and click enter. Now, double click on the option of windows installer.
  • Method 5: check the DCOM and the permission by the system through http://support.microsoft.com/?id=319624
  • Method 6: another thing you can do for resolving windows installer problem is
Tagged : / / / / / / /

How to Examin History in Subversion (SVN)?

subversion-history-examining

Examining History in Subversion

Your Subversion repository is like a time machine. It keeps a record of every change ever committed and allows you to explore this history by examining previous versions of files and directories as well as the metadata that accompanies them.

Several commands can provide you with historical data from the repository:

svn log
Shows you broad information: log messages with date and author information attached to revisions and which paths changed in each revision
svn diff
Shows line-level details of a particular change
svn cat
Retrieves a file as it existed in a particular revision number and displays it on your screen
svn list
Displays the files in a directory for any given revision
Tagged : / / / / / / / / / / / /

How to Setup Configure Hudson Master Slave? – Complete Guide

hudson-master-slave-setup
The tasks can be scheduled to run on the same machine (Master), or on a different machine (Slave). A master is a installation of Hudson, that can manage one or more slaves. The role of master remains same in Master slave setup. It serves HTTP requests, and it can still build projects on it’s own.
Slaves are computers that are setup to build projects triggered from the master. A separate program called slave agent runs on slave computer. In this article we’ll discuss about how to setup Hudson to executed distributed builds using Master slave. One computer can be configured to execute multiple slave agents.

How it works

When the slaves are registered to a master, the master starts distributing loads to slaves. The delegation depends on the specific job. The job can be configured to either execute on the master, or it can be tied to a specific slave. On the other hand, the jobs can be configured to freely roam between slaves, wherein the job is executed using the free slave. As per the user is concerned, the setup is transparent. The results for all jobs are viewable using the Master, irrespective of the Slave that executed the job.
The slave may be built using any Operating system. The Master slave setup is highly helpful while the user has to execute the job on different Operating system. Consider this use case: The application is expected to run on different operating system, Linux, Solaris and Windows system. To address this need, the user can install Hudson on any machine, say Linux, and add 2 slaves: Solaris and Windows. The user can add 3 different jobs, one running on Master itself and others running on slave machines.

Methods to set up Slave agents

The slave can be launched from Master using any of below methods:
  1. Launch Slave agents on Unix machines via SSH.
  2. Launch Slave agents via JNLP.
  3. Launch Slave agents via execution of command on the master.
  4. Let Hudson control windows slave as a windows service.

The following screenshot illustrates the list of modes under which the Hudson slave can be launched.

Set up Slave agents on Unix machines via SSH

Hudson has a built-in SSH client implementation that it can use to talk to remote sshd and start a slave agent. This is the most convenient and preferred method for Unix slaves, which normally has sshd out-of-the-box. Click Manage Hudson, then Manage Nodes, then click New Node. In this set up, the connection information is supplied, including SSH host name, user name and authentication credentials. The authentication is performed using password or ssh keys. If it is configured to use ssh keys, the SSH public key should be copied to ~/.ssh/authorized_keys file. Hudson will do the rest of the work by itself, including copying the binary needed for a slave agent, and starting/stopping slaves.


Depending on the project and hardware resource availability, the user Desktop can be used as one of Slave, without affecting his day-to-day activities, thus avoiding the need for dedicated Slaves.

Establish slave agent via Java Web Start

Another way of launching slave is to start a slave agent through Java Web Start (JNLP). In this approach, the user will login to the slave node, open a browser and open the slave page using the URL pointed to the Master. It may look like the following URL:
http://masterserver:port/hudson/jnlpJars/slave.jar
The user is presented with the JNLP launch icon. If user click the icon, the Java Web Start kicks in and it launches a slave agent on this computer.
This mode is convenient when the master cannot initiate a connection to slaves, such as when it runs outside a firewall while the rest of the slaves are in the firewall. The disadvantage is, if the machine with a slave agent goes down, the master has no way of re-launching it on its own.

Set up slave agent headlessly

This launch mode uses a mechanism very similar to Java Web Start, except that it runs without using GUI, making it convenient for an execution as a daemon on Unix. To do this, the user should configure this slave to be a JNLP slave by downloading slave.jar, and then from the slave, run a command like this:
 
java -jar slave.jar -jnlpUrl http://yourserver:port/computer/slave-name/slave-agent.jnlp

The slave.jar file is downloaded from the above mentioned URL. Make sure to replace slave-name with the name of the slave setup in Master.

By default, Hudson runs on port 8080. It can be installed and managed without the need for super user privilege. The super user privilege is not required to manage both Master and Slave.

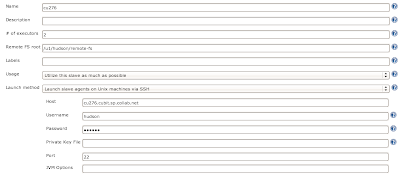
The below diagram illustrates the list of configuration parameters specific to a slave.


set up Slave Agent using own scripts

If the above modes is not flexible, the user can write his own script to launch the Slave agent. The script is placed in the Master computer and Hudson runs this script whenever it should connect to the slave. The script may use the remote login program like SSH, RSH to establish connection between Master and slave.
The script would execute the slave agent program like java -jar slave.jar. The stdin and stdout for the script should be connected to the master. For example, the script that does ssh myslave java -jar ~/bin/slave.jar would satisfy this need, when it is executed from the Master web interface. For this reason, running this script manually from the command line does no good.
The copy of slave.jar can be downloaded from the above mentioned URL. Launching the slave agent using this mode requires additional setup in the Slave. The benefit is that when the connection goes bad, the user can use Hudson web interface to re-establish the connection.
Tagged : / / / / / / / / / / / / / / / /

How to put comment in Ant | Comments in Apache Ant

comments-in-apache-ant

How to put comment in Ant | Comments in Apache Ant

Method 1:

<!– Comments are just as important in buildfiles, do not –>
<!– avoid writing them! –>
<!– Example build file for “Ant: The Definitive Guide” –>
<!– and its sample project: irssibot –>

Method 2: Echo
Description
Writes a message to the Ant logging facilities. A message may be supplied
as nested text to this task.
Echoes a message to the current loggers and listeners which means System.out unless overridden. A level can be specified, which controls at what logging level the message is filtered at.
The task can also echo to a file, in which case the option to append rather than overwrite the file is available, and the level option is ignored

Parameters

Attribute Description

Required

message the message to echo.

No. Text may also be included in a character section within this element. If neither is included a blank line will be emitted in the output.

file the file to write the message to.

No

append Append to an existing file (or open a new file / overwrite an existing file)?

No – default is false.

level Control the level at which this message is reported. One of “error”, “warning”, “info”, “verbose”, “debug” (decreasing order)

No – default is “warning”.

encoding encoding to use, default is “”; the local system encoding. since Ant 1.7

No

Examples
Style 1:
<echo message=”Hello, world”/>

Style 2:
<echo message=”Embed a line break:${line.separator}”/>

Style 3:
<echo>Embed another:${line.separator}</echo>

Style 4:
<echo>This is a longer message stretching over
two lines.
</echo>

Style 5:
<echo>
This is a longer message stretching over
three lines; the first line is a blank
</echo>

Style 5:
<echo message=”Deleting drive C:” level=”debug”/>
A message which only appears in -debug mode.

Style 6:
<echo level=”error”>
Imminent failure in the antimatter containment facility.
Please withdraw to safe location at least 50km away.
</echo>
A message which appears even in -quiet mode.

Style 7:
<echo file=”runner.csh” append=”false”>#\!/bin/tcsh
java-1.3.1 -mx1024m ${project.entrypoint} $$*
</echo>
Generate a shell script by echoing to a file. Note the use of a double $ symbol to stop Ant filtering out the single $ during variable expansion
Depending on the loglevel Ant runs, messages are print out or silently ignored:

Ant-Statement

-quiet, -q

no statement

-verbose, -v

-debug, -d

<echo message=”This is error message.” level=”error” />

ok

ok

ok

ok

<echo message=”This is warning message.” />

ok

ok

ok

ok

<echo message=”This is warning message.” level=”warning” />

ok

ok

ok

ok

<echo message=”This is info message.” level=”info” />

not logged

ok

ok

ok

<echo message=”This is verbose message.” level=”verbose” />

not logged

not logged

ok

ok

<echo message=”This is debug message.” level=”debug” />

not logged

not logged

not logged

ok

Method 3:
Description

Tagged : / / / / / / / / / / / / /

A sample Ant build script that builds a WAR file – Guide

ant-build-script-war-file

A sample Ant build script that builds a WAR file

<project name=”MyWebApplication” basedir=”..” default=”install”>

<!– project-specific variables –>
<property name=”jsp.dir.name” value=”myapp” />
<property name=”package.name” value=”${jsp.dir.name}.war” />
<property name=”webapp.dir” value=”/Users/al/tomcat-6.0.16/webapps” />

<property environment=”env” />
<property name=”build.dir” value=”build” />
<property file=”${build.dir}/build.${env.HOSTNAME}” />

<property name=”lib.dir” value=”lib” />
<property name=”pages.dir” value=”pages” />
<property name=”src.dir” value=”src” />
<property name=”src.tests.dir” value=”src-tests” />
<property name=”resources.dir” value=”resources” />
<property name=”dest.dir” value=”target” />

<!– put everything in a temp folder with the right structure during the build –>
<property name=”temp.dir” value=”temp” />
<property name=”temp.dir.web-inf” value=”${temp.dir}/WEB-INF” />
<property name=”temp.dir.lib” value=”${temp.dir.web-inf}/lib” />
<property name=”temp.dir.classes” value=”${temp.dir.web-inf}/classes” />
<property name=”temp.dir.meta-inf” value=”${temp.dir}/META-INF” />

<property name=”package.file” value=”${dest.dir}/${package.name}” />

<path id=”build.class.path”>
<fileset dir=”lib”>
<include name=”**/*.jar” />
</fileset>
</path>

<target name=”clean”>
<delete>
<fileset dir=”${dest.dir}” includes=”**/*”/>
</delete>
<delete dir=”${temp.dir}” />
<delete dir=”${temp.dir.classes}” />
<delete dir=”${temp.dir.meta-inf}” />
<delete dir=”${temp.dir.web-inf}” />
</target>

<target name=”prepare” depends=”clean”>
<mkdir dir=”${dest.dir}” />
<mkdir dir=”${temp.dir}” />
<mkdir dir=”${temp.dir.lib}” />
<mkdir dir=”${temp.dir.meta-inf}” />
<mkdir dir=”${temp.dir.web-inf}” />
<mkdir dir=”${temp.dir.classes}” />
</target>

<!– COMPILE –>
<target name=”compile” depends=”prepare”>
<echo>=== COMPILE ===</echo>
<echo>Compiling ${src.dir} files …</echo>
<javac debug=”on” srcdir=”${src.dir}” destdir=”${temp.dir.classes}” includes=”**/*”>
<classpath refid=”build.class.path” />
</javac>

<!– compile files on the src-tests path –>
<echo>Compiling ${src.tests.dir} files …</echo>
<javac debug=”on” srcdir=”${src.tests.dir}” destdir=”${temp.dir.classes}” includes=”com/**”>
<classpath refid=”build.class.path” />
</javac>
</target>

<!– PACKAGE –>
<target name=”package” depends=”compile”>
<echo>=== PACKAGE ===</echo>

<!– copy the config files –>
<copy file=”${resources.dir}/MANIFEST.MF” tofile=”${temp.dir.meta-inf}/MANIFEST.MF” overwrite=”true” />
<copy file=”${resources.dir}/web.xml” tofile=”${temp.dir.web-inf}/web.xml” overwrite=”true” />
<copy file=”${resources.dir}/managed-beans.xml” tofile=”${temp.dir.web-inf}/managed-beans.xml” overwrite=”true” />
<copy file=”${resources.dir}/navigation-rules.xml” tofile=”${temp.dir.web-inf}/navigation-rules.xml” overwrite=”true” />

<copy todir=”${temp.dir.classes}”>
<fileset dir=”${src.dir}”>
<include name=”**/*.xml”/>
<include name=”**/*.xsl”/>
</fileset>
</copy>

<!– with all resources in place, create the war file –>
<war destfile=”${package.file}” webxml=”${temp.dir.web-inf}/web.xml” basedir=”${temp.dir}”>
<fileset dir=”${pages.dir}”/>
<lib dir=”${lib.dir}” />
<classes dir=”${temp.dir.classes}” />
</war>
</target>

<!– JUST DEPLOY JSP’s –>
<target name=”jsps”>
<echo>=== DEPLOY JSP’S ===</echo>
<!– i’m trying to be explicit about what i put out there –>
<copy todir=”${webapp.dir}/${jsp.dir.name}”>
<fileset dir=”${pages.dir}”>
<include name=”**/*.jsp”/>
<include name=”**/*.html”/>
<include name=”**/*.css”/>
<include name=”**/*.gif”/>
<include name=”**/*.jpg”/>
<include name=”**/*.png”/>
<include name=”**/*.js”/>
</fileset>
</copy>
</target>

<!– INSTALL –>
<target name=”install” depends=”package”>
<echo>=== INSTALL ===</echo>
<copy file=”${package.file}” tofile=”${webapp.dir}/${package.name}” overwrite=”true” />
</target>

</project>

Tagged : / / / / / / / / / / / / / / / / /

How to install subversion on Linux?

subversion-on-linux-installation-process

To install svn in linux and make it fully working , I found it really tough and it has taken my lots of time. I am thankful to Sanjay, who helped me in this and without him it won’t be possible.While installing this you will miss a small thing and you got stuck.But this is not at all tough like open source it’s really very easy.

Why I have choosed this topic to write is that, those who are using it first time will need some time to get full of subversion.

Now the latest version of svn is 1.6.9.

To install svn first you need svn tar file. Which can be downloaded easily from here or you can run these commands (depending on your required version).

wget http://subversion.tigris.org/downloads/subversion-1.6.9.tar.gz

wget http://subversion.tigris.org/downloads/subversion_deps-1.6.9.tar.gz (It contains the library required by svn)

This you can download any where, Here I am creating a folder svn inside /usr/local directory.(/usr/local/softwares/svn/).(So it will be easy for me to specify paths and you to understand).

To start the installation process first untar this two file.

tar -xvzf subversion-1.6.9.tar.gz

tar -xvzf subversion_deps-1.6.9.tar.gz (After untar you won’t find any particular folder named subversion_deps-1.6.9. Don’t worry for that it is keeping all the libraries files inside subversion-1.6.9)

Now have to configure it, but before that we have to check whether our system is having all the dependies or not, like APR(Apache Portable Runtime) and APR utility.

If it’s not there then we can get it from here,

apr-1.2.12.tar.gz

apr-util-1.2.12.tar.gz

once downloaded you can start configuring it.

tar -xvzf apr-1.2.12.tar.gz

cd apr-1.2.12

./buildconf

./configure

make

The apr util directory requires apr directory, so we need to specify path for that.

tar -xvzf apr-util-1.2.12.tar.gz

cd apr-util-1.2.12

./buildconf –with-apr=/path to apr directory (/usr/local/sofwares/svn/apr-1.2.12)

./configure –with-apr=/path to apr directory (/usr/local/sofwares/svn/apr-1.2.12)

make

The other directories we have to check before installation are,

autoconf 2.50 or newer (autoconf –version)

libtool 1.4 or newer (this you can find inside subversion-1.6.9 folder)

Neon Library 0.25.x or 0.26.x (inside subversion-1.6.9 folder)

Berkely DataBase (If it’s not there you have to install it.)

Download the file, db-4.6.21.tar.gz .

Apache web server greater then 2.0.49 (httpd -version)

zlib (inside subversion-1.6.9 folder)

After checking all this, we can start installation process,

cd subversion-1.6.9

./autogen.sh

./configure –with-berkelay-db=/usr/local/softwares/svn/db-4.6.21 (path of berkelay data base)

make

make install

Once we have finished that we need to map svn with apache.

Before that we have to check whether mod_dav_svn and mod_authz_svn modules are present or not,if not then install it.

yum install mod_dav_svn

and add this in /etc/httpd/conf/httpd.conf file

LoadModule dav_svn_module modules/mod_dav_svn.so

LoadModule authz_svn_module modules/mod_authz_svn.so

Make sure you will add these lines after LoadModule dav_module modules/mod_dav.so.

Now create one repository with svnadmin command.Run this command inside your subversion folder.

svnadmin create repos

after that you can check with,

ls repos

conf dav db format hooks locks README.txt

This full path you have to specify in SVNPath.

Then at the end of the httpd.conf file you have to add

#for svn path

DAV svn

SVNPath /usr/local/softwares/svn/subversion-1.6.9/repos

now restart ur apache.

For security purpose to give authentication to the user we have to create authentication file with the command,

htpasswd -cm /etc/svn-auth-file user_name (test)

New password : test123

Re-Type passwd : test123

And to specify which access you want to give the user, create svn-access-file inside /etc.

Inside this file add code as,

[/]

* = rw

This will give authentication to every user specified in Require user inside location.

You can specify this inside httpd.conf file as,

DAV svn

SVNPath /usr/local/softwares/svn/subversion-1.6.9/repos

AuthzSVNAccessFile /etc/svn-access-file

AuthType Basic

AuthName “Subversion repository”

AuthUserFile /etc/svn-auth-file

Require user user_name


Now you are ready to import files in the repository, with the following command.

svn import -m “Initial import.” path(from where you want to import file) file:///usr/local/softwares/svn/subversion-1.6.9/repos/(repository path)

after running this command don’t worry it is not goin to display any thing inside repos folder. To check that you can run it in the browser.

http://localhost(you have to give your domain name)/svn/repos

Now you are ready to checkout the files with any svn client. For linux user smartsvn is best.

After doin this you can start ur smartsvn client and can follow these steps,

check out project from repository -> manage -> add -> enter svn url

enter ur url here http://localhost/svn/repos

enter ->ok

server name and repository path it will take automatically. click next, choose user radio button and give user name and password.

follow the steps to fetch the files.


To install smartsvn, first get the smartsvn tar file.

untar the file, with the command

tar -xvzf smartsvn-version.gz

for smartsvn first check the correct version of java is available or not, with

java -version command.If it is coming like this then you can proceed.

java version “1.5.0_14?

Java(TM) 2 Runtime Environment, Standard Edition (build 1.5.0_14-b03)

Java HotSpot(TM) Server VM (build 1.5.0_14-b03, mixed mode)

Sometimes java will be installed but not the JRE. In that case simply re-install java.

Can install the latest version of java with rpm bin file.

jdk-1_5_0_14-linux-i586-rpm.bin

./jdk-1_5_0_14-linux-i586-rpm.bin

go through the license and say yes.

It will installed in /usr/java/

Now have to make chnages in .bash_profile file.

cd /root

vi .bash_profile

give JAVA_HOME path.

JAVA_HOME = /usr/java/jdk1.5.0_14

Then compile it with the command,

source .bash_profile

then again check with java version.

Now you are ready to utilise the full feature of subversion

Tagged : / / / / / / / / / / / / / /

How we reduced build time from 8 hours to 1 hour ? – Complete Guide

hudson-master-slave-setup

Situation

  1. For one of our clients, Build is taking 8 hours and nightly build is failing frequently.
  2. Test case execution is consuming more time than the compilation.
  3. Low confidence levels for developers on nightly builds and subsequently during integration cycle.

Approach

  1. We reviewed the whole set of build scripts being used and test case suite to check how we can refatcor them.
  2. Verified the build infrastructure i.e., build server capacity from hardware point of view.
  3. Feasibility study done to check how a CI environment help in giving faster feedback on the quality.


Solution

  1. Refactoring done for build scripts to make modules compilation parallel (wherever possible).
  2. Some test cases are selected (which don’t require external services like database) to run as part of the build.
  3. CI environment (using open source cruise control) is established to run builds per commit and execute only above set of test cases as part of the build.
  4. Set up low-cost remote agent machine which will run remaining test suite once per day.

Results

  1. Build took only 1 hour and gave faster feedback to dev team.
  2. CI environment provided good confidence to dev team.
  3. Team is able to implement more best practices.
  4. Effective use of existing build  infrastructure (hardware) ensured no further cost is required.
  5. This helped the client in ensuring smooth release management.


Tagged : / / / / / / / / / / / / / /

HOWTO: Install e17 from SVN/source on Ubuntu

install-e17-from-svn-source

E17 is a lightweight window manager/bundle of libraries for Unix based operating systems. E17 is designed to be both elegant and fast – two goals it succeeds at very well. The only problem is that installing E17 on Ubuntu (and it’s derivatives) is not a very straight forward process if you have never done it before, the following are the steps I have taken to get the E17 environment up and running on Ubuntu 9.10 (however it should work for all Ubuntu based systems).

Step 1: Install the build dependencies, to do this simply paste the following chunk of code into your favorite terminal and let it work it’s magik

sudo apt-get install xterm make gcc bison flex subversion cvs automake1.10 autoconf autotools-dev autoconf-archive libtool gettext libpam0g-dev libfreetype6-dev libpng12-dev zlib1g-dev libjpeg62-dev libtiff4-dev libungif4-dev librsvg2-dev libx11-dev libxcursor-dev libxrender-dev libxrandr-dev libxfixes-dev libxdamage-dev libxcomposite-dev libxss-dev libxp-dev libxext-dev libxinerama-dev libxft-dev libxfont-dev libxi-dev libxv-dev libxkbfile-dev libxkbui-dev libxres-dev libxtst-dev libltdl7-dev libglu1-xorg-dev libglut3-dev xserver-xephyr libdbus-1-dev liblua5.1-0-dev

Step 2: Now that we have all the dependencies installed, we are going to use the easy e17 script to download, compile, and install e17 from SVN. To do so click on the link I just provided to download the script. Then assuming you downloaded the file to the default Downloads folder run the following in terminal to get the install going

cd ~/Downloads && chmod +x easy_e17.sh && sudo ./easy_e17.sh -i

Go get a cup of coffee or something, the length of time the above command takes to complete depends on your Internet connection and computer speed.

Step 3: Now assuming the commands you ran in step 2 finishes without issues/errors check the output in terminal, it should mention some “environmental variables” that need to be set. Copy and paste each of the export lines it lists to you and run them in terminal.

Step 4: We need to copy the elightenment .desktop file to the proper location in your shared folder so it appears as a log in option in gdm/kdm. To do so run the following in terminal

sudo cp /opt/e17/share/xsessions/elightenment.desktop /usr/share/xsessions/enlightenment.desktop

Log out of your current desktop and select “Enlightenment” from the log in options you are presented with in your login manager.

Enjoy your new E17 powered desktop! Also please remember E17 is considered beta software – so it is not encouraged to use it on production machines. Lastly I would like to also say that while the default configuration of e17 appears crude at first, this is intentional. E17 is extremely customizable. Play with settings, move things around, add and remove objects and you will see creating a beautiful and customized desktop is just a few clicks away!

Source:

http://jeffhoogland.blogspot.com/2010/05/howto-install-e17-from-svnsource-on.html

Tagged : / / / / / / / / / / / / /

How to read XML file by using shell script ?

read-xml-file-using-shell-script

This was like the first time where I had to write something that will be able to read something out of a XML file using a shell script. Usually I would use Python/Perl as my favorite choices in such a scenario but in this one I really *had* to do all within a shell script.

This is an example of the type of XML file I had to read:

Fixed a new bug
Shoaib Mir
Sun, 02 May 2010
shoaibmir[@]gmail.com

I ended up having a shell script like this:

#!/bin/bash

#Looking for four keywords in here
for key in changelog name date email
do
OUTPT=`grep $key log.xml | tr -d '\t' | sed 's/^\([^<].*\)$/\1/' `
eval ${key}=`echo -ne \""${OUTPT}"\"`
done

# Getting the results in four specific arrays
changelogarr=( `echo ${changelog}` )
namearr=( `echo ${name}` )
datearr=( `echo ${date}` )
emailarr=( `echo ${email}` )

#Print all Arrays
echo ${changelogarr[@]}
echo ${namearr[@]}
echo ${datearr[@]}
echo ${emailarr[@]}

Which gives me an output:

shoaib@shoaib-desktop:~/Desktop$ ./readxml.sh
Fixed a new bug Shoaib Mir
Sun, 02 May 2010
shoaibmir[@]gmail.com


Reference:

Reading XML file using shell script


Tagged : / / / / / / / / / / / / / / /