What is Prometheus & grafana and best course and certification in India?

Prometheus is an open-source system monitoring and alerting toolkit originally built at SoundCloud. Many companies and organizations have adopted Prometheus and have a very active developer and user community in the project. It is now a standalone open-source project and is maintained independently of any company.

Features of Prometheus:

  • A multi-dimensional data model with time series data identified by metric name and key/value pairs.
  • PromQL, a flexible query language to leverage this dimensionality.
  • No reliance on distributed storage; single server nodes are autonomous.
  • Time series collection happens via a pull model over HTTP.

What is Grafana?

Grafana is an open-source solution for running data analytics, understanding large amounts of data and monitoring our apps with the help of cool customizable dashboards.

What are the benefits of Grafana?

  • Customizable dashboards are feature-rich and can be configured to display data from a wide range of databases using visualization tools such as heatmaps, histograms, and charts.
  • The platform is flexible and easy to use.
  • Native support of a broad range of databases.

Grafana Features:

  • Dashboard templating – This is a Grafana feature that is really useful. It allows users to create a dashboard setup to suit their every need.
  • Provisioning – It can be simple enough to set up a single dashboard with a few clicks, dragging and dropping, but some users need even more ingenuity this way.
  • Annotations – This Grafana feature lets you mark graphs, which is especially helpful when you need to correlate data in case something misbehaves.
  • Custom plugins – You can extend the functionality of Grafana with plugins that provide additional tools, visualizations, and more.
  • Teams and permissions – Where an organization has an instance of Grafana and multiple teams, they usually prefer to have the option of implementing some dashboard isolation.

Pre-requisites to learn Prometheus and Grafana:

  • Basic experience with Linux/Unix system administration.
  • Familiarity with common shell commands, such as ls, cd, curl, etc.
  • Some knowledge and/or development experience in Go and Python.
  • Some experience working with Kubernetes.

If you are planning to learn Prometheus and Grafana, go with DevOpsSchool institute. Will provide you online and classroom training and certification course Program by an expert. To get in-depth knowledge of Prometheus and Grafana along with its various applications, check out our interactive, live-online training.

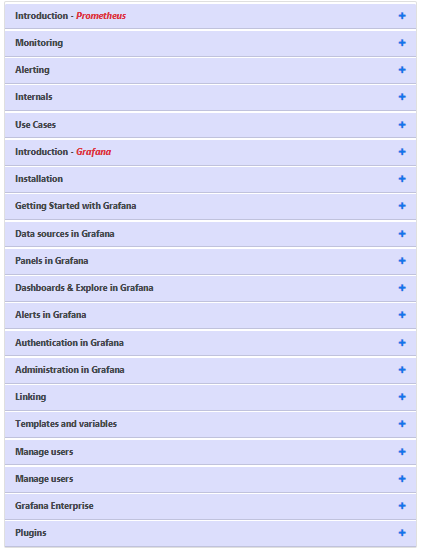
Here you can see the Agenda of Prometheus and Grafana Course:

This course covers the basics of Prometheus and Grafana and their main features. You will develop a critical understanding of why Prometheus and Grafana are useful and how they can be combined with other web development frameworks.

You will learn about the basics of Prometheus and Grafana and their advantages. Then, you’ll cover more advanced topics like integrating Prometheus and Grafana with other frameworks.

Hopefully, I think this information is helpful for you.

However, if you want to find out more details, be sure to check out our Prometheus and Grafana course to learn more about this technology.

Tagged : / / / / /

How to Secure Your Apache Server

1.Enable automatic updates

Given that the LAMP stack is based on Linux and that the entire open-source community is working to enhance it, it is also deemed secure. All security updates and patches are accessible as an automatic unattended install on an Ubuntu VPS as soon as they are released in the Ubuntu repos, so make sure you configure your system to automatically install them if you are concerned about security.If you don’t enable this option on your server and don’t manually install the latest upgrades and patches, you’re placing your server at risk of being hacked.

Install the unattended-upgrades package to enable automatic unattended upgrades.

sudo apt-get install unattended-upgrades

Edit the /etc/apt/apt.conf.d/50unattended-upgrades file to specify which package categories should be upgraded automatically.

2. Configure firewall

Another very important aspect of overall security is having a properly set firewall. ufw is Ubuntu’s default firewall configuration tool, and it’s turned off by default. You can use the following commands to enable ufw:

sudo ufw enable

Allow essential services like OpenSSH and Apache to be accessed:

sudo ufw allow 22
sudo ufw allow 80
sudo ufw allow 443

It’s simple to grant access to other services. Simply change the port number in the samples above to the port number of the service you wish to enable access to, and you’re done. Even if the machine is rebooted, the firewall rules will remain active.

3. Disable unused services

If you have active services which you are not using, you can simply disable them. For example, if you have service like Dovecot up and running on your server and you are not using it at all, stop and disable the service using the following commands:

sudo systemctl stop dovecot.service
sudo systemctl disable dovecot.service

4. Install Fail2ban

Fail2ban is a service that scans log files for excessive login failures and blocks the IP address that is displaying malicious behaviour. If you don’t use two-factor or public/private authentication techniques on services like OpenSSH, this service comes in handy. Run the following command to install Fail2ban:

sudo apt-get install fail2ban

Make a copy of the default configuration file so you can make modifications without worrying about system updates overwriting them:

sudo cp /etc/fail2ban/jail.conf /etc/fail2ban/jail.local

Edit the jail.local file:

sudo nano /etc/fail2ban/jail.local

The [sshd] block should look something like this:

[sshd]

enabled  = true
port     = ssh
filter   = sshd
logpath  = /var/log/auth.log
maxretry = 5
bantime = 600

To make the modifications take effect, save the file and restart Fail2ban:

sudo systemctl restart fail2ban.service

Enable Fail2ban on system boot:

sudo systemctl enable fail2ban.service

5. Hide Apache sensitive information

The default Apache setup exposes a great deal of sensitive data that can be used against the service. It’s critical to keep this information secret, therefore make a configuration file for your new settings:

sudo nano /etc/apache2/conf-available/custom.conf

Copy and paste the following text:

ServerTokens Prod
ServerSignature Off
TraceEnable Off
Options all -Indexes
Header unset ETag
Header always unset X-Powered-By
FileETag None

If it isn’t already enabled, enable the Apache headers module:

sudo a2enmod headers

Enable the following settings:

sudo a2enconf custom.conf

To make the modifications take effect, restart Apache:

sudo systemctl restart apache2.service

6. Install and enable mod_security

Mod security is a web application firewall (WAF) that may be added to Apache as a separate module. It can be used to protect a web server from a variety of threats, including SQL injections, session hijacking, cross-site scripting, and malicious user agents. Run the instructions following to install and enable mod security:

sudo apt-get install libapache2-modsecurity2
sudo a2enmod security2

You should setup the module and enable the OWASP ModSecurity Core Rule Set after it has been installed (CRS).

sudo mv /etc/modsecurity/modsecurity.conf-recommended /etc/modsecurity/modsecurity.conf

Then, open the /etc/modsecurity/modsecurity.conf file and edit/add the following settings:

SecRuleEngine On
SecResponseBodyAccess Off
SecRequestBodyLimit 8388608
SecRequestBodyNoFilesLimit 131072
SecRequestBodyInMemoryLimit 262144

Save and close the file. Remove the current CRS and download the OWASP CRS by using the following commands:

sudo rm -rf /usr/share/modsecurity-crs
sudo git clone https://github.com/SpiderLabs/owasp-modsecurity-crs.git /usr/share/modsecurity-crs
cd /usr/share/modsecurity-crs
sudo mv crs-setup.conf.example crs-setup.conf

Edit the security2.conf file in /etc/apache2/mods-enabled/security2.conf. It should resemble the following:

<IfModule security2_module>
	SecDataDir /var/cache/modsecurity
	IncludeOptional /etc/modsecurity/*.conf
	IncludeOptional "/usr/share/modsecurity-crs/*.conf"
	IncludeOptional "/usr/share/modsecurity-crs/rules/*.conf
</IfModule>

Finally, to make the modifications take effect, restart Apache:

sudo systemctl restart apache2.service

7. Install and enable mod_evasive

Mod evasive is an Apache module that can prevent DoS (Denial of Service), DDoS (Distributed Denial of Service), and brute-force assaults on the web server. Run the following command to install mod evasive on your server:

sudo apt-get install libapache2-mod-evasive

Open the default configuration file /etc/apache2/mods-enabled/evasive.conf and edit the settings to look like those below:

<IfModule mod_evasive20.c>
	DOSPageCount        5
	DOSSiteCount        50
	DOSPageInterval     1
	DOSSiteInterval     1
	DOSBlockingPeriod   600
	DOSLogDir           "/var/log/mod_evasive"
</IfModule>

The file should be saved and closed. Make a folder for the log files:

sudo mkdir /var/log/mod_evasive
sudo chown -R www-data: /var/log/mod_evasive

Restart Apache:

sudo systemctl restart apache2.service

Tagged : /

Linux security

User accounts

  • Since the beginning of the course, all the examples presented were run
  • using a user account.
  • A user account consists of a username and a password. This identifies the
  • user on the system and, hence, maintains security and accountability.
  • Linux also creates groupsfor each user account. A group may contain one or
  • more users, all of them sharing the same permissions.
  • The system administrator account, sometimes called the superuser, is the
  • root. This is the most important account on the system. It must be owned by
  • as a few users as possible because of the vast powers it provides.

The /etc/passwd file

  • This is one of the most important and highly protected system file. It contains various information about the user accounts on the system.
  • Each user account information is contained on a single line. A colon (:) is used to separate different fields from each other. Let’s have a quick look at each one in turn:
    • Username: the string that the user uses for identification. It is a friendly name that is chosen by the system administrator (root) to identify the user. By convention, it is all lowercase characters, it may contain numbers (but cannot start with one), special characters dash (-), udnerscore (_), and – in some distros – the dollar sign ($) at the end.
    • Password: a secret group of characters that should be known only to it’s owner. The /etc/passwd file places an x in this field, indicating that the encrypted password is stored in /etc/shadow file (more on that later).

UID and GID

  • UID: it is short for user id. This is a unique number that identifies the user account on the system. As a matter of fact, Linux security system does not care about the username of the user account; it works by examining the its UID to provide the appropriate permissions and access rights. Since there are user accounts that are reserved for system accounts, those are assigned UID numbers from 0 (which is the root account) up till 500 (they reach 1000 in some systems). The higher numbers are assigned to normal (non-system) user accounts.
  • GID: short for group id, it is the unique number that identifies a group account. A group contain one or more users that share similar access rights. The main purpose of the existence of groups is to provide certain users with access to specific files and directories while preventing others. Think of a directory on which a team of users are working. Putting those users in a group ensures that all of them will have the same permissions.

The comment and the home directory

  • The comment field normally includes the user’s real name. For example, when a username is jdoe, the real name in the comment could be John Doe. It may also contain other personal information like the phone number, address and others.
  • The home directory field contains the path to the user’s home directory. Only the user is the owner of his/her home directory. At the command line, a home directory can be referred to as tilde ~. For example, cd ~ will make you navigate to your home directory.

The default shell

  • We have mentioned before that bash is not the only shell available for Linux. There are other shells that are available for Linux like ksh, zsh, tsh and so on. The shell field contains the path to the binary file of the specific shell. For example, /bin/bash.
  • The default shell is a matter of choice. A user can change hi/her default shell.
  • Since all users (including system accounts) must have a default shell. But system accounts – by nature – do not (and should not) have login access to the system. Accordingly, the default shell of such accounts is set to /sbin/nologin. Setting the default shell to /bin/nologin prints a friendly message explaining that logins with this account are not available. Setting it to /bin/false denies login without displaying that message.

The /etc/shadow file

  • You might think that a file named /etc/passwd should be the one containing the hashed passwords of the users on the system.
  • Actually this was the case long ago. But for security reasons, and since /etc/passwd file must be readiable by all users on the system to be able to authenticate them, the hashed password was removed from that file and placed in a more secured file: /etc/shadow .This file has higher level of protection and access restrictions.
  • It contains the following information:
    • The salt: this is a random input that helps make the password more protected
    • The hash: the result of an irreversible mathematical operation. It is performed on the password and the salt combined. To authenticate a user, a hash is computed for the entered password, with the salt input added to it. If both hashes are identical the user is authenticated.
    • Password history: these are some variables that help increase user security. For example, the password must be changed after a specific number of days (configured by the system administrator).

/etc/shadow fields

  • The username: this is the username of the user and not the UID. It is what links /etc/passwd with /etc/shadow
  • The password: the salted hash of the user password. If this field contains as asterisk or an exclamation mark, this means that the account is locked.
  • Last password change: this is the date of the last password change. The UNIX timestamp is used here. UNIX timestamp is a date/time measurement method. It is the amount of time that passed since POSIX time (1/1/1970 at midnight). This field contains the number of days that passed since POSIX time.
  • The number of days till a password can be changed. This is another security measure that prevents users from changing their passwords (as per policy) and then quickly setting it back to the original one.
  • The number of days before a user must change the current password. This is sometimes referred to as password age.
  • The number of warning days before a password expires. During those days, a warning message will be displayed to the users whose account will expire soon.
  • Days between expiration and deactivation: if configured, the account can be deactivated after it’s expired. The difference is that when the account expires, the password is not erased and the account can be activated again by the system administrator or by the user logging in and changing the password. But if the account is deactivated, the password is deleted and only the system administrator can reactivate the account.
  • Expiration date: the date when the account expires, expressed as the number of days since POSIX time.
  • Special flag: this field is currently not used. It is reserved for future use.
  • Notice that some day fields may contain either -1 or 9999, which effectively means that the relevant feature is disabled
Tagged : /

Top 51 Linux commands for daily use

These are the top 51 Linux commands for daily use

1. ip – from Iproute2, a collection of utilities for controlling TCP/IP networking and traffic control in Linux.
2. ls – list directory contents.
3. df – display disk space usage.
4. du – estimate file space usage.
5. free – display memory usage.
6. scp – securely Copy Files Using SCP, with examples.
7. find – locates files based on some user-specified criteria.
8. ncdu – a disk utility for Unix systems.
9. pstree – display a tree of processes.
10. last – show a listing of last logged-in users.
11. w – show a list of currently logged-in user sessions.
12. grep – Search a file for a pattern of characters, then display all matching lines. 13. uptime – shows system uptime and load average.
14. top – shows an overall system view.
15. vmstat – shows system memory, processes, interrupts, paging, block I/O, and CPU info.
16. htop – interactive process viewer and manager.
17. dstat – view processes, memory, paging, I/O, CPU, etc., in real-time. All-in-one for vmstat, iostat, netstat, and ifstat.
18. iftop – network traffic viewer.
19. nethogs – network traffic analyzer.
20. iotop – interactive I/O viewer. Get an overview of storage r/w activity.
21. iostat – for storage I/O statistics.
22. netstat – for network statistics.
23. ss – utility to investigate sockets.
24. atop – For Linux server performance analysis.
25. Glances and nmon – htop and top Alternatives:
26. ssh – secure command-line access to remote Linux systems.
27. sudo – execute commands with administrative privilege.
28. cd – directory navigation.
29. pwd – shows your current directory location.
30. cp – copying files and folders.
31. mv – moving files and folders.
32. rm – removing files and folders.
33. mkdir – create or make new directories.
34. touch – used to update the access date and/or modification date of a computer file or directory.
35. man – for reading system reference manuals.
36. apropos – Search man page names and descriptions. 37. rsync – remote file transfers and syncing.
38. tar – an archiving utility.
39. gzip – file compression and decompression.
40. b2zip – similar to gzip. It uses a different compression algorithm.
41. zip – for packaging and compressing (to archive) files.
42. locate – search files in Linux.
43. ps – information about the currently running processes.
44. Making use of Bash scripts. Example: ./bashscript.sh
45. cron – set up scheduled tasks to run.
46. nmcli – network management.
47. ping – send ICMP ECHO_REQUEST to network hosts.
48. traceroute – check the route packets take to a specified host.
49. mtr – network diagnostic tool.
50. nslookup – query Internet name servers (NS) interactively.
51. host – perform DNS lookups in Linux.

Tagged : / / /

Install and Configure Grafana in RHEL 7

Install and Configure Grafana in RHEL 7

Step 1 – Download & Install Grafana
Download Grafana RPM file RPM for Linux from https://grafana.com/grafana/download?platform=linux

# RHEL 7

$ sudo yum install initscripts fontconfig -y
$ wget https://s3-us-west-2.amazonaws.com/grafana-releases/release/grafana-5.2.2-1.x86_64.rpm
$ sudo yum localinstall grafana-5.2.2-1.x86_64.rpm

Step 2 – Understand Grafana Installation details in RHEL/CENTOS

  1. Installs binary to /usr/sbin/grafana-server
  2. Copies init.d script to /etc/init.d/grafana-server
  3. Installs default file (environment vars) to /etc/sysconfig/grafana-server
  4. Copies configuration file to /etc/grafana/grafana.ini
  5. Installs systemd service (if systemd is available) name grafana-server.service
  6. The default configuration uses a log file at /var/log/grafana/grafana.log
  7. The default configuration specifies an sqlite3 database at /var/lib/grafana/grafana.db

Step 3 – Start the server (init.d service)

$ sudo service grafana-server start

This will start the grafana-server process as the grafana user, which is created during package installation. The default HTTP port is 3000, and default user and group is admin.

Step 4 – Configure the Grafana server to start at boot time

$ sudo /sbin/chkconfig --add grafana-server
$ sudo systemctl enable grafana-server.service
$ systemctl daemon-reload
$ systemctl start grafana-server
$ systemctl status grafana-server

Step 5 – Grafana server Environment file
The systemd service file and init.d script both use the file located at /etc/sysconfig/grafana-server for environment variables used when starting the back-end. Here you can override log directory, data directory and other variables.

Step 6 – Grafana server Log
By default Grafana will log to /var/log/grafana

Step 7 – Grafana Database
The default configuration specifies a sqlite3 database located at /var/lib/grafana/grafana.db. Please backup this database before upgrades.

You can also use MySQL or Postgres as the Grafana database, as detailed on
http://docs.grafana.org/installation/configuration/#database

Step 8 – Grafana configuration
The configuration file is located at /etc/grafana/grafana.ini. Go the Configuration page for details on all those options. You can add following data sources

  1. Graphite
  2. InfluxDB
  3. OpenTSDB
  4. Prometheus

Step 9 – Server side image rendering
Server side image (png) rendering is a feature that is optional but very useful when sharing visualizations, for example in alert notifications.

$ sudo yum install fontconfig -y
$ sudo yum install freetype* -y
$ sudo yum install urw-fonts -y


Step 10 – Browse the dashboard
http://X.X.X.X.:3000/
Username – admin
Password – admin

Tagged : / / / / /

What is SELinux and how its SELinux used in Docker?

What is SELinux and how its SELinux used in Docker?

There are three popular solutions for implementing access control in Linux:

  1. SELinux
  2. AppArmor
  3. GrSecurity

Security-Enhanced Linux (SELinux) is a Linux kernel security module that provides a mechanism for supporting access control security policies. It is a security feature of the Linux kernel. It is designed to protect the server against misconfigurations and/or compromised daemons. It put limits and instructs server daemons or programs what files they can access and what actions they can take by defining a security policy.

SELinux is an implementation of a MAC security mechanism. MAC is an acronym for Mandatory Access Control (MAC). It is built into the Linux kernel and enabled by default on Fedora, CentOS, RHEL and a few other Linux distributions. SELinux allows server admin to define various permissions for all process. It defines how all processes can interact with other parts of the server such as:

  • Pipes
  • Files
  • Network ports
  • Sockets
  • Directories
  • Other process

SELinux puts restrictions on each of the above object according to a policy. For example, an apache user with full permission can only access /var/www/html directory, but can not touch other parts of the system such as /etc directory without policy modification. If an attacker managed to gain access to sendmail mail or bind dns or apache web server, would only have access to exploited server and the files normally has access as defined in the policy for the server. An attacker can not access the other parts of the system or internal LAN. In other words, damage can be now restricted to the particular server and files. The cracker will not able to get a shell on your server via common daemons such as Apache / BIND / Sendmail as SELinux offers the following security features:

  • Protect users’ data from unauthorized access.
  • Protect other daemons or programs from unauthorized access.
  • Protect network ports / sockets / files from unauthorized access.
  • Protect server against exploits.
  • Avoid privilege escalation and much more.

Please note that SELinux is not a silver bullet for protecting the server. You must follow other security practices such as

  • Implementing firewalls policy.
  • Server monitoring.
  • Patching the system on time.
  • Writing and securing cgi/php/python/perl scripts.

The /etc/selinux/config configuration file controls whether SELinux is enabled or disabled, and if enabled, whether SELinux operates in permissive mode or enforc-ing mode.

SETTING OF SELINUX
SELinux is set in three modes.

Enforcing – SELinux security policy is enforced. IF this is set SELinux is enabled and will try to enforce the SELinux policies strictly

Permissive – SELinux prints warnings instead of enforcing. This setting will just give warning when any SELinux policy setting is breached

Disabled – No SELinux policy is loaded. This will totally disable SELinux policies.

SELinux policies
SELinux allows for multiple policies to be installed on the system, but only one policy may be active at any given time. At present, two kinds of SELinux policy exist:

Targeted – The targeted policy is designed as a policy where most processes operate without restrictions, and only specific ser-vices are placed into distinct security domains that are confined by the policy.

Strict – The strict policy is designed as a policy where all processes are partitioned
into fine-grained security domains and confined by policy.

To put SELinux into enforcing mode:

$ sudo setenforce 1

To query the SELinux status:

$ getenforce

To see SELinux status in simplified way you can use sestatus

$ sestatus

To get elobrated info on difference status of SELinux on different services use -b option along sestatus

$ sestatus -b

How to disable SElinux?

We can do it in two ways
1)Permanent way : edit /etc/selinux/config
change the status of SELINUX from enforcing to disabled
SELINUX=enforcing
to
SELINUX=disabled
Save the file and exit.

2)Temporary way : Execute below command
echo 0 > /selinux/enforce
or
setenforce 0

How about enabling SELinux?

1)Permanent way : edit /etc/selinux/config
change the status of SELINUX from disabled to enforcing
SELINUX=disabled
to
SELINUX=enforcing
Save the file and exit.

2)Temporary way : Execute below command
echo 1 > /selinux/enforce
or
setenforce 1

Now lets understand Docker with SELinux?
The interaction between SELinux policy and Docker is focused on two concerns: protection of the host, and protection of containers from one another.

SELinux labels consist of 4 parts:

User:Role:Type:level.

SELinux controls access to processes by Type and Level. Docker offers two forms of SELinux protection: type enforcement and multi-category security (MCS) separation.

Docker has the –selinux-enabled flag by default in CentOS 7.4.1708. However, in case your image or your configuration management tool is disabling it, as was the case for our puppet module verify this, you verify by running the following comman

$ docker info | grep 'Security Options'

[root@ip-172-31-80-30 ec2-user]# more /etc/selinux/config

# This file controls the state of SELinux on the system.
# SELINUX= can take one of these three values:
# enforcing - SELinux security policy is enforced.
# permissive - SELinux prints warnings instead of enforcing.
# disabled - No SELinux policy is loaded.
SELINUX=enforcing
# SELINUXTYPE= can take one of three two values:
# targeted - Targeted processes are protected,
# minimum - Modification of targeted policy. Only selected processes are pro
tected.
# mls - Multi Level Security protection.
SELINUXTYPE=targeted

Refernece
https://www.cyberciti.biz/faq/what-is-selinux/
https://en.wikipedia.org/wiki/Security-Enhanced_Linux
http://jaormx.github.io/2018/selinux-and-docker-notes/

Tagged : / /

Configuring NFS to access the files from remote Linux machine as a mount point

I have a 2Tb of storage on a linux box, and i want to use that storage as a mount point from another machine.
As a root user on the remote machine, specify the mount point details
$cat /etc/exports
/scratch *(rw)
/fusionapps *(rw,no_root_squash)
And restart the NFS
sudo /etc/rc.d/init.d/nfs restart (All services should be in  running condition)
sudo /etc/rc.d/init.d/nfs status (All services should be  in running condition)
And on the local machine, perfrom the following steps
1. Create the stage dir under / as a root user and assign 777 permissions
2. Ad the entry to /etc/fstab file
slcai664.us.oracle.com:/fusionapps /stage nfs rw,hard,nointr,rsize=131072,wsize=131072,timeo=600,noacl,noatime,nodiratime,lock 0 0
3. Then try “mount -a”
If there are any mount point issues, say even as root user, you are not able to modify the files

Unable to mount Read-Only file System

then use

sudo mount -n -o remount,rw /
Tagged : / / / / /

Linux User Management

ac Print statistics about users’ connect time.
accton Turn on accounting of processes. To turn it on type “accton /var/log/pacct”.
adduser Ex: adduser mark – Effect: Adds a user to the system named mark
chage Used to change the time the user’s password will expire.
chfn Change the user full name field finger information
chgrp Changes the group ownership of files.
chown Change the owner of file(s ) to another user.
chpasswd Update password file in batch.
chroot Run command or interactive shell with special root directory.
chsh Change the login shell.
edquota Used to edit user or group quotas. This program uses the vi editor to edit the quota.user and quota.group files. If the environment variable EDITOR is set to emacs, the emacs editor will be used. Type “export EDITOR=emacs” to set that variable.
faillog Examine faillog and set login failure limits.
finger See what users are running on a system.
gpasswd Administer the /etc/group file.
groupadd Create a new group.
grpck Verify the integrity of group files.
grpconv Creates /etc/gshadow from the file /etc/group which converts to shadow passwords.
grpunconv Uses the files /etc/passwd and /etc/shadow to create /etc/passwd, then deletes /etc/shadow which converts from shadow passwords.
groupdel Delete a group.
groupmod Modify a group.
groups Print the groups a user is in
id Print real and effective user id and group ids.
last Display the last users logged on and how long.
lastb Shows failed login attempts. This command requires the file /var/log/btmp to exist in order to work. Type “touch /var/log/btmp” to begin logging to this file.
lastcomm Display information about previous commands in reverse order. Works only if process accounting is on.
lastlog Formats and prints the contents of the last login.
logname Print user’s login name.
newgrp Lets a suer log in to a new group.
newusers Update and create newusers in batch.
passwd Set a user’s pass word.
pwck Verify integrity of password files.
pwconv Convert to and from shadow passwords and groups.
quota Display users’ limits and current disk usage.
quotaoff Turns system quotas off.
quotaon Turns system quotas on.
quotacheck Used to check a filesystem for usage, and update the quota.user file.
repquota Lists a summary of quota information on filesystems.
sa Generates a summary of information about users’ processes that are stored in the /var/log/pacct file.
smbclient Works similar to an ftp client enabling the user to transfer files to and from a windows based computer.
smbmount Allows a shared directory on a windows machine to be mounted on the Linux machine.
smbpasswd Program to change users passwords for samba.
su Ex: su mark – Effect: changes the user to mark, If not root will need marks password.
sulogin Single user login.
ulimit A bash builtin command for setting the processes a user can run.
useradd Create a new user or update default new user information.
userdel Delete a user account and related files.
usermod Modify a user account.
users Print the user names of users currently logged in.
utmpdump Used for debugging.
vigr Edit the password or group files.
vipw Edit the password or group files.
w Display users logged in and what they are doing.
wall Send a message to everybody’s terminal.
who Display the users logged in.
whoami Print effective user id.
Tagged : /

Disable IPv6 and Enable IPv4 in Red Hat Linux

rajeshkumar created the topic: Disable IPv6 and Enable IPv4 in Red Hat Linux
Disable IPv6 and Enable IPv4 in Red Hat Linux

check “disable_ipv6″ file to check if IPv6 is disabled,enter:
[root@devops ~]# cat /proc/sys/net/ipv6/conf/all/disable_ipv6
0
if you get “0” value, it means that IPv6 is enabled and “1” means it is disabled.

How to Disable IPv6 in linux system?
vim /etc/sysctl.conf

Adding the below lines into that file:

net.ipv6.conf.all.disable_ipv6 = 1
net.ipv6.conf.default.disable_ipv6 = 1
net.ipv6.conf.lo.disable_ipv6 = 1

Save and close that file, then restart sysctl with the following command:

[root@devops ~]# sysctl -p

Now you can rerun the “ifconfig” command to check if IPv6 lines have been removed.

To Enabled IPv4

Edit “/etc/sysconfig/network-scripts/ifcfg-eth0″ file, which is your defualt first NIC configuration file.

If you are using DHCP server to take IP then, edit it like this;

#vi /etc/sysconfig/network-scripts/ifcfg-eth0

ONBOOT=”yes”
BOOTPROTO=”dhcp”

Save & restart networking service,

#service network restart OR
#/etc/init.d/network restart
Regards,
Rajesh Kumar
Twitt me @ twitter.com/RajeshKumarIn

Tagged :

Answer some of Linux admin questions…

scmuser created the topic: Answer some of Linux admin questions…

1. How to send an email | check email | reply email attachment using command line??
2. How do you connect to the internet in linux?
4. How can i restrict a aceess of the file? (Add user, add group)

Tagged :