How to clean up your windows operating systems in 2021?

Over time, every Windows installation builds up junk that takes up space and wastes resources. It’s easy to neglect regular maintenance, so often the problem comes from old files and programs.

If you don’t clean your computer, before long you’ll encounter low disk space warnings and notice it slowing down. Let’s walk through how to clean Windows 10 using a variety of tools for different situations.

Step 1: Erase Temporary Junk

Windows 10 includes a pair of similar tools for clearing out old temporary files from your disk, meaning you don’t need a dedicated Windows cleaner app. They’re a great first stop on your Windows 10 cleanup journey.

Disk Cleanup

If you don’t mind an old-school interface, the classic Disk Cleanup tool gets the cleaning job done. Access it by typing Disk Cleanup into the Start menu and selecting the disk you want to clean.

After a moment, you’ll see a list of unnecessary files that Windows can clean up. Assuming you’re an administrator, you should click the Cleanup system files button to scan again for additional types of data.

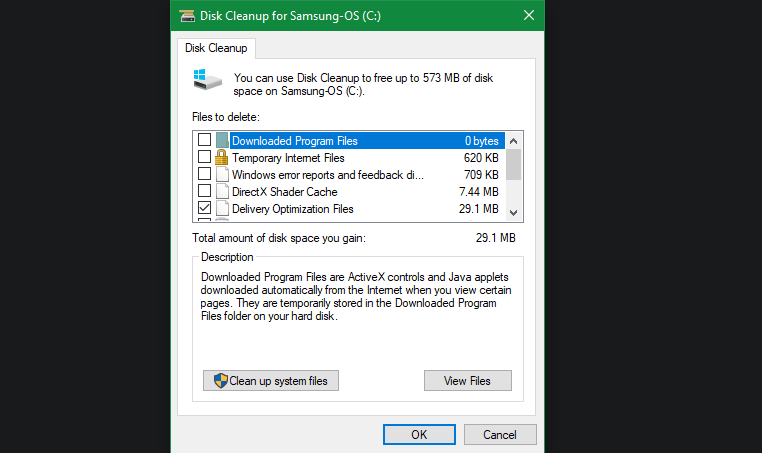
Feel free to delete pretty much every category of data available here, with a few exceptions. On older versions of Windows 10, watch out for Downloads, which will delete everything in that folder. You may also want to avoid cleaning the Recycle Bin until you’re sure that you don’t need to restore anything from it.

If you’ve recently updated to a new major version of Windows 10, you’ll see a Previous Windows installation(s) entry. Deleting this will remove the old files Windows keeps for 10 days that allows you to easily go back to an earlier version. You should also avoid removing the Windows ESD installation files option, as this is used for resetting your PC via Settings.

Check out Windows folders you can delete to save space for more info on the specific items you can remove with disk Cleanup.

Storage Sense

Windows 10 includes much of this same functionality, with a nicer interface, at Settings > System > Storage. You can use Storage Sense to automatically clean up files when your disk space is low, or every so often. Click Configure Storage Sense or run it now to change these options.

Step 2: Delete Large Files

You’ve removed unnecessary files; the next step to clean up Windows 10 is to find old data taking up a lot of space on your computer. 

Uninstall Big Programs

Under Program Files (and/or Program Files (x86) on 64-bit Windows), you’ll find files for most of the apps you have installed. If you don’t use some of these anymore, head to Settings > Apps > Apps & features to uninstall them.

Step 3: Clean Windows 10 Bloatware

Most store-bought computers come loaded with worthless manufacturer bloatware that wastes space and duplicates functionality already in Windows. In addition, Windows 10 itself includes some junk apps you probably never use.

If you haven’t taken the time to remove bloatware from your system, you should. It’s an important part of Windows 10 cleanup.

Step 4: Tidy Your Desktop

Even after you’ve cleaned up your computer, a messy desktop can still confuse you and make it harder to work efficiently. Many people use their desktop as a temporary storage space, leading to all sorts of files getting scattered across it.

You should try “resetting” your desktop to a clean state to make it neater. Start by moving all the files from your desktop to another location. Next, you can create shortcuts to files you need all the time on your desktop.

If you have so many files that you don’t think this will work, the Fences app is definitely worth a look. It includes powerful tools that let you automatically combine similar desktop icons, hide or show all icons with a few clicks, and much more.

After you’ve cleaned up Windows 10 and your desktop, you’ll feel like you have a whole new machine.

Tagged : / / / / / / / /

Vagrant installation in Centos, Ubuntu and Windows | Vagrant Tutorials

vagrant-installation-in-centos-ubuntu-and-windows
Vagrant installation in ubuntu
1. Update your apt repository
> sudo apt-get update
2. Install VirtualBox.
> sudo apt-get install virtualbox
3. Install Vagrant.
> sudo apt-get install vagrant
Vagrant installation in Centos
1. Update your system
> yum -y update
> cd etc/yum.repos.d/
> yum update -y
> yum install binutils qt gcc make patch libgomp glibc-headers glibc-devel kernel-headers kernel-devel
> dkms
> yum install virtualbox-5.0
2. Install Vagrant
> wget https://releases.hashicorp.com/vagrant/1.8.1/vagrant_1.8.1_x86_64.rpm
> yum localinstall vagrant_1.8.1_x86_64.rpm
Vagrant installation in Windows
In this tutorial, we will be installing Vagrant, a bare bones server with Ubuntu installed. Vagrant is a server that runs under VirtualBox. You will need to have VirtualBox installed. You will also need to have Putty installed in order to access your new Vagrant server via SSH. These instructions also apply to Windows 8.
Requirements:
A hard connection to the Internet
Putty needs to be installed. (putty-0.62-installer.exe)
VirtualBox needs to be installed.
Recommended: 8 GB RAM is recommended to run VirtualBox on Windows PCs
A. Installing Vagrant – bare bones server – Ubuntu only
1. Download and install the most recent VirtualBox for Windows from https://www.virtualbox.org/wiki/Downloads
Start up VirtualBox
2. Download and install the latest version of Vagrant from http://downloads.vagrantup.com. For this tutorial, we will use version 1.0.6. Windows users, download Vagrant.msi
Open Windows cmd prompt
For Windows 8, press Windows key and then press “R” key. This will open the RUN dialog box for you. Type “cmd” and press Enter.
Note: I typed vagrant command and I got the error message saying, ‘vagrant’ command not recognized. It was not added to the Path during install. Restarting your computer may help to refresh the path.
3. Change directory to C:\vagrant\vagrant\bin
4. Then type the following commands:
C:\vagrant\vagrant\bin> vagrant box add lucid32 http://files.vagrantup.com/lucid32.box
C:\vagrant\vagrant\bin> vagrant init lucid32
C:\vagrant\vagrant\bin> vagrant up
5. Open Putty and enter these credentials:
Hostname: 127.0.0.1
Port: 2222
Connection type: SSH
6. Login to Vagrant server
Enter username: vagrant
Password: vagrant
Type ls –lah at the prompt.
This is a bare bones server with Ubuntu installed.
vagrant@lucid32:~$ls -lah
Tagged : / / / / / / / / / / / / / / / / /

Windows XP/2000 Commands & Tools | Windows XP Command-line Reference

windows-xp-2000-commands-tools

Here’s the ultimate Windows XP/2000 command list that will make any Linux user feel at home at the command prompt. A lot of these commands are intended for administrating a network, but they are great for savvy home users as well.  We even listed which OS you need for these commands.

Many thanks to the digg users who ‘dugg’ our site and care to leave comments of helpful commands that we have left out!

  • at (windows XP/2000)
    Scheduling utility.
  • bootcfg (XP only)
    This utility allows you to set up your boot options, such as your default OS and other loading options.
  • cacls (XP, 2000, & NT4.0)
    Changes the ACLs (security Settings) of files and folders. Very similar to chmod in Linux. 
  • comp (XP & 2000)
    This utility is very similar to diff in Linux.  Use the /? switch to get examples of command usage.
  • contig (works with NT4.0 and newer)
    A great defrag utility for NTFS partitions.
  • control (XP only) – unpublished!
    Allows you to launch control panel applets from the command line. 
    control userpasswords2, for example will launch a helpful local user admin utility.
  • defrag (XP only – NT4.0 and Win2k use contig)
    Yes, XP comes with a command line disk defrag utility. If you are running Win2k or NT4.0 there is still hope. Contig is a free defrag program that I describe on the defrag page.
  • diskpart (XP only)
    Use this command to manage your disk partitions.  This is the text version for the GUI Disk Manager.
  • driverquery (XP only)
    Produces a list of drivers, their properties, and their versions. Great for computer documentation.
  • eudcedit (XP only) – unpublished!
    Private Character editor.  Yes with this program built into Windows XP you can create your own font!
  • fsutil (XP only) – unpublished!
    This is a utility with a lot of capability.  Come back soon for great examples.
  • getmac (XP & 2000)
    This command gets the Media Access Control (MAC) address of your network cards.
  • gpresult (XP & 2000)
    This generates a summary of the user settings and computer group policy settings.
  • gpupdate (XP only)
    Use this utility to manually apply computer and user policy from your windows 2000 (or newer) domain.
  • ipconfig (XP, 2000 & NT4.0)
    This handy tool displays IP settings of the current computer and much more.
  • MMC (XP, 2000 & NT4.0) – Microsoft Management Console
    This is the master tool for Windows, it is the main interface in which all other tools use starting primarily in Windows 2000 and newer systems.
  • more
    Utility used to display text output one screen at a time. Ex. more c:\windows\win.ini
  • msconfig (XP only)
    The ultimate tool to change the services and utilities that start when your Windows machine boots up. You can also copy the executable from XP and use it in Win2k.
  • msinfo32 (XP &smp; 2000)
    An awesome diagnostic tool. With it you can get a list of running processes, including the residing path of the executable (great for manually removing malware) and get detailed information about hardware and system diagnostics.
  • narrator (XP only)
    Turns on the system narrator (can also be found in accessibility options in control panel).  Will will allow your computer to dictate text to you.
  • netsh (XP & 2000)
    A network configuration tool console.  At the ‘netsh>’ prompt, use the ‘?’ to list the available commands and type “exit” to get back to a command prompt.
  • nslookup (all)
    A DNS name resolution tool.
  • openfiles (XP Only)
    Allows an administrator to display or disconnect open files in XP professional. Type “openfiles /?” for a list of possible parameters.
  • Pathping (XP & 2000)
    A cross between the ping and traceroute utilities. Who needs Neotrace when you can use this? Type “pathping <ip address>” and watch it go.
  • recover (XP & 2000)
    This command can recover readable information from a damaged disk and is very easy to use.
  • reg (XP & 2000)
    A console registry tool, great for scripting Registry edits.
  • sc (XP & 2000)
    A command line utility called the Service Controller.  A power tool to make service changes via a logon/logoff or startup/shutdown script.
  • schtasks (XP only)
    A newer version of the AT command.  This allows an administrator to schedule and manage scheduled tasks on a local and remote machines.
  • secedit (XP & 2000)
    Use this utility to manually apply computer and user policy from your windows 2000 (or newer) domain.  Example to update the machine policy: secedit /refreshpolicy machine_policy /enforce
    To view help on this, just type secedit.
    NOTE: In Windows XP SP1 and news, this command is superceded by: gpupdate /force
  • sfc (XP & 2000)
    The system file checker scans important system files and replaces the ones you (or your applications) hacked beyond repair with the real, official Microsoft versions.
  • shutdown (XP & 2000)
    With this tool, You can shut down or restart your own computer, or an administrator can shut down or restart a remote computer.
  • sigverif (XP only)
    Microsoft has created driver signatures. A signed driver is Microsoft tested and approved. With the sigverif tool you can have all driver files analyzed to verify that they are digitally signed. Just type ‘sigverif’ at the command prompt.
  • systeminfo (XP only)
    Basic system configuration information, such as the system type, the processor type, time zone, virtual memory settings, system uptime, and much more.  This program is great for creating an inventory of computers on your network.
  • sysedit (XP/2000)
    System Configuration File Editor.  An old tool that was very handy for the Windows 9X days.  msconfig is what you want to use now.
  • tasklist (XP pro only)
    Tasklist is the command console equivalent to the task manager in windows. It is a must have when fighting scumware and viruses. Try the command:
    tasklist /svc
    to view the memory resources your services take up.
  • taskkill (XP only)
    Taskkill contains the rest of the task manager functionality.  It allows you to kill those unneeded or locked up applications.
  • tree (XP & 2000)
    An amazing experience everyone should try!  This command will provide a ‘family tree’ style display of the drive/folder you specify.
  • WMIC (XP & 2000)
    Windows Management Instrumentation Command tool.  This allows you to pull an amazing amount of low-level system information from a command line scripting interface.
Tagged : / / / / / / / / / / / / / / / / /