Ways to Perforce server Disk Space Cleanup and Repos Size Management

perforce-server-disk-space-cleanup-and-repos-size-management

DRAFT VERSION

  1. Cleaning up Old Checkpoints
  2. Playing with Symlink(Softlink) and Redirecting the ROOT folder to drive where we have enough place.
  3. Deleting db.have and recreate it manually
  4. Display disk space information on the server using “p4 diskspace”
  5. Display size information for files in the depot using “p4 sizes”
Tagged : / / / / / / / / / / / / / / / / /

BuildForge – Exporting projects using bfexport | BuildForge Guide

buildforge-exporting-project-bfexport

Location:

BuildForge Home Dir – Platform

To display command syntax, use bfexport with no options.

 $ ./bfexport

 Usage: bfexport -l

 or:

 bfexport [-c comment] [-f filename] [-g] [-s] [-L] [-n] <Project name or UUID> <Version name>

 Options :

 -l: Lists all projects in the system and their project UUID.

-c : Add a comment to the output XML.

-f : File to write the output to.

-g : Include group users.

-s : Include all servers.

-C : Include servers collectors (requires -s).

-L : Include LDAP configuration.

-n : Include template notifications.

Project must be a valid project name or project UUID.

Example

To list the project names and project IDs that are stored in the Build Forge database, use

 > bfexport -l

To send project data to an XML file,

> bfexport -f <file_name>. You must specify the -f <file_name> option to generate a file that can be used to import project data.

To write output to a file, use the -f <file_name> option. In the following example, helloworld is the output file name and the project ID is used instead of the project name.

> bfexport -c “Saving a copy of project before making changes” -f helloworld 675B57CC-8366-11DD-B2E0-043C04E44E1A

To export the default project snapshot only, use the <project_name>.

> bfexport -f helloworld test_project

To export one snapshot of a project, use the <project_name> <snapshot_name>.

> bfexport -f helloworld test_project snapshot_1

If the parent project snapshot is not the default project, you must specify the <project_name> followed by the parent keyword to export the parent project snapshot.

 > bfexport -f helloworld test_project parent Document

 ./bfexport -c “Saving a copy of project before making changes” -C -s -f Citius-Coverity-Full-parent 6d66e5050c5a1000bcd5cd010bc00bc0

Tagged : / / / / / / / / / / / / /

Performance Optimization of Build Server | Performance Optimization Guide

build-server

Performance Optimization Checklist of Build Servers

Build Infrastructure Level

1.  Do you really need to build all source code or only the part of code which has changes?

2. Project should be divided into multiple modules/component which can be build independently and should be integrated when it needed.

3. Understand technology and make use of performance related features which will help you. e.g make, visual studio and maven has some feature which help us to compile only code which was changed also, some performance tuning features should be explored.

4. Compile dependent project only there are changes. no need to compile all the time.

5. Distribute application in non-compiled and to be compiled files. e.g src, docs and copy only src to comile. docs files cane be used while creating installer.

6. Plan for disk usage growth upfront.

Application Server level

  1. Apache Server optimization and proper log setting
  2. Disabling unused modules and component which will help performance.
  3. Follow best practices of Module Configuration, Apache Server Configuration etc

 System level

  1. Check if any background task/services is running which is consuming cpu/memory and can be  stopped and not relevant.
  2. Keep system uptodate
  3. Avoid using build server for any other task – If you must edit components or install software, build or edit the components on another machine and copy them over.
  4. Use high speen drive for i/o operations

Build Server application level

http://www.cloudbees.com/sites/default/files/whitepapers/7WaysToOptimizeJenkins.pdf

  1. Keep log files maintenance and truncate regularly. have limited build records.
  2. Move build to document server. not to keep in build server
  3. Take advantage of distribute build server using agents/slaves/nodes etc
Tagged : / / / / / / / / / / / / / / /

How to Integrate Jenkins with SVN ? | Jenkins Integration with SVN Guide

jenkins-with-svn

Hi Rajesh,

Can you please help me to configure LDAP in SVN,i checked with some of my friends but i am not able to understand that.If you having any document related to LDAP configuration please send to me or you replay here also.
Thanks & Regards
Sujeet Sahu
M:09741939212
Mail id: sahusujeet@ymail.com
Tagged : / / / / / / / / / / / / / /

How to Execute external commands by using perl?

execute-external-commands-from-perl

There are many ways to execute external commands from Perl. The most commons are:

  • system function
  • exec function
  • backticks (“) operator
  • open function

All of these methods have different behaviour, so you should choose which one to use depending of your particular need. In brief, these are the recommendations:

method use if …
system() you want to execute a command and don’t want to capture its output
exec you don’t want to return to the calling perl script
backticks you want to capture the output of the command
open you want to pipe the command (as input or output) to your script

More detailed explanations of each method follows:

Using system()
system() executes the command specified. It doesn’t capture the output of the command.
system() accepts as argument either a scalar or an array. If the argument is a scalar, system() uses a shell to execute the command (“/bin/sh -c command”); if the argument is an array it executes the command directly, considering the first element of the array as the command name and the remaining array elements as arguments to the command to be executed.
For that reason, it’s highly recommended for efficiency and safety reasons (specially if you’re running a cgi script) that you use an array to pass arguments to system()

Example:      #-- calling 'command' with  arguments    system("command arg1 arg2 arg3");         #-- better way of calling the same command    system("command", "arg1", "arg2",  "arg3");     The return value  is set in $?; this value is the exit status of the command as returned  by the 'wait' call; to get the real exit status of the command you have to  shift right by 8 the value of $? ($? >> 8).     If the value of $? is -1, then the command failed to execute, in that case you may check the value  of $! for the reason of the failure.
Example:      system("command",  "arg1");    if ( $? == -1 )    {      print "command failed: $!\n";    }    else    {      printf "command exited with value %d", $? >> 8;    }

Using exec()
The exec() function executes the command specified and never returns to the calling program, except in the case of failure because the specified command does not exist AND the exec argument is an array.
Like in system(), is recommended to pass the arguments of the functions as an array.

Using backticks (“)
In this case the command to be executed is surrounded by backticks. The command is executed and the output of the command is returned to the calling script.
In scalar context it returns a single (possibly multiline) string, in list context it returns a list of lines or an empty list if the command failed.
The exit status of the executed command is stored in $? (see system() above for details).

Example:      #-- scalar context    $result = `command arg1 arg2`;         #-- the same command in list context    @result = `command arg2 arg2`;     Notice that the  only output captured is STDOUT, to collect messages sent to STDERR you should  redirect STDERR to STDOUT
Example:      #-- capture STDERR as well  as STDOUT    $result = `command 2>&1`;

Using open()
Use open() when you want to:
– capture the data of a command (syntax: open(“command |”))
– feed an external command with data generated from the Perl script (syntax: open(“| command”))

Examples:      #-- list the processes  running on your system    open(PS,"ps -e -o pid,stime,args |") || die "Failed: $!\n";    while ( <PS> )    {      #-- do something here    }         #-- send an email to user@localhost    open(MAIL, "| /bin/mailx -s test user\@localhost ") || die  "mailx failed: $!\n";  print MAIL "This is a test message";
Tagged : / / / / / / / / / / / / / / /

Depot Migration between perforce servers with history and change list

depot-migration-between-perforce-servers

There are many questions asked for the depot migration between server without losing any of the history  such as…

  • Moving depots across servers
  • Moving depots between servers
  • Move a product depot from one Perforce server to another
  • Depot Migration between perforce servers with history and change list

There are one solution which i find worth to try it out?
1.  Take A full backup of Source perforce server including jounals and file systems using checkpoint featres
2.  Then obliterate everything in the Source server that you didn’t want to copy – and remove redundant changelists with p4 change -f -d (refer p4 manuals)
3.  Go back to the Source server and obliterate the bit you’ve moved and remove redunant changelists again.
4. Now using p4merge tool, you can merger source and destination servers. this tools will help you for how to merge two separate servers into a single combined server using the Perfmerge++ utility.

What is Perfmerge++?
Perfmerge++ is a tool for merging two Perforce repositories to produce a third repository; it replaces the venerable perfmerge2.pl script. Unlike its predecessor, perfmerge++ does not work with checkpoints, rather it accesses the database files directly and creates new database files in the target directory. These new database files contain the merged content.

Reference:
http://kb.perforce.com/article/911
ftp://ftp.perforce.com/perforce/tools/perfmerge/perfmerge.html

Tagged : / / / / / / / / / / / / / / / / / / / / / / /

Useful Tips to Make Team Building Exercises Effective and Successful

Hi, I am prabhakar, i have read an article about Team Building and i would like to share it with you.All successful businesses and organizations know that teamwork and team synergy is the key to success. A lot of effort and resources are dedicated towards team building exercises and activities. A good team forms the foundation of any company, organization or community. Team building is not an easy task. This is because a team consists of various individuals with distinct personalities, schools of thought and disposition. But effective team building steps can slowly help these individuals to rise above petty differences, working together and complimenting each other to ensure the overall success of the team as well as personal growth of each individual. A discordant and inharmonious team will continue to experience failure even if it comprises of brilliant individuals. Sports are a very good example of this, in team sports like Football, Hockey or Basketball the co-ordination, communication and synergy of the team is what sets the best teams apart rather than individual superstars.

Team building requires dedication and effective skills. Each member of the team must be made to feel an integral and indispensible part of the team so that team strategy and goals can be placed above individual goals.There are various team building games and exercises available but it is only with perfect execution and participation of all members can these be effective. It is also important to resolve any conflicts as soon as possible. Conflicts can be very harmful for team building. Negative feedback, especially in public should be avoided at all cost as it may hamper the team’s performance.

Tagged : / / / / / / / / / / / / / / / / / /

Apache web server Installation Guide, know how to Install Apache web server on Windows 7?

apache-web-server-on-windows-7-installation-guide

After a quick detour to install Notepad++, I’m on my way to installing Magento. Before I can get into the meat of it, though, I do require a few prerequisites.

From the installation instructions, installing Magento requires:

  • Apache 1.3.x or Apache 2
  • PHP 5.2.0 and above with Safe mode off
  • MySQL 4.1.20 and above

After a brief search, I happened upon a very handy site (Yes, my current dev machine runs Windows 7). No sense reinventing the wheel, so these instructions should do nicely.

I’ve chosen the latest stable release, 2.2.17, MD5-verified and ready to install.

Always one to put the right foot forward… The first thing I’ve done is to immediately download the wrong version (src) instead of the neatly prepped installer (msi) as per the instructions. Round 1 goes to my eagerness, but after a neat revisit to the Apache download page, I’m off in the right direction.

After kicking off the Apache installer, my first instinct was to twitch at the frozen installer progress (Did the instructions forget about that ghastly Windows 7 User Account Control?), but after only a brief pause, the UAC prompt has displayed and the Apache web server installation is back on track.

None the worse for wear, time for the next step.

PHP

I’ve pretty much kaboshed most of the PHP installation instructions, mostly due to its avoidance of the handy PHP for Windows installer. Pointing the installer to the Apache web server’s cgi-bin folder seems like a good idea.

A configuration change…

; Directory in which the loadable extensions (modules) reside.
; http://php.net/extension-dir
; extension_dir = “./”
; On windows:
extension_dir = “ext” ; Uncommented (removed the semicolon at the beginning of) this line

… and I’m back to the instructions. After an update to my environment variables, looks like it’s time for a reboot… and sleep.

I’ll be leaving the MySQL install (and testing Apache web server and PHP) ’til tomorrow.

Tagged : / / / / / / / / / / / / / / / / /

How to Setup Configure Hudson Master Slave? – Complete Guide

hudson-master-slave-setup
The tasks can be scheduled to run on the same machine (Master), or on a different machine (Slave). A master is a installation of Hudson, that can manage one or more slaves. The role of master remains same in Master slave setup. It serves HTTP requests, and it can still build projects on it’s own.
Slaves are computers that are setup to build projects triggered from the master. A separate program called slave agent runs on slave computer. In this article we’ll discuss about how to setup Hudson to executed distributed builds using Master slave. One computer can be configured to execute multiple slave agents.

How it works

When the slaves are registered to a master, the master starts distributing loads to slaves. The delegation depends on the specific job. The job can be configured to either execute on the master, or it can be tied to a specific slave. On the other hand, the jobs can be configured to freely roam between slaves, wherein the job is executed using the free slave. As per the user is concerned, the setup is transparent. The results for all jobs are viewable using the Master, irrespective of the Slave that executed the job.
The slave may be built using any Operating system. The Master slave setup is highly helpful while the user has to execute the job on different Operating system. Consider this use case: The application is expected to run on different operating system, Linux, Solaris and Windows system. To address this need, the user can install Hudson on any machine, say Linux, and add 2 slaves: Solaris and Windows. The user can add 3 different jobs, one running on Master itself and others running on slave machines.

Methods to set up Slave agents

The slave can be launched from Master using any of below methods:
  1. Launch Slave agents on Unix machines via SSH.
  2. Launch Slave agents via JNLP.
  3. Launch Slave agents via execution of command on the master.
  4. Let Hudson control windows slave as a windows service.

The following screenshot illustrates the list of modes under which the Hudson slave can be launched.

Set up Slave agents on Unix machines via SSH

Hudson has a built-in SSH client implementation that it can use to talk to remote sshd and start a slave agent. This is the most convenient and preferred method for Unix slaves, which normally has sshd out-of-the-box. Click Manage Hudson, then Manage Nodes, then click New Node. In this set up, the connection information is supplied, including SSH host name, user name and authentication credentials. The authentication is performed using password or ssh keys. If it is configured to use ssh keys, the SSH public key should be copied to ~/.ssh/authorized_keys file. Hudson will do the rest of the work by itself, including copying the binary needed for a slave agent, and starting/stopping slaves.


Depending on the project and hardware resource availability, the user Desktop can be used as one of Slave, without affecting his day-to-day activities, thus avoiding the need for dedicated Slaves.

Establish slave agent via Java Web Start

Another way of launching slave is to start a slave agent through Java Web Start (JNLP). In this approach, the user will login to the slave node, open a browser and open the slave page using the URL pointed to the Master. It may look like the following URL:
http://masterserver:port/hudson/jnlpJars/slave.jar
The user is presented with the JNLP launch icon. If user click the icon, the Java Web Start kicks in and it launches a slave agent on this computer.
This mode is convenient when the master cannot initiate a connection to slaves, such as when it runs outside a firewall while the rest of the slaves are in the firewall. The disadvantage is, if the machine with a slave agent goes down, the master has no way of re-launching it on its own.

Set up slave agent headlessly

This launch mode uses a mechanism very similar to Java Web Start, except that it runs without using GUI, making it convenient for an execution as a daemon on Unix. To do this, the user should configure this slave to be a JNLP slave by downloading slave.jar, and then from the slave, run a command like this:
 
java -jar slave.jar -jnlpUrl http://yourserver:port/computer/slave-name/slave-agent.jnlp

The slave.jar file is downloaded from the above mentioned URL. Make sure to replace slave-name with the name of the slave setup in Master.

By default, Hudson runs on port 8080. It can be installed and managed without the need for super user privilege. The super user privilege is not required to manage both Master and Slave.

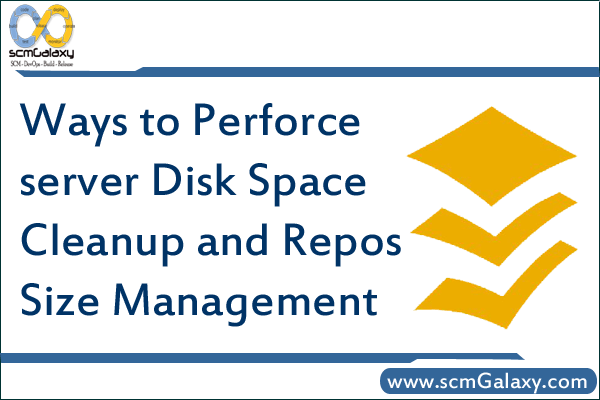
The below diagram illustrates the list of configuration parameters specific to a slave.


set up Slave Agent using own scripts

If the above modes is not flexible, the user can write his own script to launch the Slave agent. The script is placed in the Master computer and Hudson runs this script whenever it should connect to the slave. The script may use the remote login program like SSH, RSH to establish connection between Master and slave.
The script would execute the slave agent program like java -jar slave.jar. The stdin and stdout for the script should be connected to the master. For example, the script that does ssh myslave java -jar ~/bin/slave.jar would satisfy this need, when it is executed from the Master web interface. For this reason, running this script manually from the command line does no good.
The copy of slave.jar can be downloaded from the above mentioned URL. Launching the slave agent using this mode requires additional setup in the Slave. The benefit is that when the connection goes bad, the user can use Hudson web interface to re-establish the connection.
Tagged : / / / / / / / / / / / / / / / /