Using Role Based Authentication, Create Different Users DashBoard

Prerequisite:

i. Create a project in C:/xamp/htdocs directory by using Git Bash. To create a new project run the following code in Git Bash terminal

composer create-project --prefer-dist laravel/laravel project_name "5.8.*"

ii. Open the project in your code editor like VS Code

Step-1 : To use User Authentication in your project run the following code in code editor terminal

php artisan make:auth

Step-2 : Customize users table to add role field in the table. Go to database/migration/2021_03_20_000000_create_users_table.php and make some changes in users table.

Step-3: Create a Role Model and Migration for Role Table by using the following code:

php artisan make:model Role -m

Step-4: Now customize the Role table and add role_id and role_name field .Go to database/migration/2020_03_20_060108_create_roles_table and make some changes in up() function.

Step-5: Make Relationship between Users and Roles tables through Role Model and User Model.

i. To create relationship make changes in users( ) function in Role.php.

ii. In User.php make a role( ) function and write the following code .

Step-6 :  Create UsersTableSeeder  and RolesTableSeeder file by writting following two command in terminal.

php artisan make:seed UsersTableSeeder
php artisan make:seed RolesTableSeeder 

Step-7: Add Insert function in UsersTableSeeder.php and RolesTableSeeder.php file for Insert data in users table and role table. Add ” use Illuminate\Support\Facades\DB; ” in use area.

i. Go to database/seeds/UsersTableSeeder.php and add the following insert operation in run( ) function :

ii. Go to database/seeds/RolesTableSeeder.php and add the following insert operation in run( ) function :

Step-8 : Create a new Database and link it with the project

i. Run Apache and MySql .

ii. Open phpmyadmin/localhost in your web browser.

iii. Create a new database and set its name.

iv. Set Mysql Server Username ,Password and Database Name in .env file

DB_CONNECTION=mysql
DB_HOST=127.0.0.1
DB_PORT=3306
DB_DATABASE=multipleuser (Your DB name)
DB_USERNAME=root
DB_PASSWORD=

v. Migrate it by following command:

php artisan migration

Step-9 : Insert data in the table

php artisan db:seed

Step-10: Create DashboardController for Admin Dashboard work and User Dashboard work.

i. For Admin Dashboard

php artisan make:controller Admin/DashboardController

ii. For User Dashboard

php artisan make:controller User/DashboardController

Step-11 : Make AdminMiddleware and UserMiddleware for Admin and User Authentication work.

i. For AdminMiddleware

php artisan make:middleware AdminMiddleware

ii. For UserMiddleware

php artisan make:middleware UserMiddleware

Step-12: Go to app/Http directory and Use Auth class for Authentication in AdminMiddleware.php and UserMiddleware.php in use section. Implement the following condition in handle( ) function:

i. In AdminMiddleware.php add the following codition:

i. In UserMiddleware.php add the following codition:

Step-12: Go to app/Http/Middleware/RedirectIfAuthenticated.php . Implement Condition for Admin and User Login in RedirectIfAuthenticated.php. and not forget to put ” use Auth; ” in use section.

Step-13: Go to app/Http/Controllers/Auth/ directory and remove = ‘/home’ from protected $redirectTo = ‘/home’; for ResetPasswordController.php and LoginController.php . Implement Condition Login in both php file in __construct( ) function.

i. In LoginController.php

ii. In ResetPasswordController.php

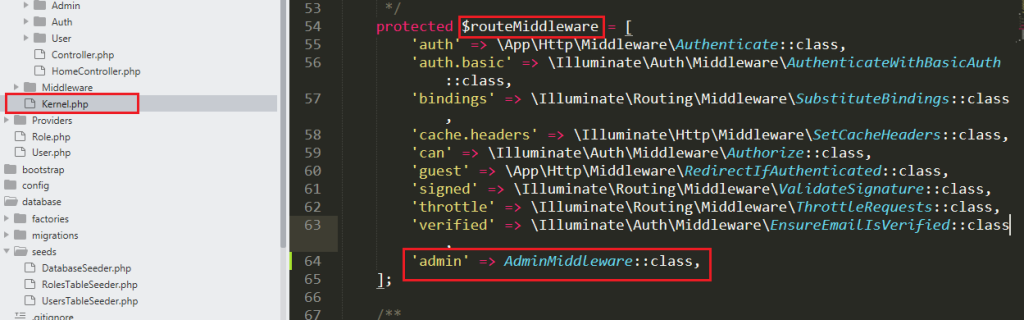
Step-14.A : Use AdminMiddleware and UserMiddleware in Kernel.php File in app/Http/Kernel.php directory

i. For AdminMiddleware

use App\Http\Middleware\AdminMiddleware;

ii. For UserMiddleware

use App\Http\Middleware\UserMiddleware;

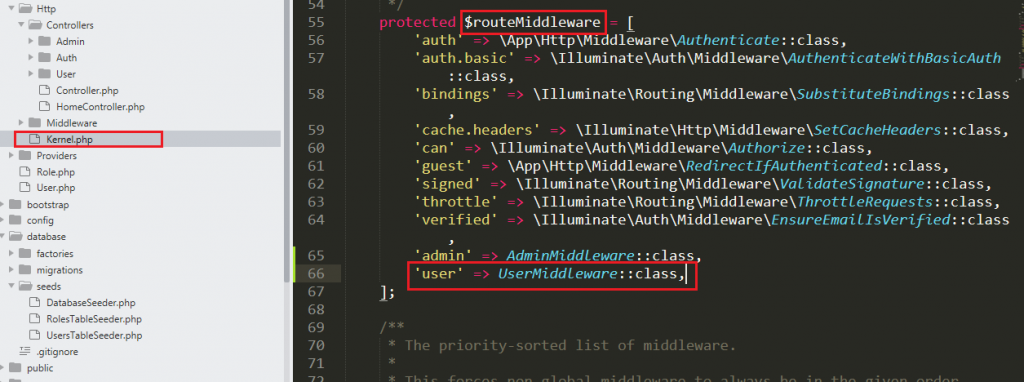
Step-14.B : Define AdminMiddleware and UserMiddleware in routeMiddleware

i. For AdminMiddleware

'admin' => AdminMiddleware::class,

ii. For UserMiddleware

use App\Http\Middleware\UserMiddleware;

Tagged : /

How to Create Multiple User Based Access Control in Laravel

Step 1: first go to xampp to htdocs and open command prompt or Git Bash and type command to create project.

composer create-project --prefer-dist laravel/laravel devopsschool "5.8.*"

Step 2: Goto project and right click and open vs code and open terminal.

Step 3: For User Authentication write this command in terminal

php artisan make:auth

Step 4:  customize users table(database/migration/2014_10_12_000000_create_users_table.php)

and added below code

Step 5: Create Model and Migration , controller and routes for Role Table

php artisan make:model Role -mcr

Step 6: customize roles table(database/migration/2020_06_10_060108_create_roles_table)

add now

Step 7: Make Relationship between users and roles tables through Role Model and User Model.

Step 7(A): In Role Model Create users() function for relationship.

Step 7(B): In User Model Create roles() function for relationship

Step 8: To  Create UsersTableSeeder file for insert data in users table through migration follow command

tpye in tarminal

php artisan make:seed UsersTableSeeder

Stp 9: To Create RolesTableSeeder file for insert data in users table through migration follow this command.

php artisan make:seed RolesTableSeeder

Step 10: Add Insert function in RolesTableSeeder.php(database/seeds/RolesTableSeeder.php) file for Insert data in roles table.

Step10(A)- use DB file in RolesTableSeeder.php

use Illuminate\Support\Facades\DB;

Step10(B)- Add Insert Function in run() function of RolesTableSeeder.php add below code.

Step 11: To Add Insert function in UsersTableSeeder.php(database/seeds/UsersTableSeeder.php) file for Insert data in users table.

Step11(A) – use DB file in UsersTableSeeder.php

use Illuminate\Support\Facades\DB;

Step11(B)- Add Insert Function in run function of UsersTableSeeder.php add codes.

Step 12: To Create Database in Mysql Serve to run xampp and go to web browser and follow command

http://localhost/phpmyadmin

And craete database

Step 13: Set Mysql Server Username ,Password and Database Name in .env file and follow command

Step 14: Migration of Tables in Database follow this command in tarminal.

php artisan migration

Step 15:  Define UsersTableSeeder and RolesTableSeeder Class on DatabaseSeeder.php file(database/seeds/DatabaseSeeder.php)

Step 16: Insert data in tables follow this command in terminal.

php artisan db:seed

Step 17: To Create DashboardController for Admin Dashboard work follow this command in terminal.

php artisan make:controller Admin/DashboardController

Step 18: To Create DashboardController for User Dashboard work follow this command in terminal.

php artisan make:controller User/DashboardController

step 19: Make AdminMiddleware for Admin Authentication work follow this command in terminal.

php artisan make:middleware AdminMiddleware

Step 20: Make UserMiddleware for User Authentication work follow this command in terminal.

php artisan make:middleware UserMiddleware

Step 21: Implement condition for Admin login in AdminMiddleware(app/Http/AdminMiddleware.php)

Step21(A) – Use Auth class for Authentication in use head of this  AdminMiddleware.php

use Auth;

Step 21 (B): Implement Condition in handle() function of AdminMiddleware.php added some code

Step 22: Implement condition for User login in UserMiddleware(app/Http/UserMiddleware.php)

Step22(A)- Use Auth class for Authentication in use head of this UserMiddleware.php

use Auth;

Step 22(B):  Implement Condition in handle() function of UserMiddleware.php aded some code

Step 23: Implement Condition for Admin and User Login in RedirectIfAuthenticated(app/Http/Middleware/RedirectIfAuthenticated.php) added some code below

public function handle()

Step 24: Implement Condition Login in LoginController(app/Http/Controllers/Auth/LoginController.php)

Step24(A)- remove = ‘/home’ from protected $redirectTo = ‘/home’;

protected $redirectTo;

And added some code

Step25: Implement Condition Login in ResetPasswordController(app/Http/Controllers/Auth/ResetPasswordController.php)

Step25(A): remove = ‘/home’ from protected $redirectTo = ‘/home’;

protected $redirectTo;

Step 25:  Implement Condition in __construct() function

And added some code

Step 26: Define AdminMiddleware in routeMiddleware(app/Http/Kernel.php)

Step26(A): use AdminMiddleware in Kernel.php File use in the head

use App\Http\Middleware\AdminMiddleware;

Step 26(B): Define AdminMiddleware in routeMiddleware

'admin' => AdminMiddleware::class,

Step 27: Define UserMiddleware in routeMiddleware(app/Http/Kernel.php)

Step27(A): use UserMiddleware in Kernel.php File add in head.

use App\Http\Middleware\UserMiddleware;

Step27(B): Define UserMiddleware in routeMiddleware add on body.

'user' => UserMiddleware::class,

Step 28: Set Middleware and Route in web.php (route/web.php)

Step28(A): Set Admin Middleware and Route added some code.

Step28(B):Set User Middleware and Route added some code.

Step 29: Serve and create link and open it

in terminal

php artisan serve

CRUD through AJAX using Laravel framework

Step 1 : create project folder through command line

composer create-project laravel/laravel AjaxCrud

Step 2 : Create Post table and model

php artisan make:model Posts -m

under this :- database/migrations, you have to put bellow code in your migration file for create Posts table

After create “Posts” table you should create post model for posts, so first create file in this path app/Post.php and put bellow content in post.php

Post model : app\post.php

Step 3: Add Route  

Post route : routes\web.php

Step 4: Create a new Controllers 

Run this command to Create a new Controller

php artisan make:controller PostController

Controlllers : app\http\controllers\PostController

Step 5 : Create a new Blade File

View : resources\views\post\index.blade.php

Step 6: Create JS and CSS File

View : resources\views\layouts\app.blade.php

now in terminal write php artisan serve

Now open browser and paste the following link

http://127.0.0.1:8000/post