How to fetch data from multiple tables in laravel

Step 1: Download Laravel Framework

For download fresh copy of Laravel framework, so first we have to into command prompt and run following command. This command will make join_table directory and under that directory it will download Laravel framework latest version.

composer create-project --prefer-dist laravel/laravel join_table "5.8.*"

Step 2: Make Database connection

After download and install Laravel framework and after this we want to make first database connection. So for make database connection, we have to open .env file and under this file, we have to define mysql database configuration. So it will create database connection in Laravel framework.

DB_DATABASE=testing
DB_USERNAME=root

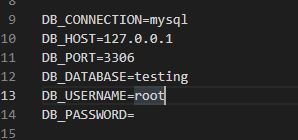
Step3: Sql file import

Once you have make database connection, then after we have to make table in mysql database. So for this you have to run following sql script in your local database, so it will create table in your define mysql database.

Step3: Create Model Class

In Laravel framework, we have to create model class for database related operation. So for create model classe using compost, we have go to command prompt and run following command, this command will make model class file with name Country.php under app/Models folder.

php artisan make:model Country

After create model class, we have to open that file and under that file we have to define mysql table name details and column details.

Step4:Create Controller Class

Under this Laravel framework, for handle HTTP request we have to create controller class. So for create controller using compost, we have go to command prompt and run following command.

php artisan make:controller JointableController

Once your controller class has been create then for open that file, we have go to app/Http/Controllers/JointableController.php file and under this file you have write following code for join multiple table using eloquent model and fetch data from multiple table in single query execution.

Step4: Create View Blade file

For display HTML output in browser, so we have to create view blade file in Laravel framework. In Laravel framework view blade file has been store under resources/views folder. Under this file, we have create join_table.blade.php file. Under this file, it will received data from controller class file. You can find source code of this view blade file in below.

Step 5: Set Route

Under this Laravel framework, we have to set route of the controller method. For set route in Laravel 8 framework, we have to open routes/web.php file. In Laravel 8 framework for set route, we have to first import our controller class under this web.php file. And for set route you can find source code below.

Step 6: Run Laravel Server

After follow all above steps now all are set now we want to run Laravel application in browser. So for this, we have to go command prompt and run following command.

php artisan serve

Once you have run above command so after run this command it will provide us base url of our Laravel application. So for check above script output, we have to hit following url in browser.

http://127.0.0.1/join_table

Tagged :

How to configure WordPress date and time settings ?

Date-Time Is showing wrong.

Hey friends, Today I am going to explain you about wordpress date and time settings. Today I saw something in blog post that time is not showing as in my pc time. so i totally confused after seeing this. so i decided to fix it. so that is for this. Let’s get started :

Step 1 : Login to your wordpress as Administrator

Step 2 : Under Dashboard, click Settings, and then click General.

Step 3 : Scroll down to the Timezone list box, and then select the time zone you want.

Time zones are grouped geographically under Africa, America, Asia, Europe, and other regions.

Step 4 : Under Date Format, select one of the predefined formats for WordPress to use to display dates.

Step 5 : Under Time Format, select one of the predefined formats.

Step 6 : at last click Save Changes.

Tagged :

Laravel Microservice Error: Call to undefined method GuzzleHttp\Exception\ConnectException::getResponse()

there are no of reason behind this error
(i) guzzle version in composer json
(ii) connection issue between client and server side microservices

client side url in env file:

server side url in env file:

Solution:

in client side and server side url http is mention so to resolve this error we have to change the client side url and server side url in env file

change http to https in both client side and server side url

2nd solution:

check guzzle version in composer json

composer require guzzlehttp/guzzle:^6.0 in terminal or gitbash

if 6.0 not suitable then other version also you can try run

Tagged : /

How to Store Data in Pop-Modal in Laravel

In this tutorial I’m going to describe how to store data in bootstrap 4 pop modal in laravel.

composer create-project laravel/laravel employee "5.8"

Step 2-> Go to .env and set up connect with database

DB_HOST=127.0.0.1
DB_PORT=3306
DB_DATABASE=popup-modal
DB_USERNAME=root
DB_PASSWORD=

3rd step migrate table

php artisan migrate

Next create migration table as name of employees lets go and create table

php artisan make:migration create_employees_table

Next got to database/migration/create_emoloyees_table and open this file

Simply copy and paste this code

<?php

use Illuminate\Support\Facades\Schema;
use Illuminate\Database\Schema\Blueprint;
use Illuminate\Database\Migrations\Migration;

class CreateEmployeesTable extends Migration
{
/**
* Run the migrations.
*
* @return void
*/
public function up()
{
Schema::create('employees', function (Blueprint $table) {
$table->bigIncrements('id');
$table->string('fname');
$table->string('lname');
$table->string('email');
$table->string('address');
$table->string('mobile');
$table->timestamps();
});
}

/**
* Reverse the migrations.
*
* @return void
*/
public function down()
{
Schema::dropIfExists('employees');
}
}

Php artisan migrate

Next step create view files in resourses/views/
folder name

empmodel.blade.php

Go to empmodel.blade.php and paste below code

<!DOCTYPE html>
<html lang="en">
<head>
<meta charset="UTF-8">
<meta name="viewport" content="width=device-width, initial-scale=1.0">
<meta http-equiv="X-UA-Compatible" content="ie=edge">

<title>Document</title>
<link rel="stylesheet" href="https://maxcdn.bootstrapcdn.com/bootstrap/4.0.0/css/bootstrap.min.css" integrity="sha384-Gn5384xqQ1aoWXA+058RXPxPg6fy4IWvTNh0E263XmFcJlSAwiGgFAW/dAiS6JXm" crossorigin="anonymous">
</head>
<body>


{{-- model start here --}}

<div class="modal fade" id="exampleModal" tabindex="-1" role="dialog" aria-labelledby="exampleModalLabel" aria-hidden="true">
<div class="modal-dialog" role="document">
<div class="modal-content">
<div class="modal-header">
<h5 class="modal-title" id="exampleModalLabel">Add Employee Detail</h5>
<button type="button" class="close" data-dismiss="modal" aria-label="Close">
<span aria-hidden="true">&times;</span>
</button>
</div>
<form action="{{ action('EmployeeController@store')}}" method="POST">
{{ csrf_field() }}
<div class="modal-body">

<div class="form-group">
<label>First Name</label>
<input type="text" name="fname" class="form-control" placeholder="Enter first name">
</div>

<div class="form-group">
<label>Last Name</label>
<input type="text" name="lname" class="form-control" placeholder="Enter last name">
</div>

<div class="form-group">
<label>Email</label>
<input type="text" name="email" class="form-control" placeholder="Enter email">
</div>

<div class="form-group">
<label>Address</label>
<input type="text" name="address" class="form-control" placeholder="Enter address">
</div>

<div class="form-group">
<label>Mobile</label>
<input type="text" name="mobile" class="form-control" placeholder="Enter mobile">
</div>

<button type="submit" class="btn btn-primary">Submit</button>

</div>
</form>
</div>
</div>
</div>
{{-- model end here --}}


<br><br><br>
<div class="container">
<h1>Store Data in Pop-modal in laravel</h1>

@if (count($errors) >0)
<div class="alert alert-danger">
<ul>
@foreach($errors->all() as $error)
<li>{{$error}}</li>
@endforeach

</ul>
</div>
@endif

@if (\Session::has('success'))
<div class="alert alert-success">
<p>{{ \Session::get('success') }}</p>

</div>
@endif

<button type="button" class="btn btn-primary" data-toggle="modal" data-target="#exampleModal">
Add Employee
</button>
</div>

{{-- pop model start here --}}

<!-- Button trigger modal -->
{{-- <button type="button" class="btn btn-primary" data-toggle="modal" data-target="#exampleModal">
Launch demo modal
</button> --}}

<!-- Modal -->


{{-- pop model end here --}}
<script src="https://code.jquery.com/jquery-3.2.1.slim.min.js" integrity="sha384-KJ3o2DKtIkvYIK3UENzmM7KCkRr/rE9/Qpg6aAZGJwFDMVNA/GpGFF93hXpG5KkN" crossorigin="anonymous"></script>
<script src="https://cdnjs.cloudflare.com/ajax/libs/popper.js/1.12.9/umd/popper.min.js" integrity="sha384-ApNbgh9B+Y1QKtv3Rn7W3mgPxhU9K/ScQsAP7hUibX39j7fakFPskvXusvfa0b4Q" crossorigin="anonymous"></script>
<script src="https://maxcdn.bootstrapcdn.com/bootstrap/4.0.0/js/bootstrap.min.js" integrity="sha384-JZR6Spejh4U02d8jOt6vLEHfe/JQGiRRSQQxSfFWpi1MquVdAyjUar5+76PVCmYl" crossorigin="anonymous"></script>
</body>
</html>

Lets next go to create model

php artisan make:model Employee

Go to Employee model and paste below code

<?php

namespace App;

use Illuminate\Database\Eloquent\Model;

class Employee extends Model
{
//
}

Next create controller

php artisan make:controller EmployeeController -r

Go to EmployeeController and paste below code

<?php

namespace App\Http\Controllers;

use Illuminate\Http\Request;
use App\Employee;

class EmployeeController extends Controller
{
/**
* Display a listing of the resource.
*
* @return \Illuminate\Http\Response
*/
public function index()
{
return view('empmodel');
}

/**
* Show the form for creating a new resource.
*
* @return \Illuminate\Http\Response
*/
public function create()
{
//
}

/**
* Store a newly created resource in storage.
*
* @param \Illuminate\Http\Request $request
* @return \Illuminate\Http\Response
*/
public function store(Request $request)
{
$this->validate($request,[
'fname' => 'required',
'lname' => 'required',
'email' => 'required',
'address' => 'required',
'mobile' => 'required',
]);

$emps = new Employee;

$emps->fname = $request->input('fname');
$emps->lname = $request->input('lname');
$emps->email = $request->input('email');
$emps->address = $request->input('address');
$emps->mobile = $request->input('mobile');

$emps->save();
return redirect('/employee')->with('success', 'Data saved');


}

/**
* Display the specified resource.
*
* @param int $id
* @return \Illuminate\Http\Response
*/
public function show($id)
{
//
}

/**
* Show the form for editing the specified resource.
*
* @param int $id
* @return \Illuminate\Http\Response
*/
public function edit($id)
{
//
}

/**
* Update the specified resource in storage.
*
* @param \Illuminate\Http\Request $request
* @param int $id
* @return \Illuminate\Http\Response
*/
public function update(Request $request, $id)
{
//
}

/**
* Remove the specified resource from storage.
*
* @param int $id
* @return \Illuminate\Http\Response
*/
public function destroy($id)
{
//
}
}

Next create route go to Route/web.php and paste below code

<?php

/*
|--------------------------------------------------------------------------
| Web Routes
|--------------------------------------------------------------------------
|
| Here is where you can register web routes for your application. These
| routes are loaded by the RouteServiceProvider within a group which
| contains the "web" middleware group. Now create something great!
|
*/

Route::get('/', function () {
return view('welcome');
});

Route::resource('/employee','EmployeeController');

next go to browser and search

http://127.0.0.1:8000/employee

Now Form is look like this

Fill all the field and click on submit

Next Go to Localhost/phpmyadmin and check your data has been successfully saved

Thanks

How to fix fatal error: Maximum execution time of 300 seconds exceeded in XAMPP

Step1: Go to this path C:\xampp\phpMyAdmin\libraries

Step2: open file config.default.php

Step3: config.default.php on this line $cfg[‘ExecTimeLimit’] = 300; change

Step4: config.default.php on this line $cfg[‘ExecTimeLimit’] = 0; change

Step5: XAMPP Will be Restart and Import the Sql file.

Tagged : /

How to add jQuery DataTables into your Laravel projects?

First of all, let’s discus here, What is DataTable?

Datatable is a plugin for jQuery JS Library. it’s really flexible tool. it provides the search, filter & pagination and it’s also mobile friendly.

📚 Step 1 : Open Datatables website (URL )

📚 Step 2 : Copy CSS & JS CDN Link from Home page

//cdn.datatables.net/1.10.24/css/jquery.dataTables.min.css
//cdn.datatables.net/1.10.24/js/jquery.dataTables.min.js

📚 Step 3 : Add it to your blade file. just see below how to add these css and js cdn links into your particular pages.

@section('css')
   <link rel="stylesheet"href="//cdn.datatables.net/1.10.24/css/jquery.dataTables.min.css">
@endsection

📚 Step 4 : Now Adding JS CDN

@push('scripts')
   <script src="//cdn.datatables.net/1.10.24/js/jquery.dataTables.min.js">
@endpush

📚 Step 5 : Add one more script which is the ID of your table where you are going to active your datatable. if you will see below code then you will find a ID (#myTable). it is your table id. in your case it will be something else.

<script>
		$(document).ready( function () {
			$('#myTable').DataTable();
		} );
</script>

Note : if you are using DataTable into your particular page then only add in that particular file and if you are going to use it multiple places then add it to your main file like app.blade.php .

Hey friends after following above steps you will find your view like below image :

Laravel 8 – Insert record using ajax

Hey friends, I came again to all of you with a new article, must follow below steps to create a CRUD in Laravel using ajax.

📚 Step 1 : create a Laravel project using below command.

       composer create-project laravel/laravel Studentsform

📚 Step 2 : Make a model for this, run below command: after running below command you will find a model name Student and one migration 2021_05_01_create_students_table

php artisan make:model Student -m

📚 Step 3 : Create a StudentController now using below command

php artisan make:controller StudentController

📚 Step 4 : Now open migration and add some column in it

Schema::create('students', function(Blueprint $table)) {
	$table->id();
	$table->string('firstname');
	$table->string('lastname');
	$table->string('email');
	$table->string('phone');
	$table->timestamps();
}

📚 Step 5 : Add table name in Student model and also write fillable area for it with your table column name.

    protected $table = 'students';
	protected $fillable = ['firstname','lastname','email','phone'];

📚 Step 6 : now migrate all your migration using below command , before migrating make sure to create a Database for it.

php artisan migrate

📚 Step 7 : And then Open StudentController.php (app/Http/Controllers/StudentController) and create a function name index().

📄 StudentController.php
public function index()
 {
	$students = Student::orderBy('id','DESC')->get();
	return view('students',compact('students'));
 }

📚 Step 8 : Let’s create a route for this. so now open web.php file situated under routes folder and add also controller location within web.php.

📄 web.php
Use App\Http\Controllers\StudentController
Route::get('/students',[StudentController::class,'index']);

📚 Step 9 : Now create a view file under resources/views with name students.blade.php and below code in it

📄 students.blade.php
<!DOCTYPE html>
<html lang="en">
<head>
    <meta charset="UTF-8">
    <meta http-equiv="X-UA-Compatible" content="IE=edge">
    <meta name="viewport" content="width=device-width, initial-scale=1.0">
    <title>Ajax Crud</title>
    <link href="https://cdn.jsdelivr.net/npm/bootstrap@5.0.0-beta3/dist/css/bootstrap.min.css" rel="stylesheet" integrity="sha384-eOJMYsd53ii+scO/bJGFsiCZc+5NDVN2yr8+0RDqr0Ql0h+rP48ckxlpbzKgwra6" crossorigin="anonymous">
</head>
<body>
    <section style="padding-top:60px">
        <div class="container">
            <div class="row">
                <div class="col-md-12">
                    <div class="card">
                        <div class="card-header">
                            Students <a href="#" class="btn btn-success" data-bs-toggle="modal" data-bs-target="#StudentModal">Add New Students</a>
                        </div>
                        <div class="card-body">
                            <table id="studentTable" class="table">
                                <thead>
                                    <tr>
                                        <th>First Name</th>
                                        <th>Last Name</th>
                                        <th>Email</th>
                                        <th>Phone</th>
                                    </tr>
                                </thead>
                                <tbody>
                                    @foreach($students as $student)
                                        <tr>
                                            <td>{{$student->firstname}}</td>
                                            <td>{{$student->lastname}}</td>
                                            <td>{{$student->email}}</td>
                                            <td>{{$student->phone}}</td>
                                        </tr>
                                    @endforeach
                                </tbody>
                            </table>
                        </div>
                    </div>
                </div>
            </div>
        </div>
    </section>

    <!-- modal start -->

    <!-- Button trigger modal -->
    <!-- Modal -->
    <div class="modal fade" id="StudentModal" tabindex="-1" aria-labelledby="exampleModalLabel" aria-hidden="true">
        <div class="modal-dialog">
        <div class="modal-content">
            <div class="modal-header">
            <h5 class="modal-title" id="exampleModalLabel">Add new student</h5>
            <button type="button" class="btn-close" data-bs-dismiss="modal" aria-label="Close"></button>
            </div>
            <div class="modal-body">
            <form action="" id="studentForm">
                @csrf
                <div class="form-group">
                    <label for="FirstName">First Name</label>
                    <input type="text" class="form-control" id="firstname">
                </div>
                <div class="form-group">
                    <label for="LastName">Last Name</label>
                    <input type="text" class="form-control" id="lastname">
                </div>
                <div class="form-group">
                    <label for="email">Email</label>
                    <input type="text" class="form-control" id="email">
                </div>
                <div class="form-group">
                    <label for="phone">Phone</label>
                    <input type="text" class="form-control" id="phone">
                </div>
                <button type="submit" class="btn btn-primary">Submit</button>
            </form>
            </div>
            
        </div>
        </div>
    </div>
    <script>
        $("#studentForm").submit(function(e){
            e.preventDefault();
            let firstname = $("#firstname").val();
            let lastname = $("#lastname").val();
            let email = $("#email").val();
            let phone = $("#phone").val();
            let _token = $("input[name=_token]").val();

            $.ajax({
                url: "{{route('student.add')}}",
                type:"POST" ,
                data: {
                    firstname:firstname,
                    lastname:lastname,
                    email:email,
                    phone:phone,
                    _token:_token
                },
                success:function(response)
                {
                    if(response){
                        $("#studentTable tbody").prepend('<tr><td>'+response.firstname+'</td><td>'+response.lastname+' </td><td>'+response.email+'</td><td>'+response.phone+'</td></tr>');
                        $("#studentForm")[0].reset();
                        $("#studentModal").modal('hide');
                    }
                }
            });

        });
    </script>
    <script src="https://cdn.jsdelivr.net/npm/@popperjs/core@2.9.1/dist/umd/popper.min.js" integrity="sha384-SR1sx49pcuLnqZUnnPwx6FCym0wLsk5JZuNx2bPPENzswTNFaQU1RDvt3wT4gWFG" crossorigin="anonymous"></script>
    <script src="https://cdn.jsdelivr.net/npm/bootstrap@5.0.0-beta3/dist/js/bootstrap.min.js" integrity="sha384-j0CNLUeiqtyaRmlzUHCPZ+Gy5fQu0dQ6eZ/xAww941Ai1SxSY+0EQqNXNE6DZiVc" crossorigin="anonymous"></script>
    <script src="https://code.jquery.com/jquery-3.6.0.js" integrity="sha256-H+K7U5CnXl1h5ywQfKtSj8PCmoN9aaq30gDh27Xc0jk=" crossorigin="anonymous"></script>
</body>
</html>

📚 Step 10 : Create another function in StudentController.php

public function addStudent(Request $request)
	{
		$student = new Student();
		$student->firstname = $request->firstname;
		$student->lastname = $request->lastname;
		$student->email = $request->email;
		$student->phone = $request->phone;
		$student->save();
		return response()->json($student);
	}

📚 Step 11 : Now create a route for addStudent() function, so for this open web.php file again

Route::post('/add-student', [StudentController::class,'addStudent'])->name('student.add');

At last fill the data into popup form and you will see that your form is working fine. yay we did it. Let’s congratulate yourself that you create a CRUD using ajax in Laravel 8.

If you find any issue on above steps then feel free to comment. I will feel very happy to resolve your problems in it.

Tagged : /