
scmGalaxy is a community initiatives based on Software configuration management that helps community members to optimize their software development process, Software Development Life Cycle optimization, Agile Methodologies and improve productivity across all aspects of Java development, including Build Scripts, Testing, Issue Tracking, Continuous Integration, Code Quality and more. scmGalaxy group that helps organisations optimize their software development process. We provide consulting, training and mentoring services in Agile Development Practices such as Version Management, Continuous Integration, Build Management, Test-Driven Development, Acceptance-Test Driven Development, Build Automation, Code Quality Practices and Automated Testing.
We provide job oriented training in the area of Configuration management, Build and Release Engineering. Candidates with engineering or software background and looking to either start or change their career to Build and Release Engineering, would benefit most from this training. Instructor-led training course offered in India, Bangalore, Delhi, Pune, Mumbai and Hydrabad. Instructor is an expert in Software configuration management, Build and release engineering with more than 15 years industry experience in india.The Goal of the course make the training attendants equip with all the concepts of build and release engineering.
Contact us at info@scmGalaxy.com | Call – +91 700 483 5930 | Skype – scmGalaxy
Course Objectives
To bring your team up to speed with agile development, We can also run the from Continuous Integration to Continuous Delivery with autoamted course within your premises.
Course Schedule
This course is an intensive 1-day & 2-day workshop with a mixture of teaching and lab exercises. Currently, this course is offered exclusively as an on-site course. Please contact us for more details.
Audience
This is a hands-on, practical course designed to teach specialised skills for real-world development situations. It is thus primarily aimed at a SCM Engineer, Build/Release Engineer and developer audience.
Approach
The course is modular and flexible – depending on specific student needs and requests. Through our trainings, you benefit from the wide experience and architectural expertise of our team. We bring that experience to you in an highly interactive, intensely hands-on setting.
Assumptions
We assume participants have a reasonable understanding of Development in any language as well as a basic understanding of the Software Development Life Cycle.
Lab Work
All our courses are above all practical in nature. We believe that the best way to learn is by doing. So the course contains approximately 80% lab work.
Learning Resources
Each registrant will receive a copy of the student notes and lab solutions, a certificate of completion, and a CD containing all the tools covered in the course and CD containing all the tools covered in the course.
Contact Us
This course is provided on-site, and can be tailored to your particular requirements. If you would like our trainings delivered at your premises, or for any additional information please contact us. Please email us at info@scmGalaxy.com
Course outline
The basic course program is outlined here:
1. Introduction
- Introduction to Continuous Integration
- Practices
- Benefits
- Continuous deployment and Continuous Delivery
- The build pipeline
- Introduction to TeamCity
- Licensing
- Features
- First-class support for various technologies
- Lots of plugins
- REST API
- Comprehensive VCS support
- A nice dashboard UI and build history
- Ease of setup and comprehensive documentation
- Build pipeline/chains
- Agents and build grids
- IDE integrations
- TeamCity and its competitors
- Jenkins
- ThoughtWorks’ Go
- Summary
2. Installation
- Installing on Windows
- Installing the server and the default agent
- Installing additional agents
- Installation on Mac OS X
- Running the TeamCity server and the default agent
- Setting up the TeamCity server as a daemon
- Installing additional agents
- Installation on Linux
- Running the server and the default agent
- Running the TeamCity server as a daemon
- Installing additional agents
- Summary
3. Getting Your CI Up and Running
- Introducing version control systems
- Centralized versus distributed VCSs
- VCSs and CI
- VCS used in this book
- Setting up CI
- The sample project
- Creating a project in TeamCity
- Subprojects
- Adding build configurations
- VCS roots and VCS settings
- Introducing the build steps
- Running our first build
- Build failure conditions
- Triggering the build on VCS changes
- Build chains
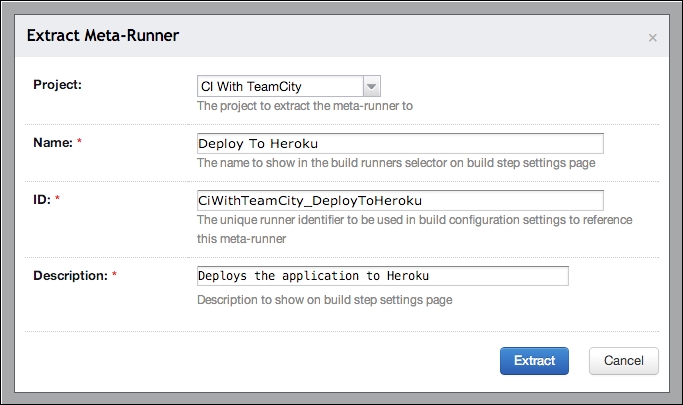
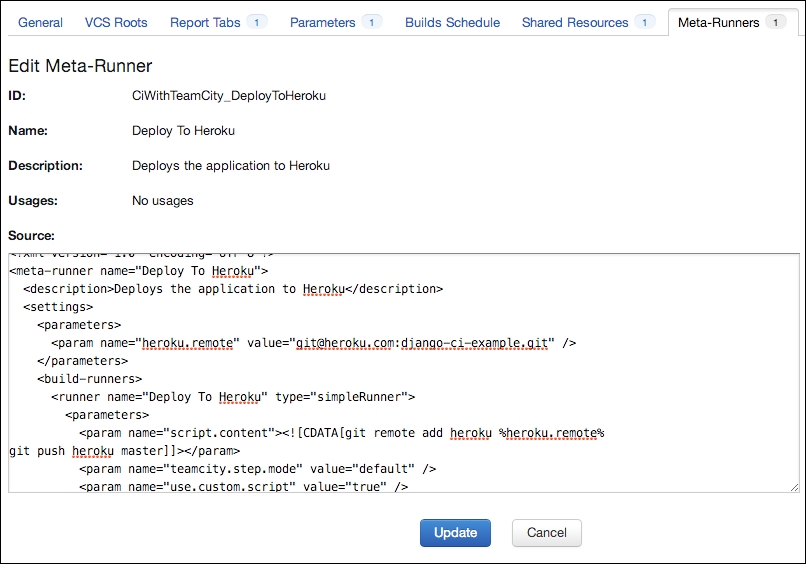
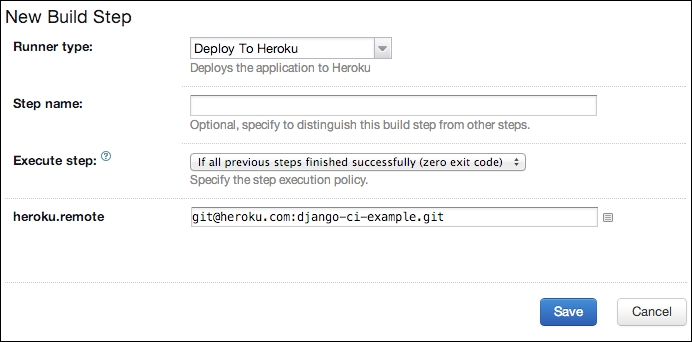
- Deploying to Heroku
- Adding functional tests
- Parameters and build parameters
- Setting up the build chain
- Snapshot dependencies
- The Finish build trigger
- The Build chain view
- Fine-tuning our setup
- Adding coverage and unit test reports
- Publishing reports as artifacts
- XML report processing
- Report tabs
- Build and project statistics
- Shared resources
- Agent Requirements
- Summary
4. TeamCity for Java Projects
- Using Ant with TeamCity
- Installing Ant
- Building with Ant build files
- Building with Ant in a build configuration
- Adding some unit tests
- Setting up code coverage
- Build scripts versus TeamCity features
- System properties and Ant
- Using Maven with TeamCity
- Installing Maven
- Creating a Maven project
- Introducing the Project Object Model (POM)
- Building the project
- Using Maven in a build configuration
- Setting version number
- Setting up code coverage for our build
- Maven on TeamCity, beyond the build runner
- Creating a Maven build configuration
- Global Maven settings file
- Setting up Maven-based triggers
- Using Gradle with TeamCity
- Installing Gradle
- Building with Gradle on TeamCity
- Introducing database migration tools
- Summary
5. TeamCity for .NET Projects
- Getting started with NAnt on TeamCity
- Installing NAnt
- Building NAnt with NAnt
- Building on TeamCity
- Adding NUnit report processing
- Configuring agent requirements
- Building with MSBuild
- Installing MSBuild
- Starting an MSBuild project
- Building with MSBuild on TeamCity
- Adding an NUnit build runner
- Running NUnit tests using NUnit task
- Running NUnit tests using the task provided by TeamCity
- Configuring code coverage with MSBuild
- NuGet and TeamCity
- Installing the NuGet command-line client
- Installing NuGet.exe on TeamCity agents
- TeamCity as a NuGet server
- NuGet-based build runners
- NuGet dependency trigger
- Introducing PowerShell
- PowerShell-based build tools
- PowerShell build runner in TeamCity
- Database migrations with .NET
- Summary
6. TeamCity for Ruby Projects
- Getting started with Rails
- Managing Ruby versions
- Introducing Bundler
- Installing Rails using Bundler
- Introducing Rake
- Setting up the build on TeamCity
- Setting up Ruby interpreter
- Running Capybara- and Selenium-based feature tests
- Summary
7. TeamCity for Mobile and Other Technologies
- CI for Android projects
- Generating the APK
- Running Calabash tests
- Building iOS projects on TeamCity
- Installing TeamCity plugins
- Installing the Python runner plugin
- Building with the Python build runner
- Introduction to TeamCity.Node plugin
- Summary
8. Integration with Other Tools
- IDE integrations
- IntelliJ platform IDEs integration
- Installing the plugin
- Configuring notifications
- Managing projects from the IDE
- Opening files and patches in IDE
- Remote Run
- Visual Studio integrations
- GitHub integrations
- GitHub webhooks and services
- Using the TeamCity.GitHub plugin
- Support for pull requests
- Integrating with GitHub issue tracker
- Build monitors
- Team Piazza
- Project Monitor
- Build lights
- Notifications
- Summary
9. TeamCity for a Member of the Team
- Managing projects of interest
- Hiding projects
- Hiding build configurations
- Navigating across projects
- Investigating investigations
- Assigning investigations
- Viewing active investigations
- Managing current and muted problems
- TeamCity universal search
- Actions on build configurations
- Pausing triggers in a build configuration
- Checking for pending changes
- Enforcing clean checkout
- Summary
10. Taking It a Level Up
- Build configuration templates
- Creating templates from scratch
- Creating build configurations from the template
- Creating templates from existing build configurations
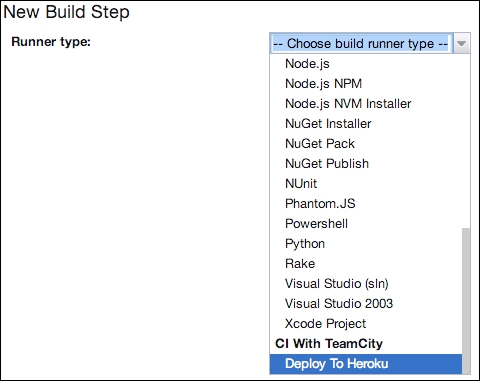
- Going meta with Meta-Runners
- Using Meta-Runners
- Build result actions
- Commenting on build results
- Tagging build results
- Pinning build results
- Promoting builds
- Marking the build as successful or failed
- Removing builds
- Build history cleanup
- Cleanup rules
- Archiving projects
- Configuring build priorities
- Interacting with TeamCity from build scripts
- Service messages
- Creating teamcity-info.xml
- Summary
11. Beyond CI – Continuous Delivery
- What is Continuous Delivery?
- Why Continuous Delivery?
- The deployment pipeline
- Implementing the deployment pipeline in TeamCity
- Publishing and consuming artifacts
- Build chain for CI
- Deploying to environments
- Environments as gates
- Identifying the build that is deployed in an environment
- Deploying any version to an environment
- Limiting deployment permissions to certain users
- Passing sensitive information during deployment
- Feature branching and feature toggling
- Summary
12. Making It Production Ready
- Using TeamCity with an external database
- Configuring PostgreSQL as an external database
- Migrating from one database to another
- Backup and restore
- Taking backups from the server UI
- Backing up and restoring data using the maintainDB tool
- A manual backup
- Handling upgrades
- Updating a server installed via an archive
- Updating TeamCity using the Windows installer
- Updating the agents
- Monitoring resource usage, performance, and logs
- Disk space usage
- TeamCity server diagnostics
- Tweaking the TeamCity JVM
- Summary
TeamCity Training In Bangalore | TeamCity Training in India | TeamCity Training in Hydrabad | TeamCity Training in Delhi | TeamCity Training in Pune | TeamCity Trainer In Bangalore | TeamCity Trainer in India | TeamCity Trainer in Hydrabad | TeamCity Trainer in Delhi | TeamCity Trainer in Pune
Tagged : Bangalore / Classroom / Classroom TeamCity Training / Course / Hyderabad / India / Mumbai / Netherlands / Online / Online TeamCity Training / Pune / Teamcity / TeamCity Course / TeamCity Trainer / TeamCity Training / Trainer / Training / UK / Usa