How to compile and build Gerrit Plugins?

To build Gerrit Plugins from source, you need:

A Linux or macOS system (Windows is not supported at this time)

zip, unzip, wget

$yum install zip -y
$ yum install unzip -y
$ yum install wget -y
$ yum install git -y

Python 2 or 3
This is installed in each RHEL 7 and Ubunutu server by defaul.

Node.js

curl --silent --location https://rpm.nodesource.com/setup_8.x | sudo bash -
OR
curl --silent --location https://rpm.nodesource.com/setup_10.x | sudo bash -
sudo yum -y install nodejs

Bazel

## RHEL/CentOS 7 64-Bit ##
$ wget https://copr.fedorainfracloud.org/coprs/vbatts/bazel/repo/epel-7/vbatts-bazel-epel-7.repo
$ cp vbatts-bazel-epel-7.repo /etc/yum.repos.d/
$ yum install -y bazel

How to Installing Bazel on Ubuntu?
https://docs.bazel.build/versions/master/install-ubuntu.html

Maven

$ cd /opt
$ wget http://www-us.apache.org/dist/maven/maven-3/3.5.4/binaries/apache-maven-3.5.4-bin.zip
$ unzip apache-maven-3.5.4-bin.zip
$ mv apache-maven-3.5.4 maven
$ export PATH=$PATH:/op/maven/bin

gcc

$ sudo yum install gcc-c++ make

Now, Bazel in tree driven means it can only be built from within Gerrit tree. Clone or link the plugin into gerrit/plugins directory:

# First become a non-root user

A JDK for Java 8

$ cd
$ wget -c --header "Cookie: oraclelicense=accept-securebackup-cookie" http://download.oracle.com/otn-pub/java/jdk/8u181-b13/96a7b8442fe848ef90c96a2fad6ed6d1/jdk-8u181-linux-x64.tar.gz
$ tar -xvf jdk-8u181-linux-x64.tar.gz
$ export JAVA_HOME=/home/ec2-user/jdk1.8.0_181
$ java -version

Follow for Gerrit.war

$ git clone --recursive https://gerrit.googlesource.com/gerrit
$ cd gerrit 
$ bazel build release

Follow for plugins such as its-jira

$ cd plugins
$ git clone https://gerrit.googlesource.com/plugins/its-jira
$ git clone https://gerrit.googlesource.com/plugins/its-base
$ bazel build plugins/its-jira

The output can be normally found in the following directory:

bazel-genfiles/plugins/its-jira/its-jira.jar

# Some plugins describe their build process in src/main/resources/Documentation/build.md file. It may worth checking.

# Some plugins cane be build using maven as well

Reference

  • https://gerrit-review.googlesource.com/Documentation/dev-bazel.html
  • https://gerrit.googlesource.com/gerrit/
  • https://gerrit-review.googlesource.com/Documentation/cmd-plugin-install.html
  • https://gerrit-review.googlesource.com/Documentation/dev-build-plugins.html
Tagged : / / / /

What is “Install Verified label” in Gerrit?

What is “Install Verified label” in Gerrit?

The Verified label was originally invented by the Android Open Source Project to mean ‘compiles, passes basic unit tests’. Some CI tools expect to use the Verified label to vote on a change after running.

During site initialization the administrator may have chosen to configure the default Verified label for all projects. In case it is desired to configure it at a later time, administrators can do this by adding the following to project.config in All-Projects:

[label “Verified”]
function = MaxWithBlock
value = -1 Fails
value = 0 No score
value = +1 Verified
copyAllScoresIfNoCodeChange = true
The range of values is:

-1 Fails
Tried to compile, but got a compile error, or tried to run tests, but one or more tests did not pass.
Any -1 blocks submit.

0 No score
Didn’t try to perform the verification tasks.

+1 Verified
Compiled (and ran tests) successfully.
Any +1 enables submit.

For a change to be submittable, the change must have a +1 Verified in this label, and no -1 Fails. Thus, -1 Fails can block a submit, while +1 Verified enables a submit.

Additional values could also be added to this label, to allow it to behave more like Code-Review (below). Add -2 and +2 entries to the label.Verified.value fields in project.config to get the same behavior.

As an example, the popular gerrit-trigger plugin for Jenkins/Hudson can set labels at:

  • The start of a build
  • A successful build
  • An unstable build (tests fails)
  • A failed build

Usually the range chosen for this verdict is the Verified label. Depending on the size of your project and discipline of involved developers you might want to limit access right to the +1 Verified label to the CI system only. That way it’s guaranteed that submitted commits always get built and pass tests successfully.

If the build doesn’t complete successfully the CI system can set the Verified label to -1. However that means that a failed build will block submit of the change even if someone else sets Verified +1. Depending on the project and how much the CI system can be trusted for accurate results, a blocking label might not be feasible. A recommended alternative is to set the label Code-review to -1 instead, as it isn’t a blocking label but still shows a red label in the Gerrit UI. Optionally, to enable the possibility to deliver different results (build error vs unstable for instance), it’s also possible to set Code-review +1 as well.

If pushing new changes is granted, it’s possible to automate cherry-pick of submitted changes for upload to other branches under certain conditions. This is probably not the first step of what a project wants to automate however, and so the push right can be found under the optional section.

Suggested access rights to grant, that won’t block changes:
Read on ‘refs/heads/*’ and ‘refs/tags/*’
Label: Code-Review with range ‘-1’ to ‘0’ for ‘refs/heads/*’
Label: Verified with range ‘0’ to ‘+1’ for ‘refs/heads/*’

Optional access rights to grant:
Label: Code-Review with range ‘-1’ to ‘+1’ for ‘refs/heads/*’
Push to ‘refs/for/refs/heads/*’

Reference
https://gerrit-review.googlesource.com/Documentation/config-labels.html#label_Verified
https://gerrit-review.googlesource.com/Documentation/access-control.html#examples_cisystem
https://groups.google.com/forum/#!topic/repo-discuss/FdN29piSmEQ

Tagged : /

What is Enable signed push support in Gerrit?

This options Defaults to false.

This ensure When a client pushes with git push –signed, this ensures that the push certificate is valid and signed with a valid public key stored in the refs/meta/gpg-keys branch of All-Users.

If true, server-side signed push validation is enabled.

Config in gerrit.config – receive.enableSignedPush

Tagged : / / / / /

Importannce of Canonical web url in Gerrit

The canonical web url must be set. Optional base URL for repositories available over the anonymous git protocol. For example, set this to git://mirror.example.com/base/ to have Gerrit display patch set download URLs in the UI. Gerrit automatically appends the project name onto the end of the URL.

By default unset, as the git daemon must be configured externally by the system administrator, and might not even be running on the same host as Gerrit.

Tagged : /

How to backup and restore Gerrit server?

How to backup and restore gerrit server?

There are 3 coponent which should be backed up in gerrit

  1. Repository – According to me best way to backup the repository is to setup a replication with other gerrit hosting tools using gerrit replication plugins. The steps can be find as below;
  2. Gerrit Database
    Depends on the database, you should take the database backup. It can be H2 or mysql….
  3. Gerrit Config
    Rysnc is the best tools to take the entire gerrit site backup.

How to replicate Gerrit repository using replication plugins?

Step 1- Setup Gerrit Server
http://www.devopsschool.com/tutorial/gerrit/gerrit-install-and-configuration.html

Step 2 – Create a Project in Gerrit

Step 3 – Setup a Developement Machine
git clone http://admin@35.154.81.167:8080/a/prj1 && (cd prj1 && curl -kLo `git rev-parse –git-dir`/hooks/commit-msg http://admin@35.154.81.167:8080/tools/hooks/commit-msg; chmod +x `git rev-parse –git-dir`/hooks/commit-msg)

Step 4: Sample Commits to be done
> touch file1.txt;git add .;git commit -m”adding first version”

Step 5: Sample push and submit it
> git push origin HEAD:refs/for/master

Step 6: create it $site_path/etc/replication.config

Content of the files is –
[remote “github”]
url = git@github.com:scmgalaxy/${name}.git

Within each URL value the magic placeholder `${name}` is replaced with the Gerrit project name.

Step 7: Generate a public/private key

> ssh-keygen -t rsa

Step 8: create a “config” under /root/.ssh

Host github.com
User git
IdentityFile /root/.ssh/id_rsa
StrictHostKeyChecking no
UserKnownHostsFile /dev/null

Step 9: Update the public key to github

Step 10: Create a repo in Github.com with same name.

Tagged : / / /

How Gerrit Works?

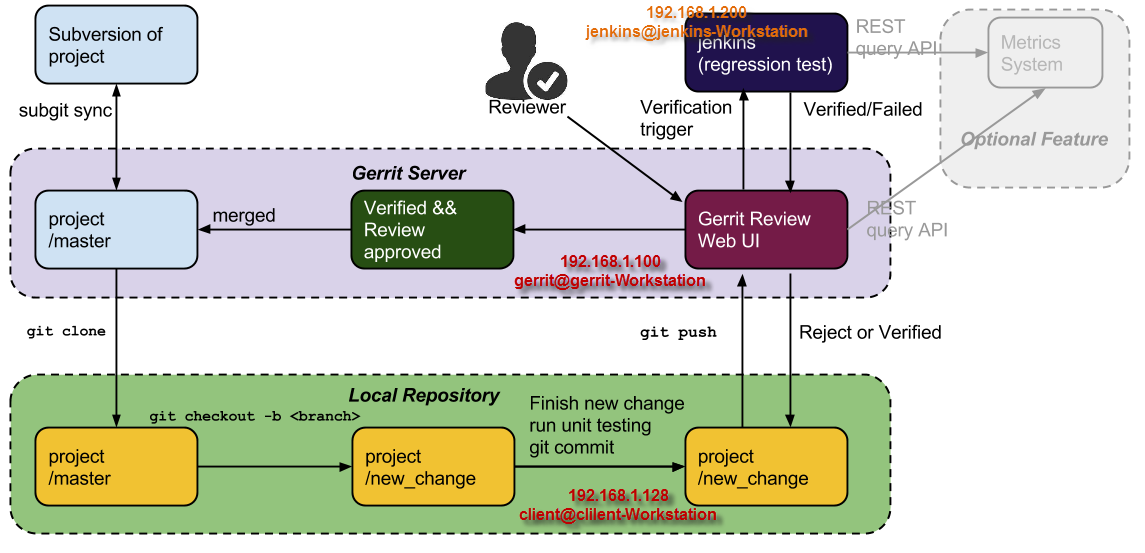
When Gerrit is configured as the central source repository, all code changes are sent to Pending Changes for others to review and discuss. When enough reviewers have approved a code change, you can submit the change to the code base.

In addition to the store of Pending Changes, Gerrit captures notes and comments made about each change. This enables you to review changes at your convenience or when a conversation about a change can’t happen in person. In addition, notes and comments provide a history of each change (what was changed and why and who reviewed the change).

Gerrit project is a workspace consisting of the following elements:

  • Git repository: It is used to store the merged code base and the changes under review that have not being merged yet. Gerrit has the limitation of a single repository per project. There can also be projects without any code repository associated at all (that is, Security-only projects)
  • Changes references under review: Git commit-id (expressed as SHA-1 Hexadecimal alphanumeric string) stored in the Gerrit DB and pointing to the corresponding changes stored in the Git repository. A Gerrit change is a Git commit object uploaded for review and associated to its comments and scores. It is stored in the project’s Git repository but it is not visible/accessible from the normal Git graph of commits, even it does start from a point on the commits graph.
  • Access Control Lists (ACLs): It contains the list of roles defined for the Gerrit project and the associated access permissions to the Git repository branches.
  • Prolog rules: It is the set of rules that govern the Code Review process for the project. 0 Additional metadata: All the extra settings such as description, merge strategy, contributor agreements, and accessory metadata needed in order to manage the project.

We have to make and review a change through these stages in Gerrit:

  1. Making the change.
  2. Creating the review.
  3. Reviewing the change.
  4. Reworking the change.
  5. Verifying the change.
  6. Submitting the change.

Tagged : /