CRUD through AJAX using Laravel framework

Step 1 : create project folder through command line

composer create-project laravel/laravel AjaxCrud

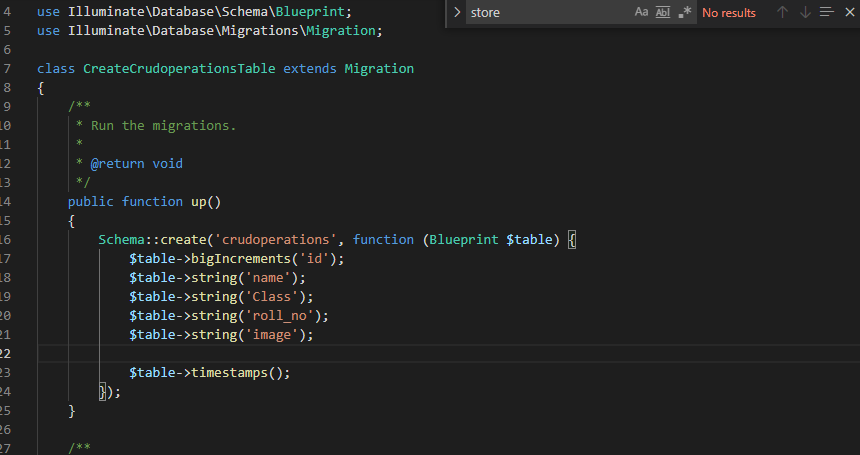
Step 2 : Create Post table and model

php artisan make:model Posts -m

under this :- database/migrations, you have to put bellow code in your migration file for create Posts table

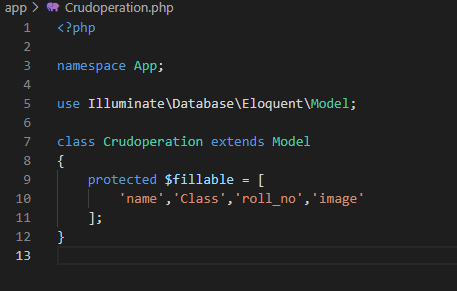
After create “Posts” table you should create post model for posts, so first create file in this path app/Post.php and put bellow content in post.php

Post model : app\post.php
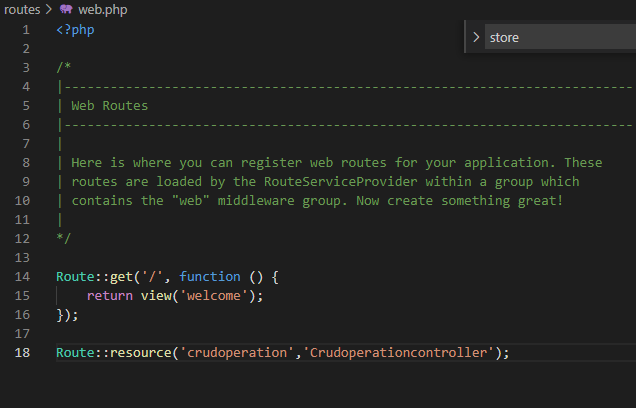
Step 3: Add Route  

Post route : routes\web.php

Step 4: Create a new Controllers 

Run this command to Create a new Controller

php artisan make:controller PostController

Controlllers : app\http\controllers\PostController

Step 5 : Create a new Blade File

View : resources\views\post\index.blade.php

Step 6: Create JS and CSS File

View : resources\views\layouts\app.blade.php

now in terminal write php artisan serve

Now open browser and paste the following link

http://127.0.0.1:8000/post

Basics jQuery Syntax to know

jQuery Hide/Show

With jQuery, you can hide and show HTML elements with the hide() and show() methods:

$(“#hide”).click(function(){ $(“p”).hide(); }); $(“#show”).click(function(){ $(“p”).show(); });

jQuery Fadein/Fadeout

With jQuery you can fade elements in and out of visibility.

$(“button”).click(function(){ $(“#div1”).fadeIn(); $(“#div2”).fadeIn(“slow”); $(“#div3”).fadeIn(3000); }); $(“button”).click(function(){ $(“#div1”).fadeOut(); $(“#div2”).fadeOut(“slow”); $(“#div3”).fadeOut(3000); });

jQuery Animation

for animate text or image etc.

$(“button”).click(function(){ $(“div”).animate({left: ‘250px’}); });

jQuery Chainning

Chaining allows us to run multiple jQuery methods (on the same element) within a single statement.

$(“#p1”).css(“color”, “red”) .slideUp(2000) .slideDown(2000);

jQuery add css

Add css through jQuery

$(“p”).css(“background-color”, “yellow”);

jQuery Event

To handle event

$(“p”).click(function(){ // action goes here!! });

jQuery Slide

The jQuery slide methods slide elements up and down.

$(“#flip”).click(function(){ $(“#panel”).slideDown(); });

jQuery Remove

To remove elements and content

$(“#div1”).remove();

jQuery Prop (For multiple properties and values:)

The jQuery prop() method is generally used to retrieve property values.

$(selector).prop({property:value, property:value,…})

jQuery Has Class

The jQuery hasClass() method is used to check whether selected elements have specified class name or not.

$(selector).hasClass(classname)

Script timeout passed, if you want to finish import, please resubmit the same file and import will resume.

If you are importing a Database using phpMyAdmin localhost then if this error occurred during the time of Import then follow the simple steps:-

  1. Open file explorer.
  2. open your XAMPP folder where XAMPP is installed (generally we install XAMPP in C:\ folder).
  3. In xampp folder find phpMyAdmin folder and open it.
  4. In phpMyAdmin folder find libraries folder and open it.
  5. In libraries folder find config.default file and open it with your notepad.
  6. And press the ctrl+F button to find $cfg[‘ExecTimeLimit’]

Change it to 0.

That’s all

Warning :- Before updating in config.default file please stop your appache and my sql and then make change in file otherwise local server may corrupt.

CRUD operation with the help of Laravel Framework.

Basic requirements:-

  • Steps for installing Laravel Framework
  1. Open Command Prompt and type
composer create-project --prefer-dist laravel/laravel project_name "5.8.*"

in place of project_name you can choose any name.

2. once Installed finished type

composer create -project laravel/laravel project_name “version_name.*”

3. Mysql Database connection

4. In first way you have to find .env file in your project folder. Open that file and under you have to define your mysql database configuration like below.

you can define your own database which you have created in PHP my Admin page.

5. Migrate Table from Laravel to Mysql Database through terminal

php artisan make:migration create_crud_table –create=crud

This command will create migration file in database/migrations folder. In this file we have to define table column which we want to create in table. Below you can find migration file in which we have define table column.

In Database / migration folder we make our schema.

6. Once schema is made we have to migrate our schema through terminal

php artisan migrate

7. Now we have to make our model, view and controller for that we run this command,

php artisan make:model Project_name -mcr

8. In app folder we find our model

Here we put our database table.

9. Setting Route

10. Set Data in View File in Laravel

In resource/view we make a new folder name parent.blade.php

11. In App/Http/Controller folder we code for function that we call during create, edit, delete operations

11. Now in resource/views we make 4 folder name 1. create.blade.php 2. edit.blade.php 3. view.blade.php 4. index.blade.php

For create.blade.php code

For edit.blade.php code

For view.blade.php code

For index.blade.php code

12. Now we run our local server for this we type

php artisan serve

now we run our project on browser.

Tagged :