A must things to do when we import new databases in any Laravel project.

Whenever we import the database we need to install the passport as it is not able to access the previous client secret. We need to change the new client secret after it is installed in the projects to all the locations required.

php artisan passport:install

For generating key we use the following command

php artisan key:generate

Then we need to run few commands for convenience so that we don’t get errors.

php artisan c:cache
php artisan r:cache
php artisan r:clear
php artisan config:clear
php artisan view:clear

If the error shows as Replicating claims as headers are deprecated and will remove from v4.0. Please manually set the header if you need it replicated. then run the following command

composer require lcobucci/jwt=3.3.3

We can also check for updating composer and for this we use command

php artisan composer:update

to link the storage we need to run following command

php artisan storage:link

We can also do for our convenience migrating the database, for this we use command

php artisan migrate 

For refreshing the migration table

php artisan migrate:refresh

Tagged : / / /

Data types in PHP (Array)

In this tutorial we will learn about Array data type in PHP, before that you can see all the data types in PHP given below:

  • String
  • Integer
  • Float
  • Boolean
  • Array
  • Object
  • Null

In PHP we have a special data type where we can assign number of values in single variable using array.

For example: $a = array(10,20,30);

In PHP, there are three types of arrays:

  • Indexed array
  • Associative array
  • Multidimensional array

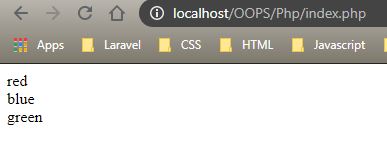
Indexed array:- PHP indexed array is an array which is represented by an index number by default. All elements of array are represented by an index number which starts from 0. PHP indexed array can store numbers, strings or any object. PHP indexed array is also known as numeric array.

Example:

Output:

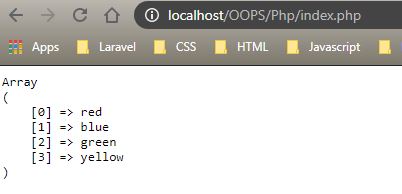
We can also use <pre> tag to print both the key and value in the output.

Output:

Another way to write the array in PHP which shows the same output as above:

Tagged : /

HOW TO CREATE API IN LARAVEL

1st step:- open command prompt and go to xampp\htdocs folder and write the code given below in command prompt to create the project

Composer create-project –prefer-dist laravel/laravel admin “5.5.*”

2nd step:-now go to the project folder and make auth. Code is given below

               php artisan make:auth

3rd step:- Now install the passport. Write the code given below in command prompt.

    Composer required laravel/passport

4th step:-open phpmyadmin and make a database.

5th step:- open .env file and configure the database.

6th step:- Now migrate the database. Write the code given below in the command prompt

     php artisan migrate

7th step:-Add the code given below in user model.

       use Laravel\Passport\HasApiTokens;

8th step:- Add the code given below in auth service proviser(C:\xampp\htdocs\ admin\Providers\AuthorServiceProvider.php)

      use Laravel\Passport\Passport;

9th step:- Now configure auth.php(C:\xampp\htdocs\admin\config\auth.php)

Change the driver and provider as given below in api:-

‘api’=>[

‘driver’=>’passport’,

‘provider’=>’users’

],

10th step:- Add the code given below in kernel.php. (C:\xampp\htdocs\ admin\app\Http\Kernal.php)

Protected $routeMiddleware=[

‘client’_credentials’=>\Laravel\Passport\Http\Middleware\CheckClientcredentials::class,

11th step:-Add the code given below in app.php(config\app.php)

/*

   *Application Service Providers…

  */

 //Passport Service provider

    Laravel\Passport\PassportServiceprovider::class,

];

12th step:- Write the code given below in command prompt.

              php artisan passport:install

      Encryption keys generated successfully.

Tagged : / /

CRUD OPERATIONS IN LARAVEL PHP FRAMEWORK

Crud is simply the basis of any web/app development features. All we have to do on any web page is Creating, Reading, Deleting, or Updating the content and that is known as the acronym CRUD. In this blog, we learn about how we perform CRUD operation in Laravel 5.8(PHP framework).

Step 0: Prerequisite

  • Install xampp a PHP development environment. (Version 7.4 best suited for 5.8 Laravel)
  • Install composer(to install libraries of Php for any application).
  • Install VS code(Code-editor).

Step 1 : Download/install Laravel 5.8

Go to command prompt and then go to the xampp folder in C drive by cmd. [C:\xampp\htdocs\]

In cmd Run :

composer create-project laravel/laravel=5.8 crud --prefer-dist

It will install laravel 5.8 in your xampp/htdocs folder, and the folder name in which the Laravel is installed is “crud”(You can change this name of the folder while writing the command in cmd).

Step 2 : Create the Database

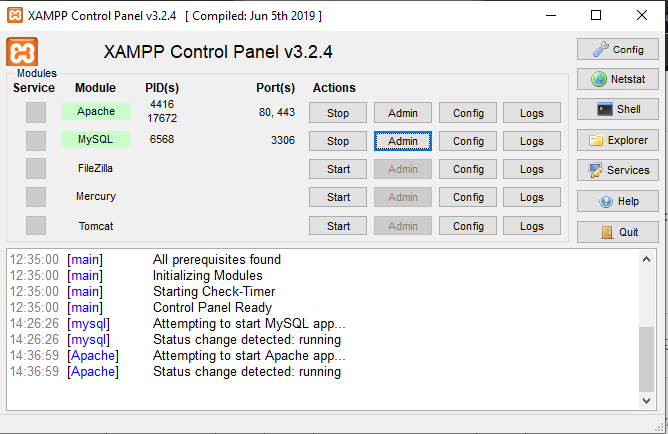
For the connection of the database first we have to run “xampp control pannel”.

Then in action tag start the Apache and MySQL.

and then click on Admin of MySQl. It will redirect to http://localhost/phpmyadmin.

  • Go to the database.
  • Give the name of the database and click create.

Step 3: Connection to the database.

In the .env file of the Laravel folder(named crud in this blog) open it with VS Code. Change your code to this.

DB_CONNECTION=mysql
DB_HOST=127.0.0.1
DB_PORT=3306
DB_DATABASE=gurukul
DB_USERNAME=root
DB_PASSWORD=

where database name should be the same as you created in step2. and change DB_USERNAME to root.

Step 4 : Migration of the table(From Laravel to MySQL Database)

We can make table in MySQL using the Laravel. For this we have to run this following command in cmd.

php artisan make:migration create_crud_table –-create=crud

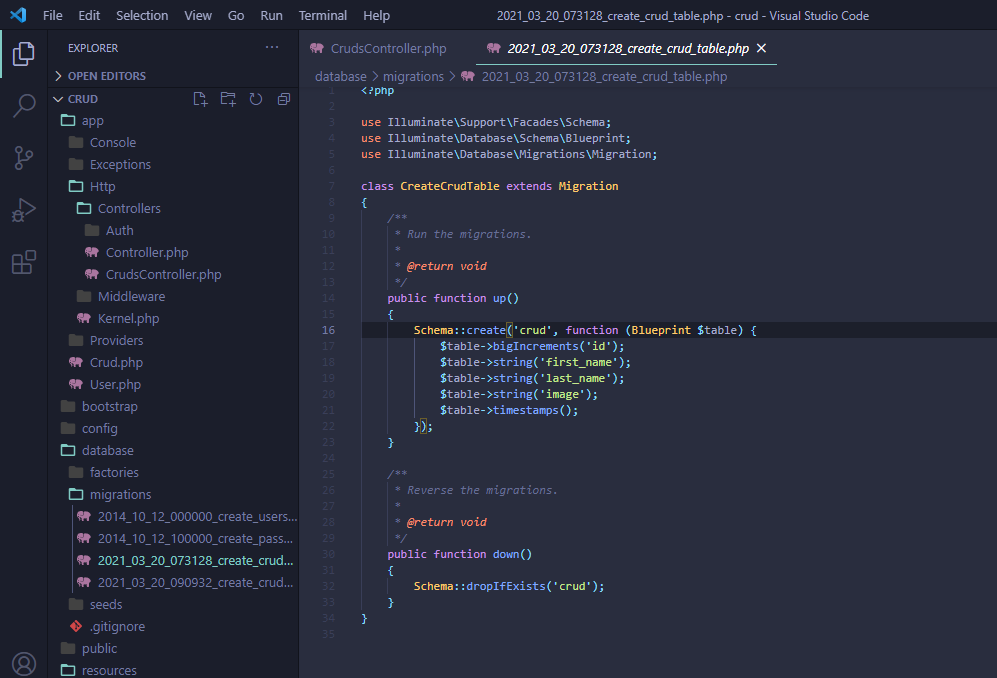
You can use any name of your table instead of create_crud_table. The above command is going to create a migration(PHP file by the name of the table) file in the database/migration folder.

Edit the code and paste this :

update the function up()

Now in the command prompt use the following command :

php artisan migrate

Step 5: Create a Model File in Laravel

php artisan make:model Crud -m

In cmd, use this command to create the model file(You can use any name instead of Crud while making other projects)

It will add a Crud.php file in the app folder and in this file in a variable define the table column.

<?php

namespace App;

use Illuminate\Database\Eloquent\Model;

class Crud extends Model
{
    //
    protected $fillable = [
            'first_name', 'last_name', 'image'
        ];
}

Step 6 : Creating the controller

Controller is used to handling the http request. They are stored in app/http/Controllers directory.

We have to create the controller using the command line:

php artisan make:model Crud -m
Note : For making CrudController file in controllers
php artisan make:controller CrudsController

Step 7 : Setting the Route

Setting the route of all the CrudController class method in route/web.php

Route::get('/', function () {
    return view('welcome');
});

Route::resource('crud', 'CrudController');

This is very important method.

Tagged : / /

CRUD Operation Using Laravel

CRUD is an short form for Create, Read, Update, and Delete. Using this operation users can easily manipulate the data.

To preform CRUD operation we have to preform certain steps :

Step 1 : Make a new Project .

To create a new project, run the following code in Git Bash in C:/xamp/htdocs Folder:

composer create-project –prefer-dist laravel/laravel project_name “version_name.*”

Eg: composer create-project –prefer-dist laravel/laravel Employees “5.8.*”

It will automatically install all the necessary file and folder for you.

Step 2 : Create a Database in SQL

Run Xamp Controller and start Apache and MySQL.

Search localhost/phpmyadmin in your browser

Create a new database using MySQL by simply click in New button and give your database a unique name.

Step 3 : Modify the Database connection in .env File

Open the .env file and change database name and set username to “root”.

DB_CONNECTION=mysql

DB_HOST=127.0.0.1

DB_PORT=3306

DB_DATABASE= your database name

DB_USERNAME=you username(Default: root)

DB_PASSWORD=

Step 4: Link the project with database

To link database run the following command on Command Promt/Git Bash/Vs Code Terminal:

php artisan migrate

Step 5: Create Table in database

We are going to create crud application for product. so we have to create migration for “products” table using Laravel 5.8 php artisan command

php artisan make:migration create_products_table –create=products

Step 6: Migration

Step 7: Create Blade File

Go to Project_name/resources/views and create the following file:

i . parent.blade.php

ii. create.blade.php

iii. view.blade.php

iv. edit.blade.php

v. index.blade.php

Step 9 : Set Route

Go to Project_name/route/web.php add the following code to change the route to universal route

We can easily change the route by changing the route name.

CRUD OPRATION USING AJAX

  • Read data from a web server – after a web page has loaded
  • Update a web page without reloading the page
  • Send data to a web server – in the background

step 1: install composer
goto terminal and write over here
-> composer install

Step 2: Create .evn file

goto terminal and type

->php .env.example .env

Step 3: To migration

php artisan migrate file_name

Step 4: All source file

i. .evn file

ii. Model file

iii. Migration file

iv. Controller file

v. View file

vi. posts file

vii. Routes file

Step 5: Artisan serve

php artisan serve

Basics jQuery Syntax to know

jQuery Hide/Show

With jQuery, you can hide and show HTML elements with the hide() and show() methods:

$(“#hide”).click(function(){ $(“p”).hide(); }); $(“#show”).click(function(){ $(“p”).show(); });

jQuery Fadein/Fadeout

With jQuery you can fade elements in and out of visibility.

$(“button”).click(function(){ $(“#div1”).fadeIn(); $(“#div2”).fadeIn(“slow”); $(“#div3”).fadeIn(3000); }); $(“button”).click(function(){ $(“#div1”).fadeOut(); $(“#div2”).fadeOut(“slow”); $(“#div3”).fadeOut(3000); });

jQuery Animation

for animate text or image etc.

$(“button”).click(function(){ $(“div”).animate({left: ‘250px’}); });

jQuery Chainning

Chaining allows us to run multiple jQuery methods (on the same element) within a single statement.

$(“#p1”).css(“color”, “red”) .slideUp(2000) .slideDown(2000);

jQuery add css

Add css through jQuery

$(“p”).css(“background-color”, “yellow”);

jQuery Event

To handle event

$(“p”).click(function(){ // action goes here!! });

jQuery Slide

The jQuery slide methods slide elements up and down.

$(“#flip”).click(function(){ $(“#panel”).slideDown(); });

jQuery Remove

To remove elements and content

$(“#div1”).remove();

jQuery Prop (For multiple properties and values:)

The jQuery prop() method is generally used to retrieve property values.

$(selector).prop({property:value, property:value,…})

jQuery Has Class

The jQuery hasClass() method is used to check whether selected elements have specified class name or not.

$(selector).hasClass(classname)