How to set up a Jira cloud instance?

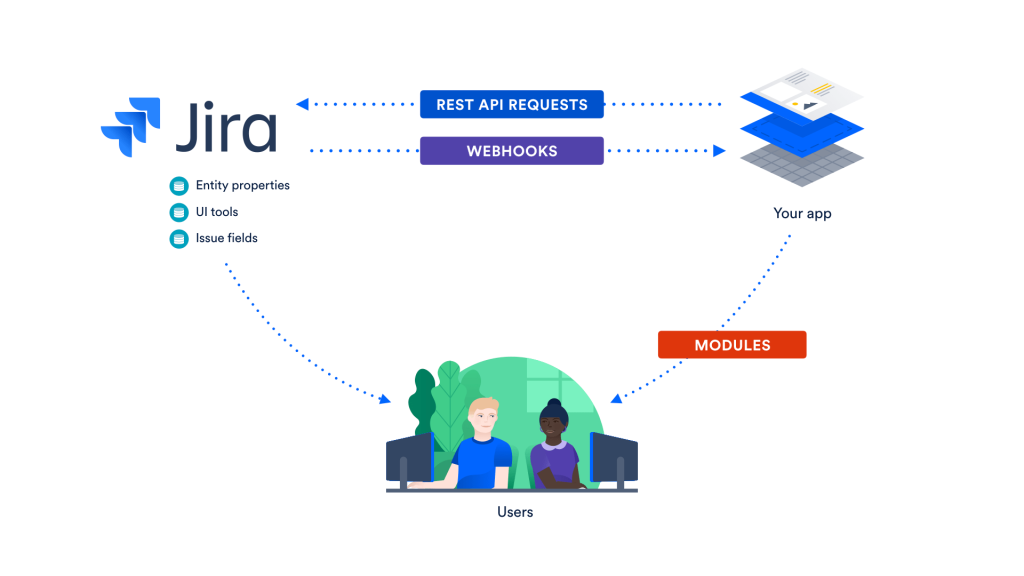
Hi dears, welcome to the course study of Jira. Today, through this article, I will explain to you how you will set up a Jira instance so that you can start to use Jira software for your projects. I have miscellaneous agenda for you. On which topics you will learn is types of Jira instance, what is the difference between server and Cloud instance? And how to create a cloud instance of Jira? So, let’s move forward to learn more about Jira concepts

Jira instance

Basically, there are two types of Jira instances, the first one is cloud and the second one is server. I will tell you what is the difference between the cloud and server instances and which one you should use if you are a beginner to learn about the Jira software. So, let’s move forward to learn about the cloud and the server instances.

Cloud vs server instance

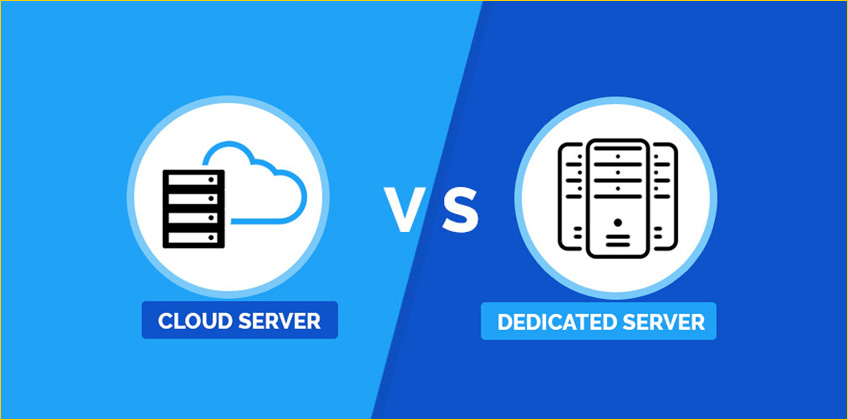
Here I will discuss the cloud instance first. So, what is a cloud instance? In the cloud instance rather than installing and maintaining, your product on your own server Atlas Sian host and set up your Jira application on the cloud for you so, this is the cloud instance and according to me, this is the best instance for the beginner, who want to learn from the very beginning. It is very fast because it’s easy to set up and get started in minutes as soon as you sign up. You may start working and inviting the team members and the second one is reduced costs because it helps to save money on the physical hardware maintenance installation support and any other hidden administration cost as well. This is a cloud instance so, everything is on the cloud and there is no need to bear the cost of your own hardware. The third one is no need to upgrade because on the cloud you get immediate access to the latest version on Jira so, there is no need to upgrade the cloud instance. The fourth one is security, it is very secure because atlas Sian takes the responsibility to maintain the security and compliances of your data and organization so, I describe the benefits of the cloud instances but I want to tell you one more thing about you don’t have direct access to change the database structure, file system, or other server infrastructure because you have a cloud instance and atlas Sian already set up your cloud instance. So, they will not give you administrator access. Let’s learn more about the server instance. What is a server instance? In the server instance, basically, you install, host, and run the Atlas Sian’s product on your own hosting environment. So, basically, those teams will prefer that want to manage all the details on their own and are able to handle the complexity of setting up and hosting the product on their own server. So, if your organization is very big and you have a department of administrators. They can manage the administrator task of the Jira or the server so, you can go with the server version but you are working in a startup and you want to learn your own then go with a cloud one.

In this complete course, I will also use the cloud instance because as I already told you, it is very easy to set up and everyone can access it from anywhere but in the server instance may be the organization installed it on the internal environment so, you would not be able to access it from outside the organization but in the cloud instance, you may access anywhere as I told you I will explain the cloud version in this course so may be the people who are using the server one they will see some differences in the UI because the cloud and the server UI is different in the server we have the navigation on the top but in the cloud we have the navigation in the left hand side and many more other differences in the UI so as I told you the difference between the cloud and the server instances so let’s move forward and see how can you create the cloud instance of Jira so for creating the cloud instance of JIRA so, you will go to the atlas Sian website, there is an atlas Sian official website www.atlassian.com once you will click on the product tab then you can see the complete list of the atlas Sian the product but there you will go with the Jira software so, you will click on Jira software.  It will take you on that page you may try it free then you can see the three plans and there will be cloud one. You may see try the product in the cloud and that is a free 7 days trail period you can go with any of the packages so, you will go there with any of the packages and you will go there with that one so, you will click on try it free, you will say that is a 7 day free cloud trial and it will give you the full access to all features, you can add the unlimited users and access to sales and technical support so, you will create the account there so you will use your ID and you will click on agree and sign up once you will end with the sign up process then you will see the screen where they will ask you to check your inbox and confirm your email ID so, you will go to your email so to verify that email you will click yes verify and it will redirect to you to the page if you want to select what type of team with do you work in then you can but for that you will skip and see the URL there that is a JIRA all sort of gentle that you have mentioned at the time of creating the account and you can invite your team with the help of the email address if you will enter the email address there and send the invitation then the people will get the email will get the invite and they can accept and use this environment and that JIRA instance for now you will skip that  and there they will ask are you new to Jira or are you already experienced with Jira then you can find out for now. That will be the next page where you can see there are the two types of templates are available first one is the classic template and the second one is a next-generation template. You can see there the Kanban is scrum and the bug tracking three templates are available and these three templates come under the software category so if you will go and will select all types you can see there are many more templates are available which are related to business. In this course, that’s it for today this is a process where you can create the cloud instance.

Related video:


Tagged : / / / / / / / / /

How to Resolve Windows Installer Problem

Installation of a program means inserting that particular program in your computer so that it can be executed properly. Some of the software programs can be simply copied to the computer and executed without doing anything further; they don’t require any kind of installation process. Many programs come with an executable suite, which requires to be installed. Installation is the process where you will have to unpack some files, copy them to desired locations, tailor the software to suite your hardware and give the desired information to the operating system.

Installation often means that once a program is installed, the user can run the program over and over again, without reinstalling it again before using each time. Until one does not uninstall the program or the program does not allow further execution, you will have to install it again. However, sometimes one can encounter problems while installing a program. Here are some simple steps that will help you in resolving windows installer problems:

teps:

  • First thing to do for resolving windows installer problem is identifying it. When you are trying to install or uninstall something, you might get a warning message like:

“The windows installer cannot be accessed”

“Windows installer service cannot be started”

“Could not start the windows installer service on Local computer. Error 5:

access is denied.”

  • These error messages will often appear on the screen when the installation of the MSI package has failed or when the windows installer service is disabled.
  • Method 1: first unregister windows installer, and then you will have to register it again. For resolving windows installer problems of such a nature, just do the following things. Go on the ’start’ menu and click on the ‘run’ option. In the dialog box start typing ‘msiexec/unreg’, and then press the enter key.
  • Go on the ’start’ menu again and click on the ‘run’ option. In the dialog box start typing, ‘msiexec/regserver’ and then press the ‘enter’ key.
  • Method 2: you can upgrade the windows installer to a higher version or a newer version. For this, open the internet explorer page, and go to the Microsoft website. Go to the link, http://msdn.microsoft.com/downloads. On the left side you will get an option of ’setup and system administration’ and now click on the ’setup’ option.
  • Select the ‘windows installer’, and then choose the appropriate link for your operating system. Now click on the ‘download’ option and install the new version or install the higher version of windows installer.
  • Method 3: for resolving windows installer problem, you might have to uninstall the failed product with the help of an installer cleanup. The description for the windows installer cleanup utility is, http://support.microsoft.com/default.aspx?scid=kb;en-us;290301
  • Method 4: if the windows service is disabled on your computer, then go to the ’start’ menu, select ‘run’ option and type ’services.msc’ and click enter. Now, double click on the option of windows installer.
  • Method 5: check the DCOM and the permission by the system through http://support.microsoft.com/?id=319624
  • Method 6: another thing you can do for resolving windows installer problem is
Tagged : / / / / / / /

Perforce Basic commands with the installation in linux

bhavadeepscm created the topic: Perforce Basic commands with the installation in linux
Hi i am new to perforce and i would like to know the work flow of perforce.

i am able to install perforce in linux and as well as windows.

but i need to know how to install client in linux and server in windows.
i have already installed the client and server in linux. now how to create client in windows and how to bridge to linux?

Tagged :

What is Wise Installation Express 7?

created the topic: What is Wise Installation Express 7?
Hi,

Could you tell me what is Wise Installation Express 7 and what are extra features available in from other Wise Installaer and Studio version?

Regards,
Rajesh

Tagged :

QSetup Installation Suite introduction

msiexpert created the topic: QSetup Installation Suite introduction
64-Bit Support
QSetup 10 is compatible with the following 64-bit operating systems: XP-64, Vista-64, Win7-64. Using QSetup 10 you can create setups that will install 32-bit applications as well as 64-bit application.

Windows 7™ Ready!
Microsoft will soon release the official version of Windows 7! Using QSetup 10 you can already build your installations to be compatible with Windows 7, you have no time to lose. QSetup is Windows 7™ Ready!

MSI
Starting from version 9.0, QSetup can create MSI setup files as well as traditional self-extract EXE setup files. In fact the same setup definition can be used to compile both type of files MSI & EXE.

It’s so easy and yet so powerful…
QSetup from Pantaray Research makes project packaging a fast and easy experience. Use our “intuitive” menus to easily handle your most challenging installation tasks. Set up sophisticated, condition-based actions and instantly test from within the Composer.

Execution Engine
The Execute Engine will let you perform a wide range of operations in a simple and intuitive way. Other installers like “InstallShield” or “Wise Install” implement such operations using very complex and time consuming scripting language. The operations of the “Execution Engine” can be UnConditional Conditional and in a While loop.

Auto-update
QSetup is unique in its ability to create setups that will AUTO-UPDATE from the Internet – when a new version of the program is available. You can also just AUTO-INFORM your users of the availability of a new version, and prompt them to update using regular browsing techniques. Adding Auto-Update or Auto-Inform to your setup is very easy. The whole procedure can be completed just by using QSetup intuitive menus. No need to add any line of code to your program.

Custom Dialogs
QSetup PRO includes a special Custom Dialogs Designer tool. Using this user friendly tool you can easily create new dialogs that will suit your evolving setup needs. Each Dialog will contain as many controls as needed from an assortment of the 11 most popular controls available under Windows. Once a new custom dialog is ready use the “Execution Engine” to interact with the dialog at setup time.

Language support
QSetup includes the most comprehensive infrastructure for Multilingual installation support. You can easily create true Multilingual setup with several license & readme files in all the languages you choose. The actual setup language will be selected either automatically (by reading the LOCALE from the OS) or manually by the end user. All text can be fully localized. Currently more then 30 languages are supported, and you can easily add your own language if your favorite one is missing.

Tokenized Serial Numbers
The idea behind Tokenized Serial Numbers is to provide every one of your customers with a UNIQUE serial number which is based on a secret Token provided by you, and a “User Name” and/or “Company Name” provided by the customer. Use the “Tokenized Serial Numbers” feature to greatly reduce software piracy and increase revenues.

Tagged :

Why do I have to restart my Macintosh at the end of the Iceberg Installation?

msiexpert created the topic: Why do I have to restart my Macintosh at the end of the Iceberg Installation?
Why do I have to restart my Macintosh at the end of the Iceberg Installation?

applicationPackaging replied the topic: Re: Why do I have to restart my Macintosh at the end of the Iceberg Installation
The restart is necessary because Iceberg is using a daemon which is running in the bootstrap context. This avoids to have to enter an admin password every time you want to build a project. This also allows building multiple projects at the same time.

Tagged :

what is MSI Script and its Installation Modes?

applicationPackaging created the topic: what is MSI Script and its Installation Modes?
MSI Script contains 3 installation modes:

1. Normal Installation:
Select this installation mode to edit the sequences that are run during a normal installation. This is the most common type of installation.

If the application is not already installed when an end user double-clicks the installation .MSI, the standard installation wizard appears (Install Dialogs), which installs the product. If the application is already installed when an end user double-clicks the installation .MSI or if the end user selects it from the Add/Remove control panel, the installation runs in maintenance mode (Maintenance Dialogs), which provides options to modify, repair, or uninstall an application.

2. Administrative Installation:
Select this installation mode to edit the sequences that are run during an administrative installation.
An administrative installation copies a source image of the application to a network; the source image resembles the directory structure of the installed application. End users who have access to the administrative installation can then install the application from the network location.
To run an administrative installation, use the command line option /a. (Example: msiexec /a “C:\path\Sample.msi”.) An administrative installation uses the Admin Dialogs.

3. Advertisement Installation
Select this installation mode to edit the sequences that are run during an advertisement

Tagged :

Guidelines for Nested Installation Custom Actions

applicationPackaging created the topic: Guidelines for Nested Installation Custom Actions
What is Nested Installation
The Process of calling another installation from within the running installation with an Install MSI custom action is called Nested Installation Custom Actions. Use this type of custom action to deploy or uninstall one product from within the installation of another product.
// See Nested Installation Actions in the Windows Installer SDK Help.

Limitations
Nested installations are supported according to the Windows Installer specification. Developers should note the following warnings when authoring nested installations.
• Nested installations cannot share components.
• An administrative installation cannot also contain a nested installation.
• Patching and upgrading may not work with nested installations.
• The installer may not properly cost a nested installation.
• Integrated ProgressBars cannot be used with nested installations.
• Resources that are to be advertised cannot be installed by the nested installation.
• A package that performs a nested installation of an application should also uninstall the nested application when the parent product is uninstalled.

Usage
According to the Windows Installer SDK, Install MSI custom actions should be placed between InstallInitialize and InstallFinalize of the main installation’s action sequence. Install MSI custom actions must be set to run synchronously.
Example: Suppose your main installation, Main.MSI, has a button on a dialog that, if clicked, installs Second.MSI. You can use an Install MSI custom action to run the second .MSI. Then you can use another Install MSI custom action to provide for uninstallation if the main installation is uninstalled.
To specify the circumstances in which a nested .MSI is called, set conditional If Statements around the Install MSI custom action in the sequence. See Guidelines for Custom Action Conditions.
Guidelines for Custom Action Conditions
Place a custom action between conditional If Statements to run it only if a certain condition is true. A condition can check whether the product is installed, the value of a property is true, if specific system requirements are met, and more.
To Run Only During Initial Installation
The Execute sequences under the Normal Installation mode run during initial installation and later during maintenance and uninstall installations. To run a custom action during the initial installation only, set its condition to NOT Installed. Installed is a Windows Installer property that is true if the product is installed.

Example: If you add a custom action that opens a Readme file and set the action’s condition to NOT Installed, then the Readme opens during initial installation, but does not open during maintenance installations (reinstall, modify, and repair operations).
To Run Only During Uninstall
If the product is being uninstalled, the REMOVE property is set to All or ALL. To run a custom action during uninstall only, set its condition to REMOVE~=”ALL”. (The ~ causes the comparison to be case-insensitive.)

Un-installation
Getting a nested installation to install is straightforward, but getting it to uninstall properly when the calling application is uninstalled requires that you add 2 custom actions. Set the first custom action to call the nested installation, and set its condition to NOT Installed (Custom Action Location dialog). Set the second custom action to call the nested installation also, set its Property Settings field to REMOVE=ALL (Custom Action Target dialog), and set its condition to REMOVE~=”All”.

Access Nested Installation
With this type of custom action, you can call only Windows Installer installations. To call an installation that was created with a WiseScript product, use a Run WiseScript custom action. To call an installation that was created with any other installation technology, use an Execute Program custom action type.
A nested installation file can be accessed from the following locations:
l It can be stored within the main installation file. See Install MSI From Installation.
l It can be distributed along with the main installation file. See Install MSI From Relative Path.
l It can be an installed or advertised application that already exists on the destination computer. See Install MSI From Destination.
The return values for nested installation actions are the same as for other custom actions. See Custom Action Return Values in the Windows Installer SDK Help.

Guidelines for Using Custom Actions

When you use Windows Installer to install a file, it takes care of the repair and management of the file. When you use a custom action to change an installation, you take Windows Installer out of the loop. (Example: If you use a custom action to install a file, you must also include custom actions to repair or uninstall the file because Windows Installer is unaware of the file.) Therefore, use custom actions conservatively when making permanent changes on the destination computer, and use them only for actions that cannot be accomplished through Windows Installer. See Uninstalling Changes Made by a WiseScript.

Caution

Although you can change the order and conditions for standard actions and dialogs, we recommend that you do not change these settings unless you are proficient in the Windows Installer development environment. Many actions have restrictions that determine where they must appear in the sequence. See Actions with Sequencing Restrictions in the Windows Installer SDK Help for more details.

Custom Action Return Values

If the msidbCustomActionTypeContinue return processing option is not set, the custom action must return an integer status code as shown in the following table.

Return value Description
ERROR_FUNCTION_NOT_CALLED Action not executed.
ERROR_SUCCESS Completed actions successfully.
ERROR_INSTALL_USEREXIT User terminated prematurely.
ERROR_INSTALL_FAILURE Unrecoverable error occurred.
ERROR_NO_MORE_ITEMS Skip remaining actions, not an error.

Note that custom actions that are executable files must return a value of 0 for success. The installer interprets any other return value as failure. To ignore return values, set the msidbCustomActionTypeContinue bit flag in the Type field of the CustomAction table.

Tagged :

Windows XP SP3 installation question…

deployexpert created the topic: Windows XP SP3 installation question…
I need help in suppressing CANCEL button during Windows XP SP3 install.

I’m using /quiet /norestart switches along with the SP3 EXE. Are there any other switches to remove/suppress CANCEL button during the install?
Any help is greatly appreciated.

applicationPackaging replied the topic: Re: Windows XP SP3 installation question…
Right now i’m packaging Windows XP SP3 for our SP2 environment and i used AutoIT script to do the job.

Use /passive /nobackup /norestart /log swicthes as

/passive will install with a progress bar
/nobackup will remove the backup for uninstall
/log will create a log file

Try the following AutoIT script:

;===================================================================================================
;Hides the AutoIT icon
Opt(“TrayIconHide”,1)

; 1st section gives the user a warning that the sevice pack install will start
$PID=SplashTextOn(“Windows XP SP3 Installation”, “Installing Microsoft Windows XP Service Pack 3. The installation can take 30 minutes. Please wait until the completion message appears.”, 450, 85, -1, -1, 4, “10”)
Sleep(20000)
SplashOff()
ProcessWaitClose($PID)

;RUN WINDOWS XP SP3 IN PASSIVE MODE WITH NO RESTART, NO BACKUP AND A LOG FILE
Run ( “WindowsXP-KB936929-SP3-x86-ENU.exe /passive /norestart /nobackup /log:c:\WindowsXP-KB936929-SP3-x86-ENU.log” )

; WAIT UNTILL SP3 WINDOW IS ACTIVE
WinWaitActive(“Software Update Installation Wizard”, “”)

; SET SP3 WINDOW ACTIVE IF IT DOESN’T HAVE FOCUS
If Not WinActive(“Software Update Installation Wizard”,””) Then WinActivate(“Software Update Installation Wizard”,””)

; HIDE BACK BUTTON
ControlHide ( “Software Update Installation Wizard”, “”, 12323 )

; HIDE FINISH BUTTON
ControlHide ( “Software Update Installation Wizard”, “”, 12325 )

;CHANGE FOCUS TO HELP BUTTON
ControlFocus(“Software Update Installation Wizard”, “”, 9)

; HIDE CANCEL BUTTON
ControlHide ( “Software Update Installation Wizard”, “”, 2 )

; WAIT UNTILL SP3 WINDOW IS ACTIVE
WinWaitActive(“Software Update Installation Wizard”, “”)
Send(“{TAB}”)

;HIDE HELP BUTTON
ControlHide ( “Software Update Installation Wizard”, “”, 9 )

;===================================================================================================

You can actually change the script according to your requirement and it is easy to use.

Let me know if you need anything.

deployexpert replied the topic: Re: Windows XP SP3 installation question…
I will definitely give it a try.

I’m aware of AutoIT but never created a script. Let me create an EXE with the above code and install.

Thanks you very much for your solution. I really appreciate it.

deployexpert replied the topic: Re: Windows XP SP3 installation question…
You still can prevent

You still can prevent shutdown. The following AutoIT code works for Windows XP provided you are using required silent switches:

#NoTrayIcon

$WM_QUERYENDSESSION = 0x0011
GUIRegisterMsg($WM_QUERYENDSESSION, “Cancel_Shutdown”)

GUICreate(“PreventShutdownGUI”)
GUISetSTate(@SW_HIDE)

While 1
sleep(10)
WEnd

Func Cancel_Shutdown($hWndGUI, $MsgID, $WParam, $LParam)
Return False
EndFunc

I installed Symantec Endpoint Protection managed client on 250 PCs this way:

#NoTrayIcon

; Exit the script after 30 minutes
AdlibEnable( “Shutdown_Machine”, 1800000)

$WM_QUERYENDSESSION = 0x0011
GUIRegisterMsg($WM_QUERYENDSESSION, “Cancel_Shutdown”)

GUICreate(“PreventShutdownGUI”)
GUISetSTate(@SW_HIDE)

MsgBox (0, “Symantec Endpoint”, “Symantec Endpoint Protection Will be Installed Now” & @CRLF & “Please DO NOT SHUTDOWN This Machine” & @CRLF “Machine Will Restart When Setup is Finished”, 10)
RunAs(“Administrator”, “Domain_Name”, “Password”, 4, “\\Server_Name\Shared_Folder_Name\Setup.exe”)

While 1
sleep(10)
WEnd

Func Cancel_Shutdown($hWndGUI, $MsgID, $WParam, $LParam)
Return False
EndFunc

Func Shutdown_Machine()
Exit
EndFunc

It is worth noting that I changed setup.ini file under [Startup] section as follows:
CmdLine=/l*v “%TEMP%\SEP_INST.LOG”
To:
CmdLine=/q

I don’t need the log file, so that I removed [/l*v “%TEMP%\SEP_INST.LOG”] switch.

Tagged :

Installation should search for application in the system and abort installation

marksmith15 created the topic: installation should search for application in the system and abort installation
Hi, i am newbie.
I need some help.
when i install an application “AAA” it should look for an application “BBB”. if application “BBB” exists in the system. it should abort installation of “AAA” silently

thanks in advance
Mark

replied the topic: Re: installation should search for application in the system and abort installat
There are many ways you can achieve this… you can set action on pre install

1. Read if an any existing Registry Entry are there for BBB
2. Read if any services running for BBB
3. Read if any files are available for BBB.

if any of these are existing or any application specific info for BBB is availble, Abort the installation.

marksmith15 replied the topic: Re: installation should search for application in the system and abort installat
Hi, thanks for the repy,
in “system search” i created Property “FINDABC” and searched for a registry of app BBB.
What should be the condition to terminate the application?
thanks,
Mark

Tagged :