How to configure Sonatype Nexus repository with Maven?

configure-sonatype-nexus-repository-with-maven

How to configure Sonatype Nexus repository with Maven?


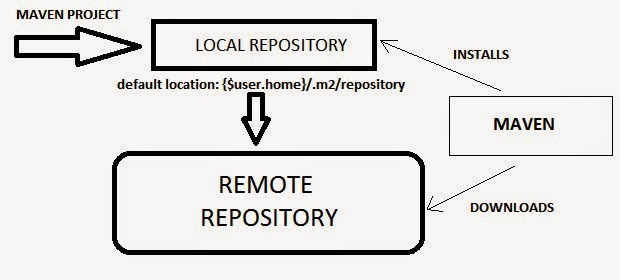
Automatic dependencies is one of the powerful feature of Apache maven and its one of the reason Maven is very popular in developer community. Maven resolve the dependent library from local repository which is again connected with central repository or remote repository. thus we can say that Maven has 3 kinds of repository concept.


1. Local repostory e.g $USER_HOME/.m2
2. Central repostory e.g http://repo.maven.apache.org/maven2/
3. Private repostory e.g Sonatype Nexus, Artifactory, Archiva etc.
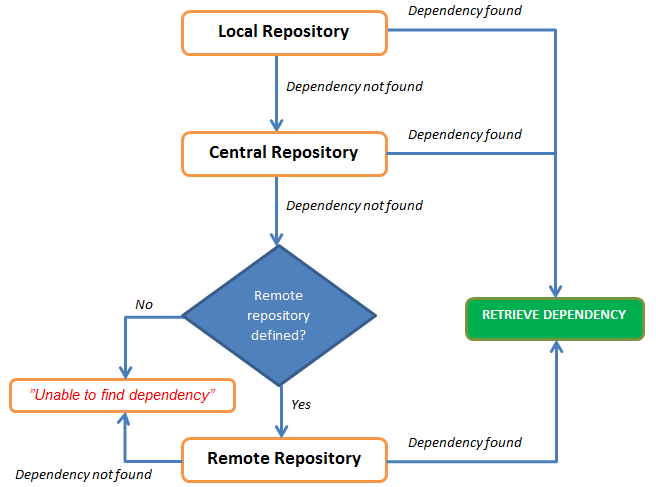
The diagram shown below represent how maven resolve the dependendency.

 
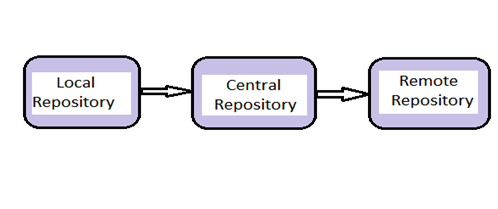
High Level Interaction between Local Repository, Central Repository and Remote Repository.


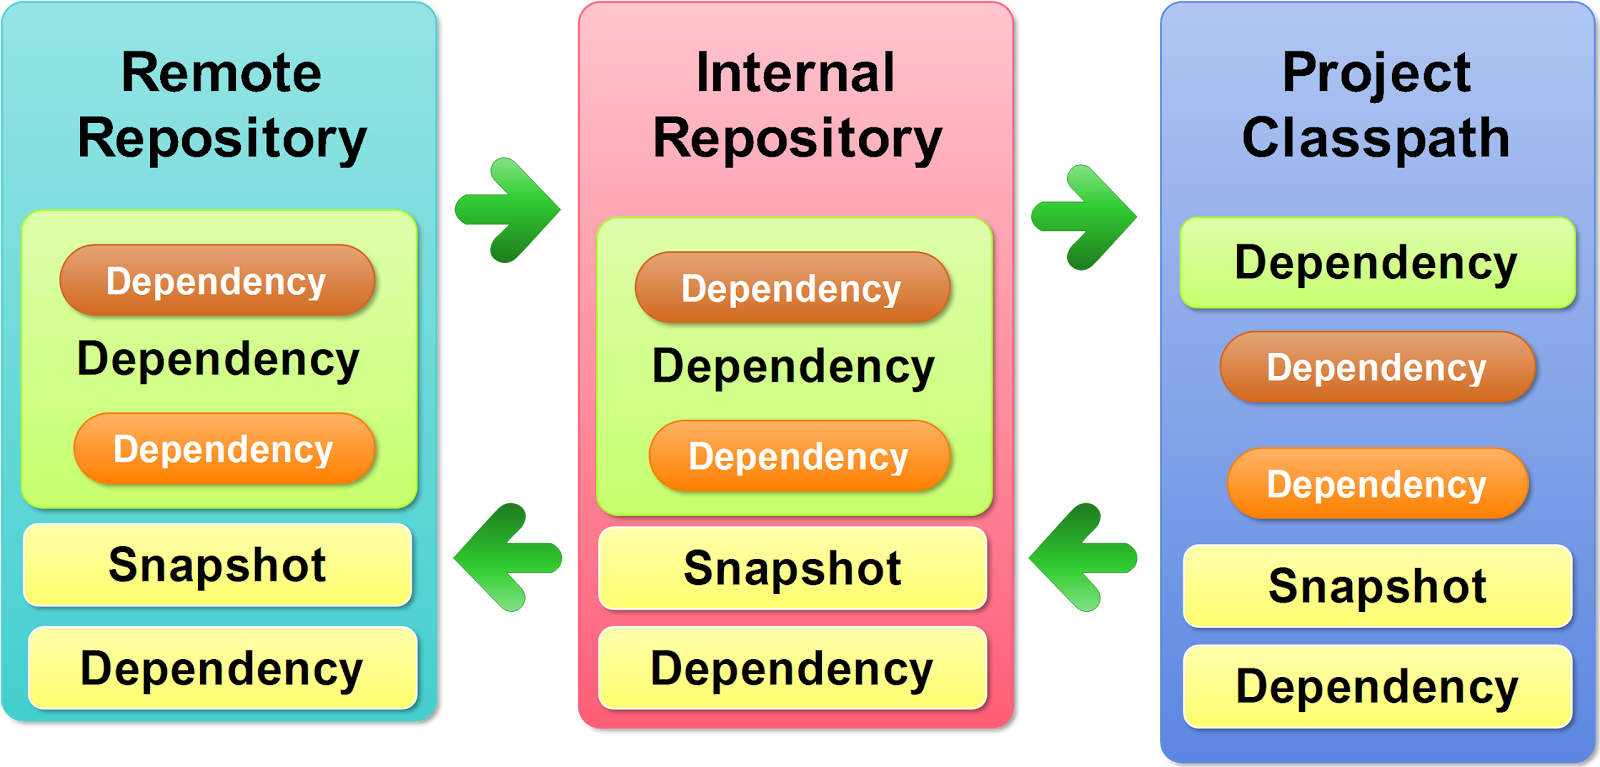
Dependency Management using Local Repository, Central Repository and Remote Repository.

This is How maven interact with Repository!


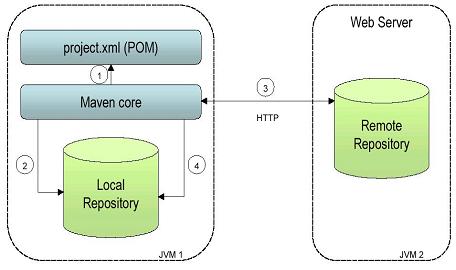
This is a diagram which shows the define flow in which maven try to resolve the dependency.


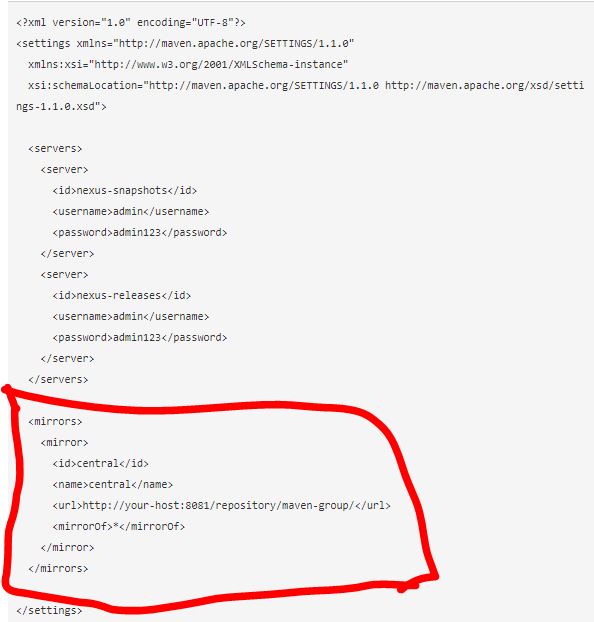
Now, We have understood that Central rrepository is in built but next questions is, How to inform the maven about the location of remote repository? In order to configure maven with remote repostory, in our case SonaType Nexus, we need to configuring host machine setting.xml and projects pom.xml to use your Nexus repos.


Put this in your ~/.m2/settings.xml file. This will configure the credentials to publish to your hosted repos, and will tell your mvn to use your repo as a mirror of central:

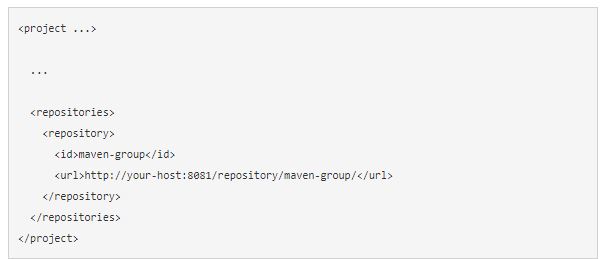
And now configure your projects.

If you want only to download dependencies from Nexus, put this in the pom.xml:

and

Add the following at the end of setting.xml

<activeProfiles>

    <!–make the profile active all the time –>

    <activeProfile>nexus</activeProfile>

  </activeProfiles>


Reference

https://maven.apache.org/guides/mini/guide-mirror-settings.html

Tagged : / / / / /

Sonatype Nexus installation using Docker

sonatype-nexus-installation-using-docker

Sonatype Nexus Repository Manager 2

Install a Docker Engine
Installation Instructions can be found here – http://www.devopsschool.com/tutorial/docker/docker-install-and-configuration.html

Download a Sonatype Nexus Image
> docker pull sonatype/nexus

For Sonatype Nexus Repository Manager 2 OSS, To run (if port 8081 is open on your host):
> docker run -d -p 8081:8081 –name nexus sonatype/nexus:oss

For Sonatype Nexus Repository Manager 2 PRO, To run (if port 8081 is open on your host):
> docker run -d -p 8081:8081 –name nexus sonatype/nexus:pro

To determine the port that the container is listening on:
> docker ps -l

To Test
> curl http://localhost:8081/nexus/service/local/status

Browse Following URL
http://localhost:8081/nexus/

It can take some time (2-3 minutes) for the service to launch in a new container. You can tail the log to determine once Nexus is ready:
> docker logs -f nexus

Note
Default credentials are: admin / admin123
Installation of Nexus is to /opt/sonatype/nexus
Notably: /opt/sonatype/nexus/conf/nexus.properties is the properties file.
Parameters (nexus-work and nexus-webapp-context-path) defined
here are overridden in the JVM invocation.

Sonatype Nexus Repository Manager 3

Install a Docker Engine
Installation Instructions can be found here – http://www.devopsschool.com/tutorial/docker/docker-install-and-configuration.html

Clone the Repostory from Gihub
> git clone https://github.com/sonatype/docker-nexus3
> cd docker-nexus3

Build a Image for Sonatype Nexus Repository Manager 3 OSS
> docker build –rm –tag sonatype/nexus oss/

Build a Image for Sonatype Nexus Repository Manager 3 PRO
> docker build –rm –tag sonatype/nexus:pro pro/

For Sonatype Nexus Repository Manager 2 OSS, To run (if port 8081 is open on your host):
> docker run -d -p 8081:8081 –name nexus sonatype/nexus:oss

For Sonatype Nexus Repository Manager 2 PRO, To run (if port 8081 is open on your host):
> docker run -d -p 8081:8081 –name nexus sonatype/nexus:pro

To determine the port that the container is listening on:
> docker ps -l

To Test
> curl http://localhost:8081/nexus/service/local/status

Browse Following URL
http://localhost:8081/nexus/

It can take some time (2-3 minutes) for the service to launch in a new container. You can tail the log to determine once Nexus is ready:
> docker logs -f nexus

Note
Default credentials are: admin / admin123
Installation of Nexus is to /opt/sonatype/nexus
Notably: /opt/sonatype/nexus/conf/nexus.properties is the properties file.
Parameters (nexus-work and nexus-webapp-context-path) defined
here are overridden in the JVM invocation.

Reference
https://hub.docker.com/r/sonatype/nexus/

Tagged : / / / / / / / / / / / /

How to upload the artifacts in Sonatype Nexus | Tutorial

 artifacts-in-sonatype-nexus
1. Upload Artifacts using NEXUS GUI
https://books.sonatype.com/nexus-book/reference/using-sect-uploading.html
2. Upload Artifacts using Maven pom.xml using “mvn deploy”
Update your pom.xml with following…
<distributionManagement>
  <repository>
  <id>deployment</id>
  <name>Internal Releases</name>
  <url>http://uvo1ppw4qmimuo3p1tg.vm.cld.sr:8081/nexus/content/repositories/releases/</url>
  </repository>
  <snapshotRepository>
<id>deployment</id>
<name>Internal Releases</name>
<url>http://uvo1ppw4qmimuo3p1tg.vm.cld.sr:8081/nexus/content/repositories/snapshots/</url>
</snapshotRepository>
</distributionManagement>
Update your setting.xml with following
<servers>
<server>
<id>deployment</id>
<username>deployment</username>
<password>deployment123</password>
</server>
</servers>
3. Upload Artifacts using Linux Commands
> curl -v -u admin:admin123 –upload-file pom.xml http://localhost:8081/nexus/content/repositories/releases/org/foo/1.0/foo-1.0.pom
> curl -v \
-F “r=releases” \
-F “g=com.acme.widgets” \
-F “a=widget” \
-F “v=0.1-1” \
-F “p=tar.gz” \
-F “file=@./widget-0.1-1.tar.gz” \
-u myuser:mypassword \
http://localhost:8081/nexus/service/local/artifact/maven/content
4. Upload Artifacts using mvn commands
Upload Artifacts using Maven “deploy-file” Deployment
Example without a pom file:
mvn deploy:deploy-file -DgroupId=com.somecompany -DartifactId=project -Dversion=1.0.0 -DgeneratePom=true -Dpackaging=jar -DrepositoryId=nexus -Durl=http://localhost:8081/nexus/content/repositories/releases -Dfile=target/project-1.0.0.jar
With a pom file:
mvn deploy:deploy-file -DgroupId=com.somecompany -DartifactId=project -Dversion=1.0.0 -DgeneratePom=false -Dpackaging=jar -DrepositoryId=nexus -Durl=http://localhost:8081/nexus/content/repositories/releases -DpomFile=pom.xml -Dfile=target/project-1.0.0.jar
With a Zip file:
> mvn deploy:deploy-file -DgroupId=com.fanniemae.securitiesprocessor -DartifactId=sp_adapter_mbs -Dversion=0.0.1-SNAPSHOT -Dpackaging=zip -Dfile=sp_adapter.zip -DrepositoryId=deployment -Durl=http://nexus-server:8081/nexus/content/repositories/snapshots/
Note: You need to update your setting.xml with following. where as The “repositoryId” parameter is not a Nexus repository ID, it is the ID of a server section in your settings.xml file which has then credentials needed for deployment.
<servers>
<server>
<id>nexus</id>
<username>deployment</username>
<password>deployment123</password>
</server>
</servers>
Tagged : / / / / / /

Install SonaType SonaType Community Version

sonatype-nexus-community-version
Download & Install JDK 1.8
64 bit
# cd /opt/</div>
<div># wget --no-cookies --no-check-certificate --header "Cookie: gpw_e24=http%3A%2F%2Fwww.oracle.com%2F; oraclelicense=accept-securebackup-cookie" "http://download.oracle.com/otn-pub/java/jdk/8u66-b17/jdk-8u66-linux-x64.tar.gz"</div>
<div># tar xzf jdk-8u66-linux-x64.tar.gz
32 bit
# cd /opt/</div>
<div># wget --no-cookies --no-check-certificate --header "Cookie: gpw_e24=http%3A%2F%2Fwww.oracle.com%2F; oraclelicense=accept-securebackup-cookie" "http://download.oracle.com/otn-pub/java/jdk/8u66-b17/jdk-8u66-linux-i586.tar.gz"</div>
<div># tar xzf jdk-8u66-linux-i586.tar.gz


Install SonaType Nexus Community Version

Download the Latest Package from http://www.sonatype.org/nexus/go/
TGZ – http://download.sonatype.com/nexus/3/latest-unix.tar.gz
ZIP – http://download.sonatype.com/nexus/oss/nexus-latest-bundle.zip

Install
https://support.sonatype.com/entries/20673251-Installing-Nexus-OSS

$ yum install wget
$ cd /opt/
$ wget http://download.sonatype.com/nexus/3/latest-unix.tar.gz
$ tar -zxvf latest-unix.tar.gz
$ mv nexus-3.12.1-01 nexus
$ cd nexus/bin
$ ./nexus start
$ ./nexus status

http://13.127.30.125:8081/
admin
admin123

Upgrade
https://support.sonatype.com/entries/23031188-How-do-I-upgrade-Nexus-OSS

Starting Nexus from the command line
https://support.sonatype.com/entries/20673271-Starting-Nexus-from-the-Command-Line

Execute ./bin/nexus ( ./bin/nexus.bat on Windows ) without any parameters to get the supported commands for controlling Nexus.

Open the Installation as – http://localhost:8081/nexus
Log In Dialog (default login/password is admin/admin123)”.

More
https://books.sonatype.com/nexus-book/reference/installing.html

Tagged : / / / / / /