Top 10 Container Monitoring Solutions/Tools in 2018
- Native Docker
- cAdvisor
- Scout
- Pingdom
- Datadog
- Sysdig
- Prometheus
- Heapster / Grafana
- ELK stack
- Sensu
Reference
https://rancher.com/comparing-10-container-monitoring-solutions-rancher/
Top 10 Container Monitoring Solutions/Tools in 2018
Reference
https://rancher.com/comparing-10-container-monitoring-solutions-rancher/
By default docker use https to connect to docker registry. But there can be use cases to use insecure registry. Here are the steps to use insecure registry.
In ubuntu
edit the file /etc/default/docker and update DOCKER_OPTS e.g
DOCKER_OPTS='--insecure-registry 10.84.34.155:5000'
where 10.84.34.155 is ipaddress of registry and 5000 is your port on which registry is configured.
In Centos
Edit the file /etc/docker/daemon.json e.g.
{
"insecure-registries" : ["10.84.34.155:5000"]
}
where 10.84.34.155 is ipaddress of registry and 5000 is your port on which registry is configured.
Restart docker
$ service docker restart
As of Version 0.12.0, Docker supports PAUSE and UNPAUSE commands to pause and resume containers using cgroup freezer.
The docker pause command suspends all processes in the specified containers. On Linux, this uses the cgroups freezer. Traditionally, when suspending a process the SIGSTOP signal is used, which is observable by the process being suspended. With the cgroups freezer the process is unaware, and unable to capture, that it is being suspended, and subsequently resumed. On Windows, only Hyper-V containers can be paused.
So it means that the processes in the container stop running, and they are able to be resumed later.
Possible use is to pause resource intensive tasks that you can resume at a later date. Some people predict that “docker pause” could be used in the future to support “live” migration of containers between Docker Engines.
Checkout more about cgroups freezer here https://www.kernel.org/doc/Documentation/cgroup-v1/freezer-subsystem.txt
[root@ip-172-31-80-30 ~]# docker run -d -p 8080:8080 -p 50000:50000 jenkins

[root@ip-172-31-80-30 ~]# docker ps
CONTAINER ID IMAGE COMMAND CREATED STATUS PORTS NAMES
6be033bf1f69 jenkins "/bin/tini -- /usr/l…" About an hour ago Up About an hour (Paused) 0.0.0.0:8080->8080/tcp, 0.0.0.0:50000->50000/tcp laughing_bell

[root@ip-172-31-80-30 ~]# docker pause 6be033bf1f69
Error response from daemon: Container 6be033bf1f6917f3bfcccd5d770c00349c47576ab1cd77b14aa39ef1333ae90c is already paused

[root@ip-172-31-80-30 ~]# docker ps
CONTAINER ID IMAGE COMMAND CREATED STATUS PORTS NAMES
6be033bf1f69 jenkins "/bin/tini -- /usr/l…" About an hour ago Up About an hour (Paused) 0.0.0.0:8080->8080/tcp, 0.0.0.0:50000->50000/tcp laughing_bell

[root@ip-172-31-80-30 ~]# docker exec -it 6be033bf1f69 /bin/bash
Error response from daemon: Container 6be033bf1f69 is paused, unpause the container before exec

[root@ip-172-31-80-30 ~]# docker top 6be033bf1f69
UID PID PPID C STIME TTY TIME CMD
ec2-user 23703 23691 0 13:26 ? 00:00:00 /bin/tini -- /usr/local/bin/jenkins.sh
ec2-user 23724 23703 0 13:26 ? 00:00:23 java -jar /usr/share/jenkins/jenkins.war
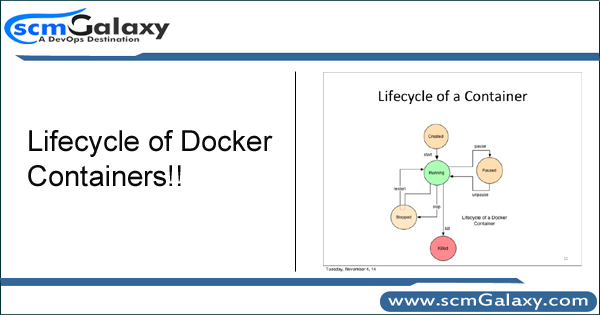
We need to carefully understand the life cycle of Docker containes. There are following images which depicts the the right phases of docker containers.
Phase of Docker Containers
Image flow of Simple Docker Container Lifecycle
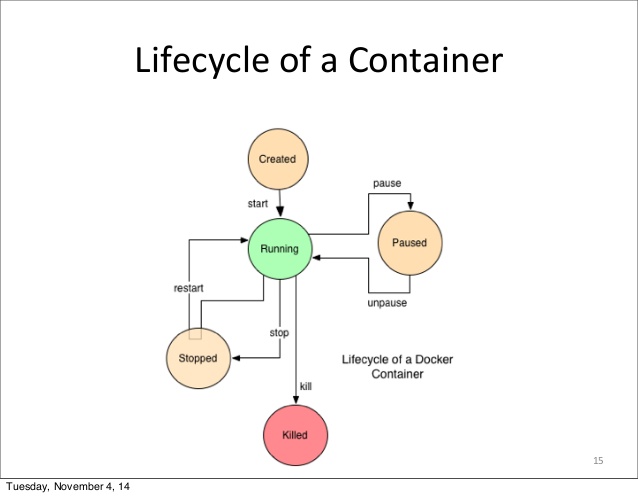
Image flow of Detailed Docker Container Lifecycle
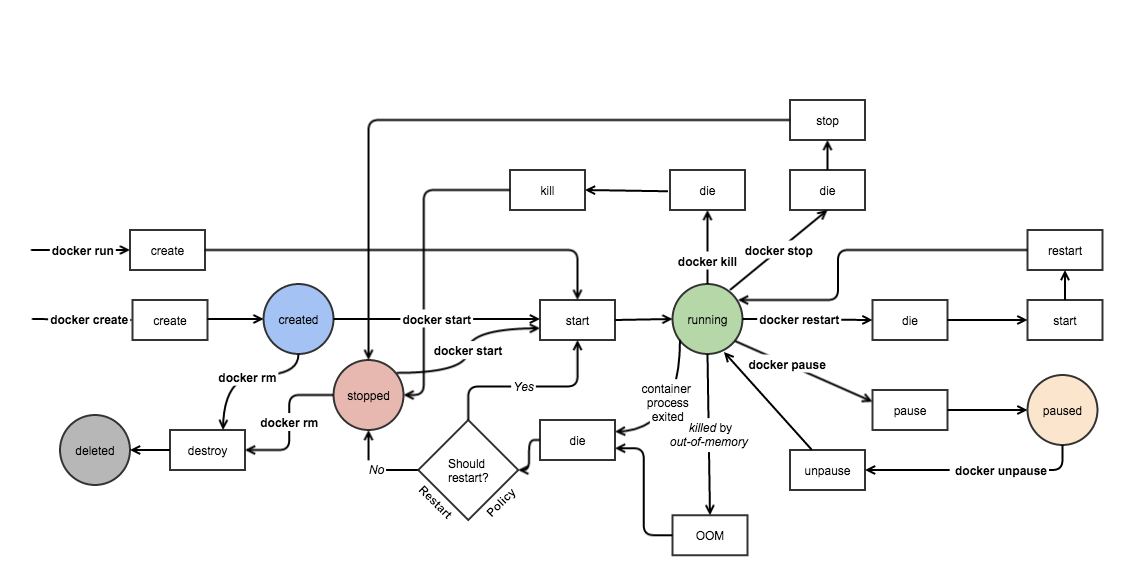
Image Source and Credits: http://docker-saigon.github.io/post/Docker-Internals/
Create container
$ docker create –name ubuntu-cont ubuntu
Run docker container
$ docker run -itd ubuntu
$ docker run -itd –name ubuntu-cont ubuntu
Pause container
$ docker pause <container-id/name>
Unpause container
$ docker unpause <container-id/name>
Start container
$ docker start <container-id/name>
Stop container
$ docker stop <container-id/name>
Restart container
$ docker restart <container-id/name>
Kill container
$ docker kill <container-id/name>
Destroy container
$ docker rm <container-id/name>
Port expose and publish has to happen when a container is created. Just stop the existing container and create a new one in its place with the added expose and/or publish options.
By default Docker containers can make connections to the outside world, but the outside world cannot connect to containers. Each outgoing connection will appear to originate from one of the host machine’s own IP addresses thanks to an iptables masquerading rule on the host machine that the Docker server creates when it starts:
$ sudo iptables -t nat -L -n
...
Chain POSTROUTING (policy ACCEPT)
target prot opt source destination
MASQUERADE all -- 172.17.0.0/16 0.0.0.0/0
The Docker server creates a masquerade rule that lets containers connect to IP addresses in the outside world. If you want containers to accept incoming connections, you will need to provide special options when invoking docker run. There are two approaches.
How to map ports to containers?
Approach 1
First, you can supply -P or –publish-all=true|false to docker run
or
EXPOSE line in the image’s Dockerfile
or
–expose <port> commandline flag and maps it to a host port somewhere within an ephemeral port range.
Approach 2
Mapping can be specified explicitly using -p SPEC or –publish=SPEC option. It allows you to particularize which port on docker server – which can be any port at all, not just one within the ephemeral port range – you want mapped to which port in the container.
How to EXPOSE Port on running container?
Mehtod 1 – Using docker commit
Commit your current container to a new image and then do a docker run specifying the new port range and the new image name.
$ docker stop containerID
$ docker commit containerID newImageName:tag
$ docker run -d --name db -p 8091-8094:8091-8094 -p 11210:11210 newImageName:tag
Method 2 – using iptables
HOST> iptables -t nat -A DOCKER -p tcp --dport 443 -j DNAT --to-destination 172.17.0.2:443
HOST> iptables -t nat -A POSTROUTING -j MASQUERADE -p tcp --source 172.17.0.2 --destination 172.17.0.2 --dport https
HOST> iptables -A DOCKER -j ACCEPT -p tcp --destination 172.17.0.2 --dport https
What is SELinux and how its SELinux used in Docker?
There are three popular solutions for implementing access control in Linux:
Security-Enhanced Linux (SELinux) is a Linux kernel security module that provides a mechanism for supporting access control security policies. It is a security feature of the Linux kernel. It is designed to protect the server against misconfigurations and/or compromised daemons. It put limits and instructs server daemons or programs what files they can access and what actions they can take by defining a security policy.
SELinux is an implementation of a MAC security mechanism. MAC is an acronym for Mandatory Access Control (MAC). It is built into the Linux kernel and enabled by default on Fedora, CentOS, RHEL and a few other Linux distributions. SELinux allows server admin to define various permissions for all process. It defines how all processes can interact with other parts of the server such as:
SELinux puts restrictions on each of the above object according to a policy. For example, an apache user with full permission can only access /var/www/html directory, but can not touch other parts of the system such as /etc directory without policy modification. If an attacker managed to gain access to sendmail mail or bind dns or apache web server, would only have access to exploited server and the files normally has access as defined in the policy for the server. An attacker can not access the other parts of the system or internal LAN. In other words, damage can be now restricted to the particular server and files. The cracker will not able to get a shell on your server via common daemons such as Apache / BIND / Sendmail as SELinux offers the following security features:
Please note that SELinux is not a silver bullet for protecting the server. You must follow other security practices such as
The /etc/selinux/config configuration file controls whether SELinux is enabled or disabled, and if enabled, whether SELinux operates in permissive mode or enforc-ing mode.
SETTING OF SELINUX
SELinux is set in three modes.
Enforcing – SELinux security policy is enforced. IF this is set SELinux is enabled and will try to enforce the SELinux policies strictly
Permissive – SELinux prints warnings instead of enforcing. This setting will just give warning when any SELinux policy setting is breached
Disabled – No SELinux policy is loaded. This will totally disable SELinux policies.
SELinux policies
SELinux allows for multiple policies to be installed on the system, but only one policy may be active at any given time. At present, two kinds of SELinux policy exist:
Targeted – The targeted policy is designed as a policy where most processes operate without restrictions, and only specific ser-vices are placed into distinct security domains that are confined by the policy.
Strict – The strict policy is designed as a policy where all processes are partitioned
into fine-grained security domains and confined by policy.
To put SELinux into enforcing mode:
$ sudo setenforce 1
To query the SELinux status:
$ getenforce
To see SELinux status in simplified way you can use sestatus
$ sestatus
To get elobrated info on difference status of SELinux on different services use -b option along sestatus
$ sestatus -b
How to disable SElinux?
We can do it in two ways
1)Permanent way : edit /etc/selinux/config
change the status of SELINUX from enforcing to disabled
SELINUX=enforcing
to
SELINUX=disabled
Save the file and exit.

2)Temporary way : Execute below command
echo 0 > /selinux/enforce
or
setenforce 0
How about enabling SELinux?
1)Permanent way : edit /etc/selinux/config
change the status of SELINUX from disabled to enforcing
SELINUX=disabled
to
SELINUX=enforcing
Save the file and exit.

2)Temporary way : Execute below command
echo 1 > /selinux/enforce
or
setenforce 1
Now lets understand Docker with SELinux?
The interaction between SELinux policy and Docker is focused on two concerns: protection of the host, and protection of containers from one another.
SELinux labels consist of 4 parts:
User:Role:Type:level.
SELinux controls access to processes by Type and Level. Docker offers two forms of SELinux protection: type enforcement and multi-category security (MCS) separation.
Docker has the –selinux-enabled flag by default in CentOS 7.4.1708. However, in case your image or your configuration management tool is disabling it, as was the case for our puppet module verify this, you verify by running the following comman
$ docker info | grep 'Security Options'
[root@ip-172-31-80-30 ec2-user]# more /etc/selinux/config
# This file controls the state of SELinux on the system.
# SELINUX= can take one of these three values:
# enforcing - SELinux security policy is enforced.
# permissive - SELinux prints warnings instead of enforcing.
# disabled - No SELinux policy is loaded.
SELINUX=enforcing
# SELINUXTYPE= can take one of three two values:
# targeted - Targeted processes are protected,
# minimum - Modification of targeted policy. Only selected processes are pro
tected.
# mls - Multi Level Security protection.
SELINUXTYPE=targeted
Refernece
https://www.cyberciti.biz/faq/what-is-selinux/
https://en.wikipedia.org/wiki/Security-Enhanced_Linux
http://jaormx.github.io/2018/selinux-and-docker-notes/
Docker is one of the revolutions technologies which has created lots of buzz in the Software development practices. Docker has not only helped to setup Continuous Integration and Delivery but also manage and replicate test environments and deploy a large at scale in no time. Here are the following advantages which benefit to testing team using docker
But there is one limitation. The major problem of a Docker container for UI testing is that it does not have a screen output. There are in general two solutions:
Recommended is second one because in this case you do not need to change my testing code to use a WebDriver for a headless browser. Moreover, headless browser may not have full functionalities of a real browser. What I need is a display server called Xvfb or X virtual frame buffer. It performs all graphical operations in memory without showing any screen output.
You can find sample example in following urls.
https://medium.com/@yiquanzhou/run-selenium-ui-tests-in-docker-container-78be98e1b52d
http://testnblog.com/ui-automation-framework-on-docker/
Issues – docker-compose prepends current directory name to named volumes
What actually happens is that the named volume gets prepended with (a simplified version of) the directory name from which the docker-compose command was run.
For instance, if I run from the “dcompos-programs” directory, and I name the volume “my_named_vol”, then I end up with a volume named “dcompos-programs_my_named_vol”.
docker-compose-named-volume.yml:
version: '3'
services:

solr:
 image: alpine:3.5
 container_name: foo
 volumes:
 - my_named_vol:/opt/foo
volumes:
 my_named_vol:
Result:
$ docker-compose -f docker-compose-named-volume.yml up -d && \
> echo "## named volume:" && \
> docker volume ls | grep my_named_vol && \
> echo "## stop" && \
> docker-compose -f docker-compose-named-volume.yml down && \
> echo "## rm volume" && \
> docker volume rm $(docker volume ls | grep my_named_vol | awk '{print $2}')
Creating network "deploymentroot_default" with the default driver
Creating volume "dcompos-programs_my_named_vol" with default driver
Creating foo
Answer
docker-compose uses a project name. By default it’s the directory name which prevents collisions with existing containers. But you can use -p to change the prefix name.
You can use the external volume setting to avoid the prefix.
https://docs.docker.com/compose/compose-file/#external

<p style="font-weight: 400;">D:\kubernete>minikube-windows-amd64.exe start --kubernetes-version="v1.8.0" --vm</p>
<p style="font-weight: 400;">-driver="virtualbox" --alsologtostderr</p>
<p style="font-weight: 400;">W0110 <span data-term="goog_1571914274">12:16:04.517163</span>   10504 root.go:148] Error reading config file at C:\Users</p>
<p style="font-weight: 400;">\panan4\.minikube\config\config.json: open C:\Users\panan4\.minikube\config\conf</p>
<p style="font-weight: 400;">ig.json: The system cannot find the file specified.</p>
<p style="font-weight: 400;">I0110 <span data-term="goog_1571914275">12:16:04.528163</span>   10504 notify.go:109] Checking for updates...</p>
<p style="font-weight: 400;">I0110 <span data-term="goog_1571914276">12:16:05.901354</span>   10504 cache_images.go:290] Attempting to cache image: gc</p>
<p style="font-weight: 400;"><a href="http://r.io/k8s-minikube/storage-provisioner:v1.8.0" data-saferedirecturl="https://www.google.com/url?hl=en&q=http://r.io/k8s-minikube/storage-provisioner:v1.8.0&source=gmail&ust=1515821717506000&usg=AFQjCNHilUJGRCqAxx0Naa3yTEDGQ9X2Dw">r.io/k8s-minikube/storage-provisioner:v1.8.0</a> at C:\Users\panan4\.minikube\cache\</p>
<p style="font-weight: 400;">images\<a href="http://gcr.io/" data-saferedirecturl="https://www.google.com/url?hl=en&q=http://gcr.io&source=gmail&ust=1515821717506000&usg=AFQjCNHwyTmXfOb8jcAGQbTDyIr_DuEirg">gcr.io</a>\k8s-minikube\storage-provisioner_v1.8.0</p>
<p style="font-weight: 400;">I0110 <span data-term="goog_1571914277">12:16:05.901354</span>   10504 cache_images.go:290] Attempting to cache image: gc</p>
<p style="font-weight: 400;"><a href="http://r.io/google_containers/k8s-dns-dnsmasq-nanny-amd64:1.14.5" data-saferedirecturl="https://www.google.com/url?hl=en&q=http://r.io/google_containers/k8s-dns-dnsmasq-nanny-amd64:1.14.5&source=gmail&ust=1515821717506000&usg=AFQjCNFAVT9yppX_1usJ2E0YbShOwXUE9A">r.io/google_containers/k8s-dns-dnsmasq-nanny-amd64:1.14.5</a> at C:\Users\panan4\.mi</p>
<p style="font-weight: 400;">nikube\cache\images\<a href="http://gcr.io/" data-saferedirecturl="https://www.google.com/url?hl=en&q=http://gcr.io&source=gmail&ust=1515821717507000&usg=AFQjCNF--H_EnOHq-1gORX9rvCyL0guvAA">gcr.io</a>\google_containers\k8s-dns-dnsmasq-nanny-amd64_1.14.5</p>
<p style="font-weight: 400;">Starting local Kubernetes v1.8.0 cluster...</p>
<p style="font-weight: 400;">Starting VM...</p>
<p style="font-weight: 400;">I0110 <span data-term="goog_1571914278">12:16:05.901354</span>   10504 cluster.go:74] Skipping create...Using existing ma</p>
<p style="font-weight: 400;">chine configuration</p>
<p style="font-weight: 400;">I0110 <span data-term="goog_1571914279">12:16:05.901354</span>   10504 cache_images.go:290] Attempting to cache image: gc</p>
<p style="font-weight: 400;"><a href="http://r.io/google_containers/kubernetes-dashboard-amd64:v1.6.3" data-saferedirecturl="https://www.google.com/url?hl=en&q=http://r.io/google_containers/kubernetes-dashboard-amd64:v1.6.3&source=gmail&ust=1515821717507000&usg=AFQjCNERLC4qpuUBrUqm5OvSjac96pWNKw">r.io/google_containers/kubernetes-dashboard-amd64:v1.6.3</a> at C:\Users\panan4\.min</p>
<p style="font-weight: 400;">ikube\cache\images\<a href="http://gcr.io/" data-saferedirecturl="https://www.google.com/url?hl=en&q=http://gcr.io&source=gmail&ust=1515821717507000&usg=AFQjCNF--H_EnOHq-1gORX9rvCyL0guvAA">gcr.io</a>\google_containers\kubernetes-dashboard-amd64_v1.6.3</p>
<p style="font-weight: 400;">I0110 <span data-term="goog_1571914280">12:16:05.901354</span>   10504 cache_images.go:290] Attempting to cache image: gc</p>
<p style="font-weight: 400;"><a href="http://r.io/google_containers/k8s-dns-kube-dns-amd64:1.14.5" data-saferedirecturl="https://www.google.com/url?hl=en&q=http://r.io/google_containers/k8s-dns-kube-dns-amd64:1.14.5&source=gmail&ust=1515821717507000&usg=AFQjCNFhurp_V-c-NFhO73j_Zjakc4fptw">r.io/google_containers/k8s-dns-kube-dns-amd64:1.14.5</a> at C:\Users\panan4\.minikub</p>
<p style="font-weight: 400;">e\cache\images\<a href="http://gcr.io/" data-saferedirecturl="https://www.google.com/url?hl=en&q=http://gcr.io&source=gmail&ust=1515821717507000&usg=AFQjCNF--H_EnOHq-1gORX9rvCyL0guvAA">gcr.io</a>\google_containers\k8s-dns-kube-dns-amd64_1.14.5</p>
<p style="font-weight: 400;">I0110 <span data-term="goog_1571914281">12:16:05.901354</span>   10504 cache_images.go:290] Attempting to cache image: gc</p>
<p style="font-weight: 400;"><a href="http://r.io/google-containers/kube-addon-manager:v6.4-beta.2" data-saferedirecturl="https://www.google.com/url?hl=en&q=http://r.io/google-containers/kube-addon-manager:v6.4-beta.2&source=gmail&ust=1515821717507000&usg=AFQjCNEFsklfJPJCpLyEX7qsaLsvUDDRow">r.io/google-containers/kube-addon-manager:v6.4-beta.2</a> at C:\Users\panan4\.miniku</p>
<p style="font-weight: 400;">be\cache\images\<a href="http://gcr.io/" data-saferedirecturl="https://www.google.com/url?hl=en&q=http://gcr.io&source=gmail&ust=1515821717507000&usg=AFQjCNF--H_EnOHq-1gORX9rvCyL0guvAA">gcr.io</a>\google-containers\kube-addon-manager_v6.4-beta.2</p>
<p style="font-weight: 400;">I0110 <span data-term="goog_1571914282">12:16:05.901354</span>   10504 cache_images.go:290] Attempting to cache image: gc</p>
<p style="font-weight: 400;"><a href="http://r.io/google_containers/k8s-dns-sidecar-amd64:1.14.5" data-saferedirecturl="https://www.google.com/url?hl=en&q=http://r.io/google_containers/k8s-dns-sidecar-amd64:1.14.5&source=gmail&ust=1515821717507000&usg=AFQjCNEOfewUFCow70i9iSK2lBFDahW47A">r.io/google_containers/k8s-dns-sidecar-amd64:1.14.5</a> at C:\Users\panan4\.minikube</p>
<p style="font-weight: 400;">\cache\images\<a href="http://gcr.io/" data-saferedirecturl="https://www.google.com/url?hl=en&q=http://gcr.io&source=gmail&ust=1515821717507000&usg=AFQjCNF--H_EnOHq-1gORX9rvCyL0guvAA">gcr.io</a>\google_containers\k8s-dns-sidecar-amd64_1.14.5</p>
<p style="font-weight: 400;">I0110 <span data-term="goog_1571914283">12:16:05.901354</span>   10504 cache_images.go:290] Attempting to cache image: gc</p>
<p style="font-weight: 400;"><a href="http://r.io/google_containers/pause-amd64:3.0" data-saferedirecturl="https://www.google.com/url?hl=en&q=http://r.io/google_containers/pause-amd64:3.0&source=gmail&ust=1515821717507000&usg=AFQjCNF2E15ZIwSbjHDnD4zxOcapo39PIQ">r.io/google_containers/pause-amd64:3.0</a> at C:\Users\panan4\.minikube\cache\images</p>
<p style="font-weight: 400;">\<a href="http://gcr.io/" data-saferedirecturl="https://www.google.com/url?hl=en&q=http://gcr.io&source=gmail&ust=1515821717507000&usg=AFQjCNF--H_EnOHq-1gORX9rvCyL0guvAA">gcr.io</a>\google_containers\pause-amd64_3.0</p>
<p style="font-weight: 400;">I0110 <span data-term="goog_1571914284">12:16:05.911354</span>   10504 cache_images.go:78] Successfully cached all images</p>
<p style="font-weight: 400;">.</p>
<p style="font-weight: 400;">I0110 <span data-term="goog_1571914285">12:16:06.292552</span>   10504 cluster.go:83] Machine state:  Error</p>
<p style="font-weight: 400;">E0110 <span data-term="goog_1571914286">12:16:06.292552</span>   10504 start.go:150] Error starting host: Error getting s</p>
<p style="font-weight: 400;">tate for host: machine does not exist.</p>
<p style="font-weight: 400;"></p>
<p style="font-weight: 400;">Retrying.</p>
<p style="font-weight: 400;">E0110 <span data-term="goog_1571914287">12:16:06.292552</span>   10504 start.go:156] Error starting host:  Error getting</p>
<p style="font-weight: 400;">state for host: machine does not exist</p>
<p style="font-weight: 400;">================================================================================</p>
<p style="font-weight: 400;"></p>
<p style="font-weight: 400;">An error has occurred. Would you like to opt in to sending anonymized crash</p>
<p style="font-weight: 400;">information to minikube to help prevent future errors?</p>
<p style="font-weight: 400;">To opt out of these messages, run the command:</p>
<p style="font-weight: 400;">        minikube config set WantReportErrorPrompt false</p>
<p style="font-weight: 400;">================================================================================</p>
Please use/install minikube in the c drive.
rajeshkumar created the topic: Docker malformed HTTP status code “online”
Error
[root@localhost madhavi]# docker pull jenkins
Using default tag: latest
Warning: failed to get default registry endpoint from daemon (Cannot connect to the Docker daemon. Is the docker daemon running on this host?). Using system default: index.docker.io/v1/
Cannot connect to the Docker daemon. Is the docker daemon running on this host?
[root@localhost madhavi]# systemctl start docker
[root@localhost madhavi]# docker pull jenkins
Using default tag: latest
Pulling repository docker.io/library/jenkins
Error while pulling image: Get index.docker.io/v1/repositories/library/jenkins/images : malformed HTTP status code "online"
[root@localhost madhavi]#
Regards,
Rajesh Kumar
Twitt me @ twitter.com/RajeshKumarIn
