Limited Time Offer!

For Less Than the Cost of a Starbucks Coffee, Access All DevOpsSchool Videos on YouTube Unlimitedly.
Master DevOps, SRE, DevSecOps Skills!

Enroll Now

What are cookies in JavaScript?

Cookies

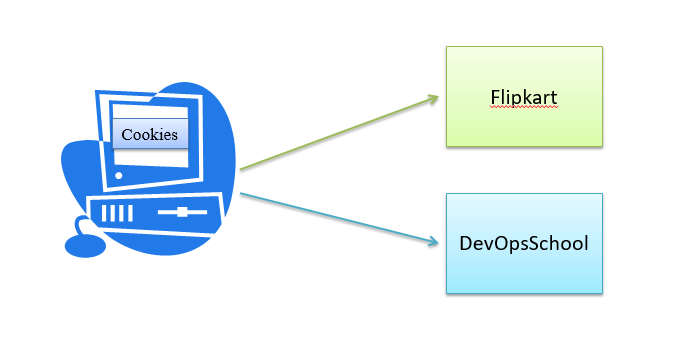
A cookie is a small piece of text data set by the Web server that resided on the client’s machine. Once it’s been set, the client automatically returns the cookie to the webserver with each request that it makes. This allows the server to place values it wishes to ‘remember’ in the cookie, and have access to them when creating a response.

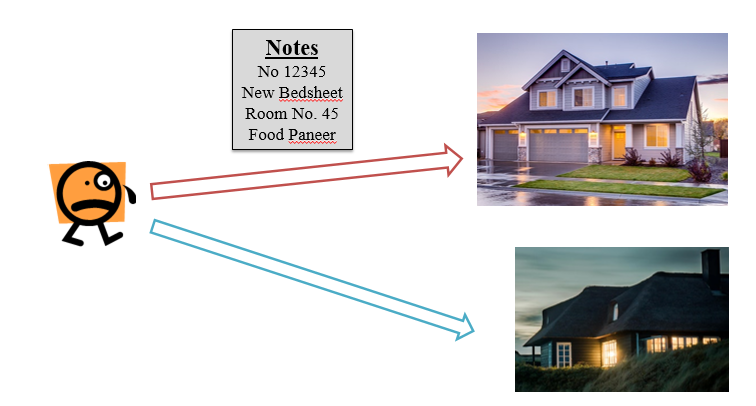
How Cookie Works

How Cookie Works

How Cookie Works

How Dangerous Cookies are

Type of Cookies

  • Session Cookies – Cookies that are set without the expires field are called session cookies. It is destroyed when the user quits the browser.
  • Persistent Cookies – The browser keeps it up until their expiration date is reached.
Tagged : / / /

What is JaveScript?

JavaScript is the programming language of HTML and the Web. It makes the web pages dynamic. It is an interpreted programming language with object-oriented capabilities. JavaScript is also known as client-side language. This is the client site language itself. But some people also call it server site language.

The meaning of the client site which is accessed by the user is called client site language. And what runs in the server is called the server-side language.

JaveScript History

  • JavaScript was introduced in 1995 by Netscape. And it was developed by Brendan Eich.
  • It was first named Mocha.
  • After that its name was changed to Livescript.
  • Then javascript.
  • Then it came to be called Ekamscript. But still people call it JavaScript only.
  • There is a 5,6 version of Ekscript. May have come in 2009.

Tools

  • Notepad
  • Notepad++
  • Any Text Editor

JavaScrips and Java Same?

No, Only java has similarities in JavaScript and java, apart from this there are no similarities in it.

Java programming language was very popular when Javascripts was being launched in the market, so they merged java with them, and then it was named JavaScript.

Advantage of JavaScript

  • Client Side execution
  • Velidation on Browser
  • easy language

Disadvantage of JavaScript

  • Less Secure
  • No Hardware Access

Why of adding JavaScript

Here too, if you want to use JavaScript, then you have to link both the files through your HTML. And it has its own different rules.

  • Inline

-Inside head tag
-inside body tag

  • External file

-Inside head Tag

-Inside body Tag

Inline

You can write inline in 2 ways, inline and external.

Inside head Tag –

<html>
	<head><title>Hello JS</title>
		<script type="text/javascript">
			document.write("Hello DevOpSchool");
		</script>
	</head>
	</body>
`		<h1>I am heading</h1>
		<p>I am Paraghraph</p>
	</body>
	
</html>

Inside body tag

<html>
	<head><title>Hello JS</title>
		
	</head>
	</body>
`		<h1>I am heading</h1>
		<p>I am Paraghraph</p>
		<script type="text/javascript">
			document.write("Hello DevOpSchool");
		</script>
	</body>
	
</html>

External

Inside head tag

<html>
	<head><title>Hello JS</title>
		<script src="name.js" type="text/javascript">
		</script>
	</head>
	</body>
`		<h1>I am heading</h1>
		<p>I am Paraghraph</p>
		
	</body>
	
</html>

*Save with .js extension
Ex:- name.js

*Now link this file to HTML

Inside Body tag

<html>
	<head><title>Hello JS</title>
		
	</head>
	</body>
`		<h1>I am heading</h1>
		<p>I am Paraghraph</p>
		
		<script src="name.js" type="text/javascript">
		</script>
	</body>
	
</html>

*Save with .js extension
Ex:- name.js

*Now link this file to HTML

Tagged : / / / / / /

Customer review email template

Subject line: Your feedback is important to us

BODY

Dear/Hi <<Customer/Client name>>

It was our sincere pleasure to provide our service for you recently. We truly appreciate your business, support and more specifically your feedback.

We take feedback from our customers very seriously as it allows us to continuously improve upon our services.

As a local business, we rely enormously on positive word of mouth and would be grateful if you could take a minute or two of your time to write a quick Google and Facebook review for our business.

We would be grateful if you could share your experience by submitting a review using the link below:

Google:- <<https://bit.ly/3x8vfgH>>

Facebook:- <<https://bit.ly/2UJCj4Z>>

Not sure about what to write?

Below are a few suggestions that may help you with your creative flow.

  • What service did we provide to you and what did you like best about it?
  • Which trainer looked after your training program? (feel free to mention their name, they will be very flattered)
  • Which service do you think makes us different from our competitors?
  • What would you tell your friends or colleagues about us?
  • Is there any way we can improve some of our services/courses? if so which ones and how?

We appreciate your time and look forward to seeing you at your next visit.

Thanks again for choosing <<Name of your business>>

Warmest Regards,

<<Email Signature>>

================================

Short Text message or whatsapp message template for Review:-

We’d like your feedback!

We value your opinion, would you be willing to take a few minutes to leave us a review?

That will help others to learn about us.

Google reviews:- <<https://bit.ly/3x8vfgH>>

Facebook reviews:- <<https://bit.ly/2UJCj4Z>>

Tagged : / / / / / / / /

What is PHP?

Introduction to PHP

PHP is an open-source server-side programming language, also called the use scripting language, embedding the code of PHP into the code of API HTML. The full form of PHP is Hypertext Preprocessor, its original name is Personal Home Page. It was created by Ramsum Lerdorf in 1994.

Php runs on all platforms like Windows, Linux, Unix, Mac, OS, Etsy.

PHP file ka extension .php

What we can do with PHP?

-Can create dynamic pages with PHP.
-Handle button click, radio button:-
Through PHP you can handle the button click event
-Create database application
-client/server application
-Student Registration
-online course
-online shopping cart
-chat rooms

EXAMPLE:-

<!DOCTYPE html>
<html>
<body>

<?php
	echo"Helllo World";
?>

</body>
</html>

What are client and server?

Client

A client is a piece of computer hardware or software that accesses a service made available by a server. For example, web browsers are clients that connect to the web servers and retrieve web pages for display.

Server

A server is a computer program or a device that provides functionality for other programs or devices, called “client”.

There are many servers like: web server, mail server, print server etc.

Client-server Architecture

Client server Architecture:-

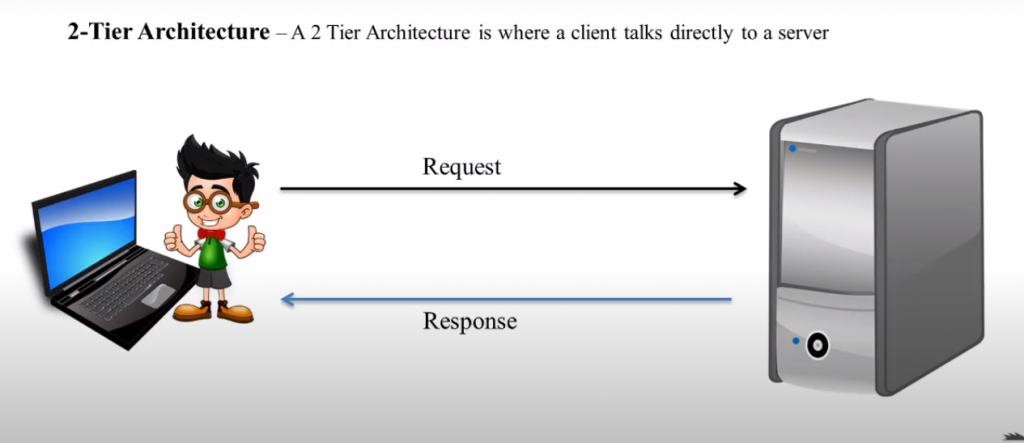
2-Tier Architecture:- A 2 Tire Architecture is where the client talks directly to a server.

3-Tier Architecture:- Middleware

If the client has sent the request to the application server, the application server checks that the request is made by the client. If the request is in its data source, then that application server will respond to your request.

Web Browser and Web Server

Web Browser

The web browser is a client, program, software, or tool through which we sent HTTP requests to a web server. It knows how to communicate whit the server. The main purpose of a web browser is to locate the content on the World wide web and display the web page, images, audio, or video form.

Web Server

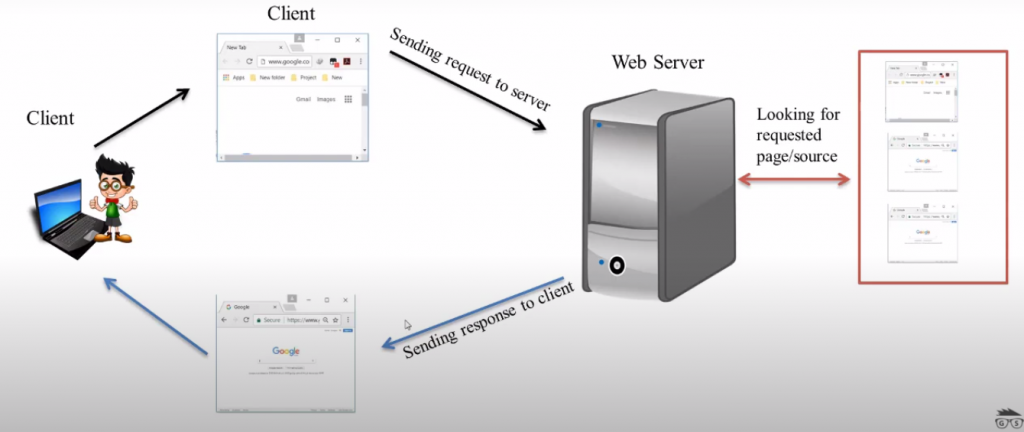
A web server can be either a software unit or a hardware unit, which provides the web pages via HTTP. The web server gets the request and finds the resources than the response to the client. The web server provides service only for web applications. All the communication between client (web browser) and server takes place via HTTP.

Web server architecture

Web application

A web application or web app is a client-server software application in which the client runs in a web browser.

What is a Website?

Website is a collection of related web pages that may contain text, images, audio, and video. A website can consist of one page, depending on what the site owner is trying to accomplish.

Tagged : / / / / /

Syncro SVN Client v5.1 for Windows, Linux & MacOSX – Features

syncro-svn-client-v51

Syncro SVN Client makes easier the document and code sharing between content authors or developers. This multiplatform Subversion front-end allows you to browse repositories, check for changes, commit changes, update your working copy and examiner the revision history. The Syncro SVN Client was initially developed as an embedded application in the XML Editor and starting with version 8.1 of the editor it is available also as a separate product.

Features
• Why Subversion?
– The advantages of the SVN version control system that recommend it as a replacement for the CVS system.
• Flexible Layout of the User Interface
– The layout of the user interface can be arranged by dragging dockable and floating views in the window and outside the window of the application.
• SVN Repository
– Special view for managing SVN repositories accessed through different protocols: SVN, SVN+SSH, HTTP(S).
• SVN Resource History
– The History view contains the revision number, author name, commit message and date of each revision of a file or folder from the SVN repository.
• Local Working Copy of a SVN Repository
– Each author that shares the SVN repository with other authors works on local versions of the repository resources called a working copy of the repository. The changes applied to the local copy of the repository must be synchronized with the repository hosted on the SVN server.
• Author Information at Line Level
– For each line of a file stored on a SVN server the author (user name) and the revision number of the last change applied to that line is displayed.
• Check Differences Between Local Version and Repository Version
– Compare the local working copy version of a file with the SVN repository version.
• Visual Conflict Editing
– Visually edit the conflicts generated in the local version of a file by an update operation.
• Revision Graph
– The history of a SVN resource can be viewed as a graph in which a node represents one revision of the resource committed to the trunk or a branch of the SVN repository.
• Directory Change Set
– The Directory Change Set view presents a set with all the resources changed between two revision numbers of a SVN folder.
• Integration with Bug Tracking Tools
– The commit message can include a bug ID which links the committed revision with a bug tracking tool. Special SVN properties configure the format and location of the bug ID in the commit message.

Home Page – http://www.syncrosvnclient.com/

Tagged : / / / / / / / / / / / / / / /

Process to Install CollabNet SVN Command Line Client in Windows

install-collabnet-svn-command-line-client-in-windows

Link: http://www.collab.net/downloads/subversion/

1. Platform and configuration

   Product: CollabNet Subversion server

   Certified platforms: Windows XP SP2, Win 2003(Standard Edition) R2

   Apache version: 2.2.8

   ViewVC: 1.0.5 (requires ActiveState Python 2.5)

   Repository format: fsfs (bdb support not included)

   Prerequisite: The user needs administrative privileges to install

   and uninstall CollabNet Subversion.

2. IMPORTANT: Apache version upgraded from 2.0 to 2.2

   With the CollabNet Subversion 1.5.0 release, we have upgraded the included

   Apache server version from 2.0 to 2.2. This is consistent with the

   packages we provide for other operating systems, and also upgrades our

   package to the best available version of Apache.

   This is important to existing users because your current Apache 2.0 server

   configuration cannot be automatically updated to the format of the Apache

   2.2 configuration file. If you allow the installer to upgrade your existing

   installation, it backs up your Apache conf, logs, and htdocs folders so

   that you can refer to your previous configuration when configuring your new

   server.

3. Installation tips

     If you install an Apache server, the installer asks you for a

     “Repository URL.” This represents the prefix of the URL which users can

     use to connect to Subversion. If you set this URL to ‘/svn’, then users

     can checkout their repository from:

        http://hostname/svn/repos-name

     We recommend that you use ‘/svn’ as your URL prefix, as this is common

     practice.

4. ViewVC installation

   Users of the Apache web server option can now also have ViewVC automatically

   installed and configured as part of the installation. You must have

   ActiveState’s ActivePython 2.5 installed before installing CollabNet Subversion.

   Download a free version of ActivePython from:

   http://www.activestate.com/Products/activepython/index.mhtml

   You must install version 2.5.x.

5. Upgrade procedure

   When the installer detects a previous version, it offers to upgrade your existing

   installation. However, if you want to add ViewVC to your installation, we

   recommend you use the following process for an upgrade. In general, this is

   the best process for any upgrade scenario:

   1. Stop Apache or Subversion Server services, if running.

   2. Copy/back up any customizations that were done to your Apache installation.

     (For example, your httpd.conf file, a password database, any content you

      added to the htdocs folder, and so on.)

   3. Uninstall the currently installed version.

   4. Manually delete the existing folder if the installer did not remove it. The

      uninstall process does not remove files that were added or modified after

      installation.

   5. Follow the normal install instructions for 1.5.

   6. Manually put back your Apache customizations. NOTE:  You cannot simply copy

      back the previous configuration file. You must make the appropriate edits

      to your new Apache 2.2 version of the configuration file.

6. Post-installation instructions

   The installer created a folder to store your repositories. You are not required

   to use this folder, but if you let the installer install the server to run as a

   service, then the server has also been configured to serve repositories from this

   location. It is a good idea to use the location you specified in the installer.

   A. Using svnserve

      ==============

   To use svnserve as your server, follow these steps:

     1. Open a new terminal (command prompt).

        NOTE: If you have an old command prompt open (prior to the Subversion

              installation), remember to open a brand new command prompt.

     2. Create a subversion repository.

        cd <Repository_Path>

        svnadmin create <Repository_Name>

        For example:

        cd \repositories

        svnadmin create my-first-repos

     3. Setup a password database.

        Using notepad, edit the svnserve.conf file inside the conf directory of your

        repository.

        For example:

        If your repository is C:\repositories\my-first-repos

        svnserve.conf is:

        C:\repositories\my-first-repos\conf\svnserve.conf

        Inside svnserve.conf, you see the following information:

         ### The password-db option controls the location of the password

         ### database file.  Unless you specify a path starting with a /,

         ### the file’s location is relative to the conf directory.

         ### Uncomment the line below to use the default password file.

         #password-db = passwd

       Follow the above instructions, and uncomment the “password-db=passwd”

       line, so that it simply says:

          password-db = passwd

     4. Setup usernames and passwords.

       Next, edit the passwd file. This passwd file is located in the

       same directory as svnserve.conf.

       Inside the passwd file, you see the following information:

       ### This file is an example password file for svnserve.

       ### Its format is similar to that of svnserve.conf. As shown in the

       ### example below it contains one section labelled [users].

       ### The name and password for each user follow, one account per line.

       [users]

       #harry = harryssecret

       #sally = sallyssecret

       To add a new user account, add your own username and password

       inside the [users] section. For example, if your name is “joe”,

       and you want to set your password to “super-secret”, add a

       new line like this:

         joe = super-secret

       Add as many users as you like.

     5. Open Port on Windows firewall.

        Before starting the server, the firewall must be notified that

        this particular port is going to be used. To enable this port in the

        Windows firewall, follow the instructions found here:

    http://www.microsoft.com/windowsxp/using/security/internet/sp2_wfexceptions.mspx

        Note: svnserve.exe is the program name which needs to be added to the

        exceptions list. Alternatively, you can also use the port where

        you decide to run the server. By default, svnserve runs on 3690.

     6. Start svnserve.

        If you elected to have the installer setup svnserve as a service, then open

        the Services application, find the entry for the Subversion server, and take

        the Start option. The service has been configured to start automatically

        on reboot. You can also run this command from the command line:

        net start svnserve

        If you did not install svnserve as a service and want to start the server

        manually, run this command:

        svnserve -d -r <Repository_Path>

        For example: svnserve -d -r C:\repositories

     7. To provide read and write access to anonymous users, modify the

        conf/svnserve.conf file inside the repository.

        anon-access = write

        To restrict an anonymous user from the repository:

        anon-access = none

     8. Check out the repository.

        svn co svn://localhost/<Repository_Name>

        For example: svn co svn://localhost/my-first-repos

     Tip: If you check out your Subversion repository from a different computer,

     replace ‘localhost’ with the IP address or hostname of the machine which

     hosts the Subversion repository.

   B. Using Apache

      ============

   To use Apache as your server, follow these steps:

     1. Configure Apache.

        The installer did these steps automatically based on the repository location

        entered in the installer. This information is only presented if you want to

        manually modify the configuration.

        Use notepad to edit the httpd.conf file inside the httpd\conf directory of your

        CollabNet Subversion Server installation.

        Tip: By default, httpd.conf is in the following directory:

             C:\Program Files\CollabNet Subversion Server\httpd\conf\httpd.conf

        At the bottom of the httpd.conf file, you see a location directive that looks

        something like this:

          <Location /svn>

            DAV svn

            SVNParentPath C:\repositories

          </Location>

        Change the above section to look like the following:

          <Location /svn>

            DAV svn

            SVNParentPath C:\repositories

            SVNListParentPath On

            Require valid-user

            AuthType Basic

            AuthName “Subversion repository”

            AuthUserFile C:\repositories\password-file

          </Location>

     2. Open a new terminal (command prompt).

        NOTE: If you have an old command prompt open (prior to the Subversion

              installation), remember to open a new command prompt.

     3. Create Subversion users.

        Now create usernames with passwords that can be used to authenticate with

        Apache. Use the htpasswd command to create usernames and passwords for the

        Apache server.

        Type the following at the command prompt:

          htpasswd -cm <password-file> <username>

        This command prompts you for a password for the user. Enter the

        password and retype the password when prompted.

        For example: If you want to create a user ‘joe’, and the file at

        “C:\repositories\password-file”, type the following at the

         command prompt:

               htpasswd -cm C:\repositories\password-file joe

        Enter the desired password for the user and retype the password

        when prompted.

        For additional users, use the following command at the command prompt:

        htpasswd -m C:\repositories\password-file joe

     4. Create a Subversion repository.

        svnadmin create <Repository_Path>\<Repository_Name>

        For example: svnadmin create C:\repositories\my-first-repos

     5. Open Port on Windows firewall.

        Before starting the server, the firewall must be notified that

        this particular port is going to be used. To enable this port in the

        Windows firewall, follow the instructions found here:

    http://www.microsoft.com/windowsxp/using/security/internet/sp2_wfexceptions.mspx

        Note: apache.exe is the program name which you need add to the

        exceptions list. Alternatively, you can also use the port where

        you decide to run the server. By default, apache is run on 80.

     6. Start Apache.

        If you elected to have the installer set up Apache as a service, then open

        the Services application, find the entry for Apache/2, and take

        the Start option. The service was configured to start automatically

        on reboot. You can also run this command from the command line:

        net start apache2

        To start the server manually, run the following at the command prompt:

        apache

     7. Checkout the repository.

        svn co http://localhost/svn/<Repository_Name>

        For example: svn co http://localhost/svn/my-first-repos

        Tip: If you check out your Subversion repository from a different

        computer, replace ‘localhost’ with the IP address or hostname

        of the machine which hosts the Subversion repository.

7. Known issues

   When trying to access a repository via ViewVC, you might see an error

   trace that ends with this message:

      ImportError: DLL load failed with error code 182

   This error occurs when you have an older version of the OpenSSL DLLs in your

   PATH ahead of the CollabNet Subversion bin folder. Many Windows applications

   ship the OpenSSL DLLs and many of them also use older versions. To fix this

   problem:

      1. Edit your PATH so that the CollabNet Subversion bin folder is at or

         near the beginning of your PATH.

      2. Reboot so that your Apache service can pick up the change.

8. Back-end support

  If you try to access an existing BDB (Berkeley DB) based repository through

  CollabNet Subversion, then you might receive an alert “Failed to load module

  for FS type ‘bdb’.” This is because CollabNet Subversion does not support BDB.

  CollabNet recommends FSFS over BDB for ease of maintenance and supportability.

9. Support for CollabNet Subversion

   Find out about CollabNet Technical Support at

   http://www.collab.net/services/subversion/

   Information about CollabNet Training, Consulting, and Migration

   services is at http://www.collab.net/services/subversion/training.html

   Join openCollabNet for community support: http://open.collab.net

10 About Subversion and CollabNet

   CollabNet launched the Subversion project in 2000 in response to the demand

   for an open standard for Web-based software configuration management that

   could support distributed development. CollabNet continues to be strongly

   involved with the Subversion project and offers CollabNet Subversion Support,

   Training, and Consulting services.

   CollabNet also provides the most widely used collaborative development

   environment in the world. More than 1,400,000 developers and IT projects

   managers collaborate online through CollabNet. The company is transforming

   the way software is developed by enabling organizations to leverage global

   development talents to deliver better products and innovate faster.

   Visit CollabNet at http://www.collab.net for more information.

Tagged : / / / / / / / / / / / / / / / / / / /

How to Install CollabNet SVN Command Line Client in Solaris?

collabnet-svn-command-line

Link: http://www.collab.net/downloads/subversion/solaris.html

1. Platform and configuration

Product: CollabNet Subversion client

Platforms: Solaris 10 SPARC

Prerequisite: You must be a superuser (root) to install and uninstall

CollabNet Subversion.

2. Import/Update CollabNet certificate

CollabNet Subversion Solaris packages are signed. As a one-time task,

import the CollabNet certificate using the command:

    sudo pkgadm addcert -ty certificate.pem

The CollabNet certificate is available for download at:

http://www.collab.net/nonav/downloads/subversion/certificate/certificate.pem

NOTE: the certificate has changed between 1.5.0 and 1.5.1 release.  The

certificate used for 1.5.0 had a short expiration date so we have created

a new certificate.  If you have previously installed the 1.5.0 certificate,

you must remove it before installing the new one:

    sudo pkgadm removecert “Alexander Thomas(AT)”

Once it is removed you can install the new certificate.

3. First installation

The command to install the CollabNet Subversion client, if a previous version

has not already been installed, is:

    sudo pkgadd -d /path/to/client-sparc-local

4. Updating an existing installation

The proper way to update a Solaris package is to remove the current version

and then install the new version.  If you have the CollabNet Subversion server

installed, you will need to remove it first.  Again, refer to the readme for

that package before proceeding.

    sudo pkgrm CSVNclnt

    sudo pkgadd -d /path/to/client-sparc-local

5. Post-installation instructions

A. CollabNet Subversion installs into /opt/CollabNet_Subversion, which is

   probably not on the executable search path for your system. Add the directory

   /opt/CollabNet_Subversion/bin to your $PATH environment variable. In order to

   make this change affect all users of your system and persists across reboots,

   add the following line to /etc/profile:

    PATH=/opt/CollabNet_Subversion/bin:$PATH

B. CollabNet Subversion provides man pages and localizations for several

   languages. To take advantage of these features, update your MANPATH and/or

   LOCPATH environment variables to include the CollabNet Subversion directories.

   For example:

    export MANPATH=/opt/CollabNet_Subversion/share/man:$MANPATH

    export LOCPATH=/opt/CollabNet_Subversion/share/locale:$LOCPATH

6. Support for CollabNet Subversion

Find out about CollabNet Technical Support at

http://www.collab.net/services/subversion/

Information about CollabNet Training, Consulting, and Migration

services is at http://www.collab.net/services/subversion/training.html

Join openCollabNet for community support: http://open.collab.net

7. About Subversion and CollabNet

CollabNet launched the Subversion project in 2000 in response to the demand

for an open standard for Web-based software configuration management that

could support distributed development. CollabNet continues to be strongly

involved with the Subversion project and offers CollabNet Subversion Support,

Training, and Consulting services.

CollabNet also provides the most widely used collaborative development

environment in the world. More than 1,400,000 developers and IT projects

managers collaborate online through CollabNet. The company is transforming

the way software is developed by enabling organizations to leverage global

development talents to deliver better products and innovate faster.

Visit CollabNet at http://www.collab.net for more information

Tagged : / / / / / / / / / / / / / / / / / / / / /

How to Access SVN when client is under proxy ?

access-svn-when-client-is-under-proxy

The Subversion client can go through a proxy, if you configure it to do so.


First, edit your “servers” configuration file to indicate which proxy to use. The files location depends on your operating system.


On Linux or Unix it is located in the directory “~/.subversion”.


On Windows it is in “%APPDATA%\Subversion”. (Try “echo %APPDATA%”, note this is a hidden directory.)

Tagged : / / / / / / / / / / /