Limited Time Offer!

For Less Than the Cost of a Starbucks Coffee, Access All DevOpsSchool Videos on YouTube Unlimitedly.
Master DevOps, SRE, DevSecOps Skills!

Enroll Now

CRUD OPERATIONS IN LARAVEL PHP FRAMEWORK

Crud is simply the basis of any web/app development features. All we have to do on any web page is Creating, Reading, Deleting, or Updating the content and that is known as the acronym CRUD. In this blog, we learn about how we perform CRUD operation in Laravel 5.8(PHP framework).

Step 0: Prerequisite

  • Install xampp a PHP development environment. (Version 7.4 best suited for 5.8 Laravel)
  • Install composer(to install libraries of Php for any application).
  • Install VS code(Code-editor).

Step 1 : Download/install Laravel 5.8

Go to command prompt and then go to the xampp folder in C drive by cmd. [C:\xampp\htdocs\]

In cmd Run :

composer create-project laravel/laravel=5.8 crud --prefer-dist

It will install laravel 5.8 in your xampp/htdocs folder, and the folder name in which the Laravel is installed is “crud”(You can change this name of the folder while writing the command in cmd).

Step 2 : Create the Database

For the connection of the database first we have to run “xampp control pannel”.

Then in action tag start the Apache and MySQL.
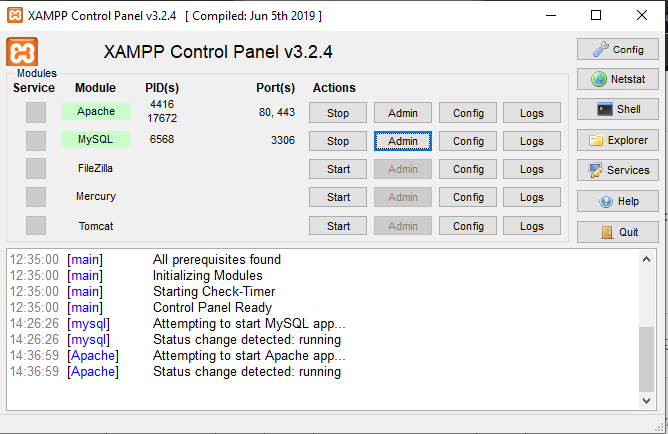
and then click on Admin of MySQl. It will redirect to http://localhost/phpmyadmin.

  • Go to the database.
  • Give the name of the database and click create.

Step 3: Connection to the database.

In the .env file of the Laravel folder(named crud in this blog) open it with VS Code. Change your code to this.

DB_CONNECTION=mysql
DB_HOST=127.0.0.1
DB_PORT=3306
DB_DATABASE=gurukul
DB_USERNAME=root
DB_PASSWORD=

where database name should be the same as you created in step2. and change DB_USERNAME to root.

Step 4 : Migration of the table(From Laravel to MySQL Database)

We can make table in MySQL using the Laravel. For this we have to run this following command in cmd.

php artisan make:migration create_crud_table –-create=crud

You can use any name of your table instead of create_crud_table. The above command is going to create a migration(PHP file by the name of the table) file in the database/migration folder.

Edit the code and paste this :
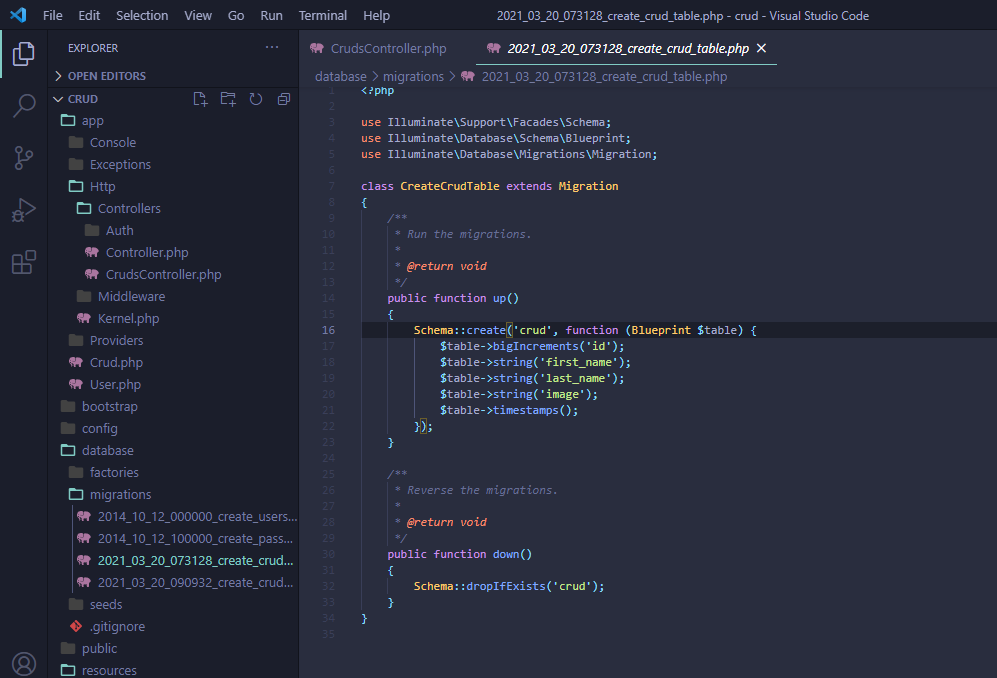
update the function up()

Now in the command prompt use the following command :

php artisan migrate

Step 5: Create a Model File in Laravel

php artisan make:model Crud -m

In cmd, use this command to create the model file(You can use any name instead of Crud while making other projects)

It will add a Crud.php file in the app folder and in this file in a variable define the table column.

<?php

namespace App;

use Illuminate\Database\Eloquent\Model;

class Crud extends Model
{
    //
    protected $fillable = [
            'first_name', 'last_name', 'image'
        ];
}

Step 6 : Creating the controller

Controller is used to handling the http request. They are stored in app/http/Controllers directory.

We have to create the controller using the command line:

php artisan make:model Crud -m
Note : For making CrudController file in controllers
php artisan make:controller CrudsController

Step 7 : Setting the Route

Setting the route of all the CrudController class method in route/web.php

Route::get('/', function () {
    return view('welcome');
});

Route::resource('crud', 'CrudController');

This is very important method.

Tagged : / /

CRUD Operation Detailed Explaination with Example.

Before performing CRUD operations we need to do some of the basic tasks. These includes:- 1. Installing Laravel 2. Creating Laravel Project 3. Making Model 4. Migrating After that we are good to go for the operation.

Explanation for the above operations is given in link below https://www.scmgalaxy.com/tutorials/crud-operation-prerequisites/

5. Create Operation

Create a folder Under resource =>view => Task =>File_name (say create.blade.php) and code the Html part in it.

We will now move to route(web.php) and create a route for the view . We will use Route::get(‘create’,’TaskController@index’)->name(‘create’);

We will now move to route(web.php) and create a route for the view to display. name(‘task‘) is given in the URL as http://127.0.0.1:8000/task. Control flow:- As the URL is hit the control will go the route(web.php), there we will write Route::get(‘create‘,’TaskController@create’)->name(‘create‘); Here, there will be a name match from the URL and if there is a match then there will be a function call named create and route will redirect to TaskController.php where it will find the function create and operate according to the instructions given in it. }

The TaskController.php will get to the create function definition Here this function will return a view create.blade.php, which has html codes, Output displayed on the browser.

After the create operation we need to store the data in the database for this we used <form action=”{{route(‘store’)}}” method=”POST”> which will call store function. for that, we need to call the store function when the user clicks submit after entering the data on the above page. The store function be like

In the store function we create object $var of Task make variables as $var->task which is assigned $request->task; (gets value from 1st field) & $var->detail which is assigned $request->detail; (gets value from 2nd field) and $var->save(); function will save it to the database.

Soon after the data is created and stored in the database, we can view it by performing Read operation.

6. Read operation

Create a file in resource =>view => Task (say, task.blade.php). and code the Html part in it.

We will now move to route(web.php) and create a route for the view to display. We will write the name(‘task‘) is given in the URL as http://127.0.0.1:8000/task. Control flow:- As the URL is hit the control will go the route(web.php), there it will write Route::get(‘task’,’TaskController@index’)->name(‘task’); Here, there will be a name match from the URL and if there is a match then there will be a function call named index and route will redirect to TaskController.php where it will find the function index and operate according to the instructions given in it. }

Here this function will return a view taskIndex.blade.php, which has HTML codes, which is to display on the browser with all the things compact.

7. Update operation

Create a file in resource =>view => Task => File_name (say, edit.blade.php). and code the Html part in it.

For update we need to give an edit button which calls the update function when clicked. for this we used <a href=”{{route(‘notes.edit’,[‘id’ => $note->id])}}”  type=”button” class=”btn btn-primary”>Edit</a> This will redirect to route (web.php) where we will write Route::get(‘edit’,’TaskController@edit’)->name(‘edit’); Here, there will be a name match from the URL and if there is match then there will be a function call named edit and route will redirect to TaskController.php where it will find the function edit and operate according to the instructions given in it. This will call edit function

This will find the corresponding id and return the edit page view with the details prefilled in it.

On click of submitting after changing the details which were prefilled, This will redirect to route (web.php) where we will write Route::post(‘update/{id}’,’TaskController@update’)->name(‘update’); Here, there will be a name match from the URL and if there is a match then there will be a function call named update and route will redirect to TaskController.php where it will find the function update and operate according to the instructions given in it. The update function will run.

In the Update function we create object $var1 of Task which finds and matches id and make variables as $var1->task which is assigned  $request->task; (gets value from 1st field) & $var1->detail which is assigned $request->detail; (gets value from 2nd field) and $var1->save(); function will save it to the database. and return redirect() will redirect the route to task.

7. Delete Operation

Implementing delete operation is easy and we need to Just provide a delete button in the html view which will help call the destroy function.

On click of Delete button This will redirect to route (web.php) where we will write Route::post(‘delete/{id}’,’TaskController@delete’)->name(‘delete’); Here, there will be a name match from the URL and if there is a match then there will be a function call named delete and route will redirect to TaskController.php where it will find the function delete and operate according to the instructions given in it. The update function will run.

In the Update function we create object $var2 of Task which finds and matches id and $var1->delete(); function will delete it from the database. and return redirect() will redirect the route to task.

Tagged : / / / / / / /