Define PHP and How to work?

Type of website:-

A static page is called that in which the information that is there is in the name of every user. You cannot change anything in a static page. It is only used to see information.

Dynamic website:-

Dynamic website is user-friendly, user can interact with it. The page in which the user can interact is called a dynamic website. Like submitting a form by filling in a web page. In this, each user gives different information, the user who enters the information gets the same result.

How PHP works?

There is a client who sends a request or works to visit a website.

web server

The webserver provides us this facility which will be there for 24 hours. So that your client will be able to send that request by any time difference and its corresponding web server will be able to respond to it. A server will run in the webserver which you call Apache server.

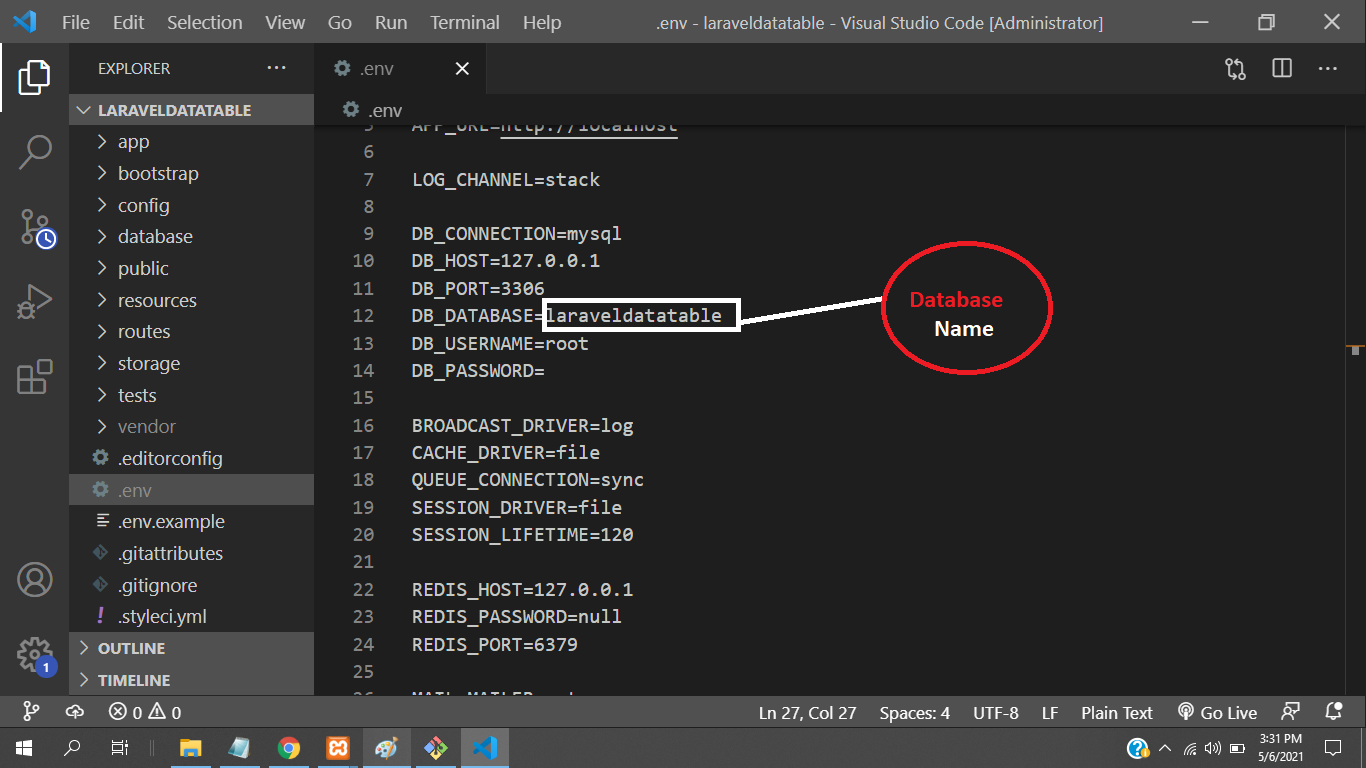
This is the web server, this is your small storage in which you have a database created. In which your own server is running which supports PHP. As a programmer, whatever site he has developed is the content of the whole site or is it accessories, They give way by storing them in their web server. You will also create a database so that the user can access it anytime.

client > apache> PHP> database> PHP> Apache> client

Development environment

Operating system – Windows, Linux, Mac, etc.

Web server – XAMP, WAMP, MAMP etc.

Editor/IDE- Notepad, Notepad++, notepad, brackets, eclipse etc.

Web browser – chrome, Firefox etc.

MySQL

MySQL ek database management system hai, is a kind of software in which you write MySQL. MySQL is a software and SQL is a language.

When you install XAMPP, you get:
Apache + MariaDB + PHP + Perl

Apache + MySQL + PHP + Perl

The basic structure of PHP

<?php   opening markup/ Opening tag

php codes;

?> closing markup/ closing tag

Whatever is written between these two is called php code.

We can write Php with HTML

<!DOCTYPE html>
<html>
	<body>
		<h1><body>DevOpsSchool</h1>
	<?php
		echo'hello devopsschool';
	?>
	
	</body>
</html>

How to run on the local server

If you have to run the PHP file in the local server, then first you have to open the XAMMP control panel, then you have to open apache and MySQL in it, this is the first thing. After that you have to go to this puck, then where you have saved the XAMMP file, you have to open the sump file, after that you have to open the htdos. After that you have to go to this PC, then open the file where you have saved XAMPP. After that htdcos has to be opened. Your project will have to create a file, all your files will be made from PHP, HTML, ccs, javascript, audio, images, videos, etc. Then go to your browser and open localhost, then type the name of your project in it and open it. After that, your PHP file will start running.

Tagged : / / / /

PhpMyAdmin is suddenly showing errors Fatal error: Uncaught TypeError: Return value of PhpMyAdmin\Relation

When you import sql file in your database and after few moment not import your sql file in your database then showing this type of error.

Fatal error: Uncaught TypeError: Return value of PhpMyAdmin\Relation::getRelationsParam() must be of the type array,

Not any solutions for this error. So,
Please try clearing your browser cache and removing phpMyAdmin cookies, which start with “pma”.

Follow these steps

  • Open up your phpMyAdmin in browser
  • Press F12 to open Developer tools
  • go to Application > Clear storage
  • Clear all Cookies and Cache
  • Try refreshing the page.

Your http://localhost/phpmyadmin/ will be run.

Tagged : / / / / / /

General error: 1364 Field ‘phone’ doesn’t have a default value

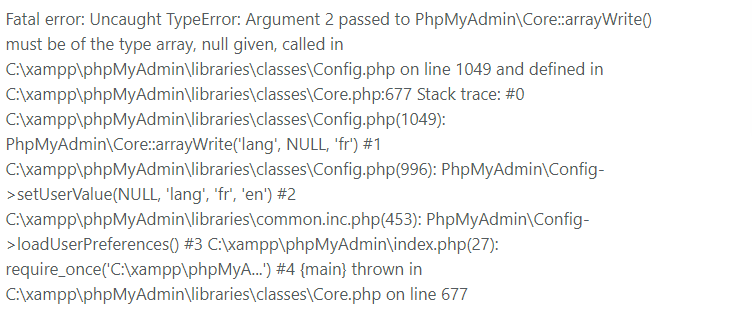
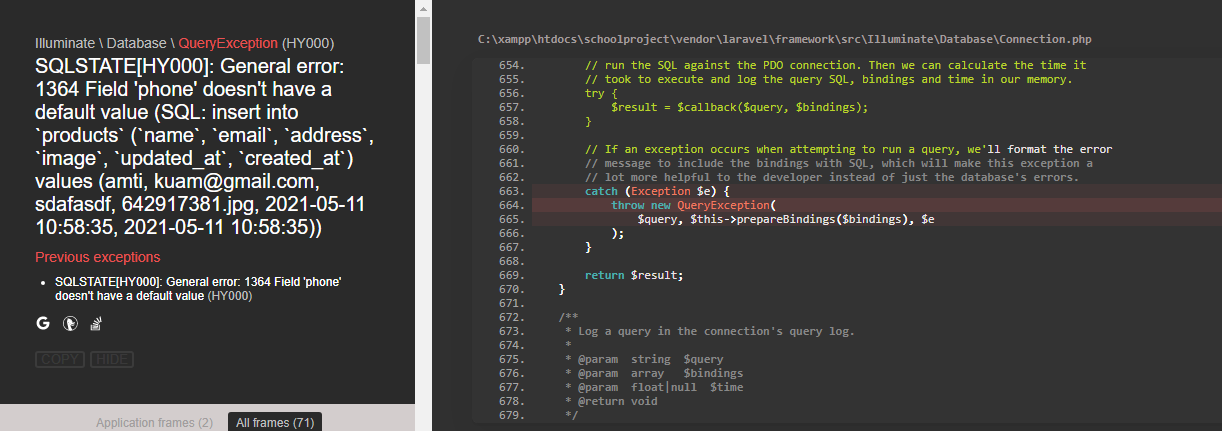
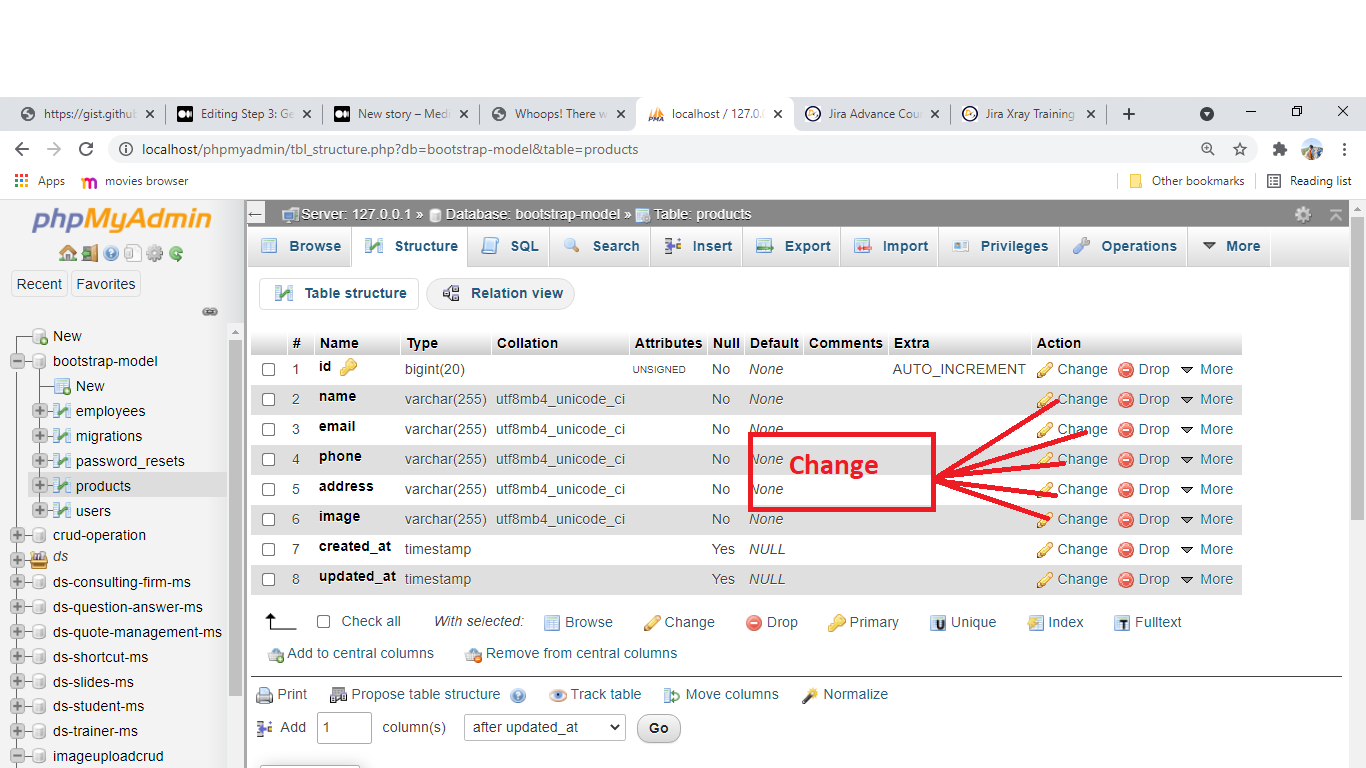
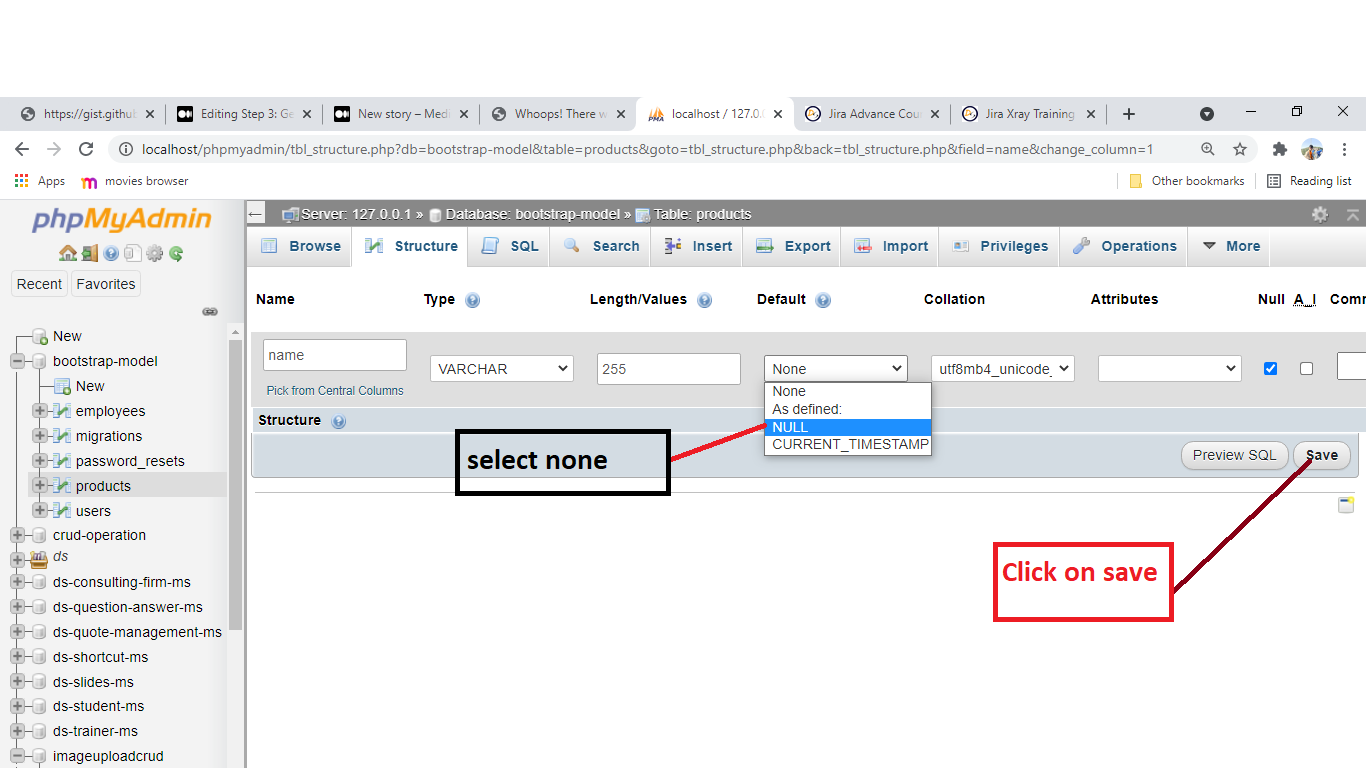
SQLSTATE[HY000]: General error: 1364 Field ‘phone’ doesn’t have a default value (SQL: insert into `products` (`name`, `email`, `address`, `image`, `updated_at`, `created_at`) values (amti, kuam@gmail.com, sdafasdf, 642917381.jpg, 2021–05–11 10:58:35, 2021–05–11 10:58:35))

When I’m submit form then got General error field doesn’t have default value. let’s go to solve this.

👉 1 step go to your database and put change none>to Null and save.

Lets go to phpmyadmin

👉 Click on Structure

Click on change and change all field to None to Null and save

Set Null and click on save button

👁👁 Now its error has been solved and your data has been stored successfully.

Thanks

Tagged : / / / / / /

How to Add Data in DataTable in Laravel Crud

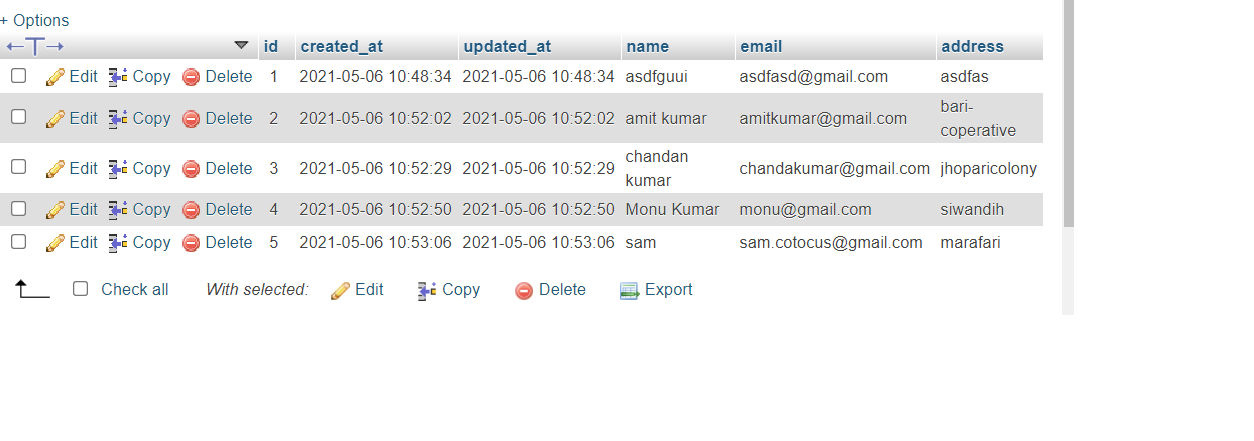
In this tutorial I’m going to describe how to add data in DataTable in laravel 8 we will create single page companies ajax crud application (SPA) using dataTables js, modal and jQuery in laravel 8.

Laravel 8 Ajax CRUD Tutorial using Datatable JS
Step 1 – Download Laravel 8 App
Step 2 – Database Configuration
Step 3 – Installing Yajra Datatables
Step 4 – Make Model & Migration
Step 5 – Make Routes
Step 6 – Create AJAX CRUD Datatables Controller
Step 7 – Create Blade Views File
companies.blade.php
company-action.blade.php
Step 8 – Run Development Server

Step 1 — Download Laravel 8 App

1st step Install laravel project and new setup, lets open the terminal C:\xampp\htdocs and paste below code

composer create-project --prefer-dist laravel/laravel laraveldatatable

Step 2 — Database Configuration

Setup database with your installed laravel 8 project . lets go to .env folder and put database name and connect to database.

DB_CONNECTION=mysql
DB_HOST=127.0.0.1
DB_PORT=3306
DB_DATABASE=laraveldatatable
DB_USERNAME=root
DB_PASSWORD=

Next run this command

php artisan migrate

Step 3 — Installing Yajra Datatables

composer require yajra/laravel-datatables-oracle

Then configure datatables package. So go to config directory and open app.php file. And add the following service providers into app.php file:

Go to -> config/app.php and put in providers section

'providers' => [

Yajra\Datatables\DatatablesServiceProvider::class,
],

'aliases' => [

'Datatables' => Yajra\Datatables\Facades\Datatables::class,
]

Then publish laravel datatables vendor package by using below command:

php artisan vendor:publish

Step 4 — Make Model & Migration

php artisan make:model Company -m

Simply copy this code and paste in companies model

<?php

use Illuminate\Database\Migrations\Migration;
use Illuminate\Database\Schema\Blueprint;
use Illuminate\Support\Facades\Schema;

class CreateCompaniesTable extends Migration
{
/**
* Run the migrations.
*
* @return void
*/
public function up()
{
Schema::create('companies', function (Blueprint $table) {
$table->id();
$table->timestamps();
$table->string('name');
$table->string('email');
$table->string('address');
});
}

/**
* Reverse the migrations.
*
* @return void
*/
public function down()
{
Schema::dropIfExists('companies');
}
}

Lets migrate table to database run this command

php artisan migrate

After that, lets go to app/models directory and open company.php model file. Then add the following code into it:

<?php

namespace App;

use Illuminate\Database\Eloquent\Model;

class Company extends Model
{

protected $fillable =['name', 'email', 'address'];

}

Step 5 — Make Routes

<?php

use Illuminate\Support\Facades\Route;

/*
|--------------------------------------------------------------------------
| Web Routes
|--------------------------------------------------------------------------
|
| Here is where you can register web routes for your application. These
| routes are loaded by the RouteServiceProvider within a group which
| contains the "web" middleware group. Now create something great!
|
*/

Route::get('/', function () {
return view('welcome');
});

use App\Http\Controllers\DataTableAjaxCRUDController;

Route::get('ajax-crud-datatable', [DataTableAjaxCRUDController::class, 'index']);
Route::post('store-company', [DataTableAjaxCRUDController::class, 'store']);
Route::post('edit-company', [DataTableAjaxCRUDController::class, 'edit']);
Route::post('delete-company', [DataTableAjaxCRUDController::class, 'destroy']);

Step 6 — Create AJAX CRUD Datatables Controller

php artisan make:controller DataTableAjaxCRUDController -r

Lets go to controller and copy below code and paste there

<?php

namespace App\Http\Controllers;


use Illuminate\Http\Request;
use App\Company;
class DataTableAjaxCRUDController extends Controller
{
/**
* Display a listing of the resource.
*
* @return \Illuminate\Http\Response
*/
public function index()
{
if(request()->ajax()) {
return datatables()->of(Company::select('*'))
->addColumn('action', 'company-action')
->rawColumns(['action'])
->addIndexColumn()
->make(true);
}
return view('companies');
}

/**
* Show the form for creating a new resource.
*
* @return \Illuminate\Http\Response
*/
public function create()
{
//
}

/**
* Store a newly created resource in storage.
*
* @param \Illuminate\Http\Request $request
* @return \Illuminate\Http\Response
*/
public function store(Request $request)
{
$companyId = $request->id;

$company = Company::updateOrCreate(
[
'id' => $companyId
],
[
'name' => $request->name,
'email' => $request->email,
'address' => $request->address
]);

return Response()->json($company);
}

/**
* Display the specified resource.
*
* @param int $id
* @return \Illuminate\Http\Response
*/
public function show($id)
{
//
}

/**
* Show the form for editing the specified resource.
*
* @param int $id
* @return \Illuminate\Http\Response
*/
public function edit($id)
{
$where = array('id' => $request->id);
$company = Company::where($where)->first();

return Response()->json($company);
}

/**
* Update the specified resource in storage.
*
* @param \Illuminate\Http\Request $request
* @param int $id
* @return \Illuminate\Http\Response
*/
public function update(Request $request, $id)
{
//
}

/**
* Remove the specified resource from storage.
*
* @param int $id
* @return \Illuminate\Http\Response
*/
public function destroy($id)
{
$company = Company::where('id','$request->id')->delete();
return Response()->json($company);
}
}

Step 6 — Create Blade Views File

Create two blade views file, which is following:

  • companies.blade.php

Next go to companies.blade.php file and paste below code

<!DOCTYPE html>
<html lang="en">
<head>
<meta charset="UTF-8">
<title>Laravel 8 AJAX CRUD using DataTable js Tutorial From Scratch - Tutsmake.com</title>
<meta name="csrf-token" content="{{ csrf_token() }}">
<link rel="stylesheet" href="https://stackpath.bootstrapcdn.com/bootstrap/4.5.2/css/bootstrap.min.css" >
<script src="https://code.jquery.com/jquery-3.5.1.min.js"></script>
<script src="https://stackpath.bootstrapcdn.com/bootstrap/4.5.2/js/bootstrap.min.js"></script>
<link href="https://cdn.datatables.net/1.10.21/css/jquery.dataTables.min.css" rel="stylesheet">
<script src="https://cdn.datatables.net/1.10.21/js/jquery.dataTables.min.js"></script>
</head>
<body>
<div class="container mt-2">
<div class="row">
<div class="col-lg-12 margin-tb">
<div class="pull-left">
<h2>Laravel 8 Ajax CRUD DataTables Tutorial</h2>
</div>
<div class="pull-right mb-2">
<a class="btn btn-success" onClick="add()" href="javascript:void(0)"> Create Company</a>
</div>
</div>
</div>
@if ($message = Session::get('success'))
<div class="alert alert-success">
<p>{{ $message }}</p>
</div>
@endif
<div class="card-body">
<table class="table table-bordered" id="ajax-crud-datatable">
<thead>
<tr>
<th>Id</th>
<th>Name</th>
<th>Email</th>
<th>Address</th>
<th>Created at</th>
<th>Action</th>
</tr>
</thead>
</table>
</div>
</div>
<!-- boostrap company model -->
<div class="modal fade" id="company-modal" aria-hidden="true">
<div class="modal-dialog modal-lg">
<div class="modal-content">
<div class="modal-header">
<h4 class="modal-title" id="CompanyModal"></h4>
</div>
<div class="modal-body">
<form action="javascript:void(0)" id="CompanyForm" name="CompanyForm" class="form-horizontal" method="POST" enctype="multipart/form-data">
<input type="hidden" name="id" id="id">
<div class="form-group">
<label for="name" class="col-sm-2 control-label">Company Name</label>
<div class="col-sm-12">
<input type="text" class="form-control" id="name" name="name" placeholder="Enter Company Name" maxlength="50" required="">
</div>
</div>
<div class="form-group">
<label for="name" class="col-sm-2 control-label">Company Email</label>
<div class="col-sm-12">
<input type="email" class="form-control" id="email" name="email" placeholder="Enter Company Email" maxlength="50" required="">
</div>
</div>
<div class="form-group">
<label class="col-sm-2 control-label">Company Address</label>
<div class="col-sm-12">
<input type="text" class="form-control" id="address" name="address" placeholder="Enter Company Address" required="">
</div>
</div>
<div class="col-sm-offset-2 col-sm-10">
<button type="submit" class="btn btn-primary" id="btn-save">Save changes
</button>
</div>
</form>
</div>
<div class="modal-footer">
</div>
</div>
</div>
</div>
<!-- end bootstrap model -->
</body>
<script type="text/javascript">
$(document).ready( function () {
$.ajaxSetup({
headers: {
'X-CSRF-TOKEN': $('meta[name="csrf-token"]').attr('content')
}
});
$('#ajax-crud-datatable').DataTable({
processing: true,
serverSide: true,
ajax: "{{ url('ajax-crud-datatable') }}",
columns: [
{ data: 'id', name: 'id' },
{ data: 'name', name: 'name' },
{ data: 'email', name: 'email' },
{ data: 'address', name: 'address' },
{ data: 'created_at', name: 'created_at' },
{data: 'action', name: 'action', orderable: false},
],
order: [[0, 'desc']]
});
});
function add(){
$('#CompanyForm').trigger("reset");
$('#CompanyModal').html("Add Company");
$('#company-modal').modal('show');
$('#id').val('');
}
function editFunc(id){
$.ajax({
type:"POST",
url: "{{ url('edit-company') }}",
data: { id: id },
dataType: 'json',
success: function(res){
$('#CompanyModal').html("Edit Company");
$('#company-modal').modal('show');
$('#id').val(res.id);
$('#name').val(res.name);
$('#address').val(res.address);
$('#email').val(res.email);
}
});
}
function deleteFunc(id){
if (confirm("Delete Record?") == true) {
var id = id;
// ajax
$.ajax({
type:"POST",
url: "{{ url('delete-company') }}",
data: { id: id },
dataType: 'json',
success: function(res){
var oTable = $('#ajax-crud-datatable').dataTable();
oTable.fnDraw(false);
}
});
}
}
$('#CompanyForm').submit(function(e) {
e.preventDefault();
var formData = new FormData(this);
$.ajax({
type:'POST',
url: "{{ url('store-company')}}",
data: formData,
cache:false,
contentType: false,
processData: false,
success: (data) => {
$("#company-modal").modal('hide');
var oTable = $('#ajax-crud-datatable').dataTable();
oTable.fnDraw(false);
$("#btn-save").html('Submit');
$("#btn-save"). attr("disabled", false);
},
error: function(data){
console.log(data);
}
});
});
</script>
</html>

Lets go to your browser and run this url

http://127.0.0.1:8000/ajax-crud-datatable

Now its open like this and successfully working and store in database as well.

Thanks 🙏🙏

Tagged : / / / /

How to create virtual local host setup in Laravel

In this tutorial I’m going to describe how to set up virtual host in Laravel. Please follow this Tutorial and you able to create successfully virtual host in Laravel

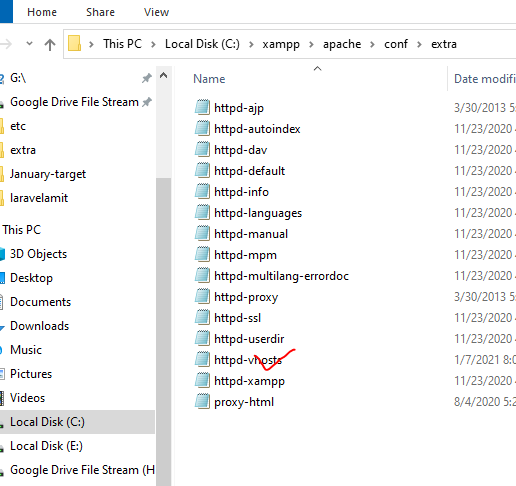
1. Go to C drive and Go to this Directory-> C:\xampp\apache\conf\extra and open httpd-vhosts name of folder

Virtual-host-in-laravel

Open this folder -> httpd-vhosts

2nd Step Copy Below Code

👇

<VirtualHost *:80>

DocumentRoot “C:/xampp/htdocs/blog/public”

ServerName localhost

</VirtualHost>

<VirtualHost *:80>

DocumentRoot “C:/xampp/htdocs/blog/public”

ServerName blog.co

</VirtualHost>

☝️

and paste simply there in this folder -> httpd-vhosts

3rd Step go to windows C:\Windows\System32\drivers\etc and open hosts folder

4th step simply copy this

👇

127.0.0.1 localhost

127.0.0.1 blog.co

And paste this folder

👇

After stop your xampp apache server and start then

And start then Xampp Apache server

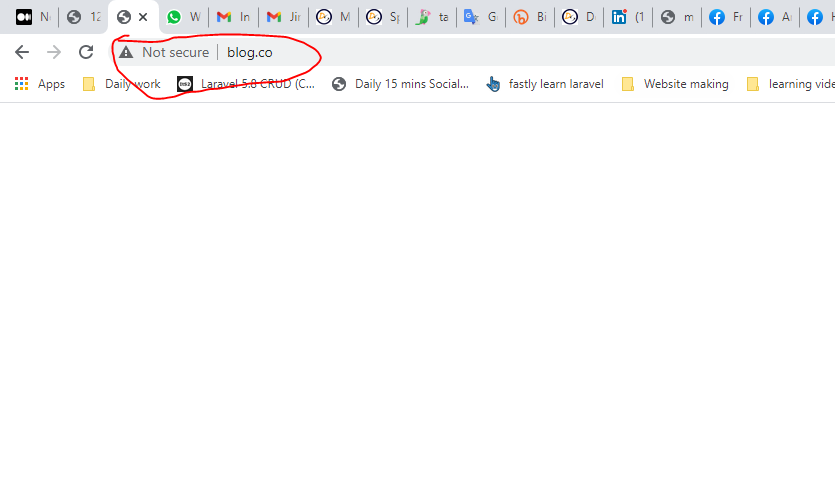
And run blog.co now you can see blog.co localhost set up is done.

Thanks …… 🙂

Tagged : / / / /

Run Ansible Adhoc commands or playbook in Local mode

If you are trying to run Ansible Adhoc commands or playbook in Local mode, these articles will help you.

Ansible can’t run playbooks locally without ssh if ansible_connection=local is defined in the hosts file, although it can run playbooks locally without ssh with connection: local in the playbook or with flag –connection=local.

# # # # # # # # # # # # Method 1 # # # # # # # # # # # # # # # # # #

ansible 127.0.0.1 -m file -a "dest=/opt/a.txt mode=600 state=touch"
ansible 127.0.0.1 -m file -a "dest=/opt/a.txt mode=600 state=file"

# # # # # # # # # # # # Method 2 # # # # # # # # # # # # # # # # # #

Inventory file
127.0.0.1 ansible_connection=local
localhost ansible_connection=local

# # # # # # # # # # # # Method 3 # # # # # # # # # # # # # # # # # #

---

- name: run the playbook tasks on the localhost
hosts: 127.0.0.1
connection: local
become: yes
tasks:

- name: print out the hostname of target
command: hostname

- name: ensure aptitude is installed
command: apt-get -y install aptitude

- name: update the apt package index i.e. apt-get update
apt: update_cache=yes

- name: upgrade system packages i.e. apt-get upgrade
apt: upgrade=yes

Tagged : / / / /

Secure Tunnels to localhost using ngrok

Secure Tunnels to localhost using ngrok

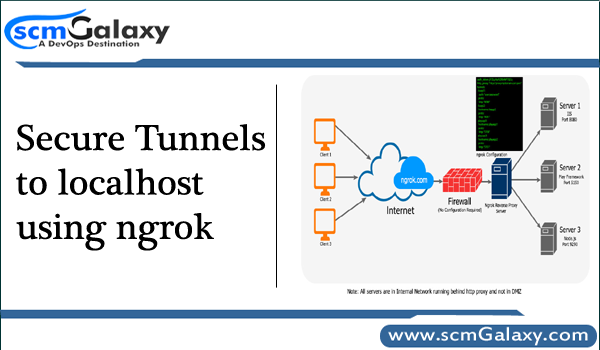
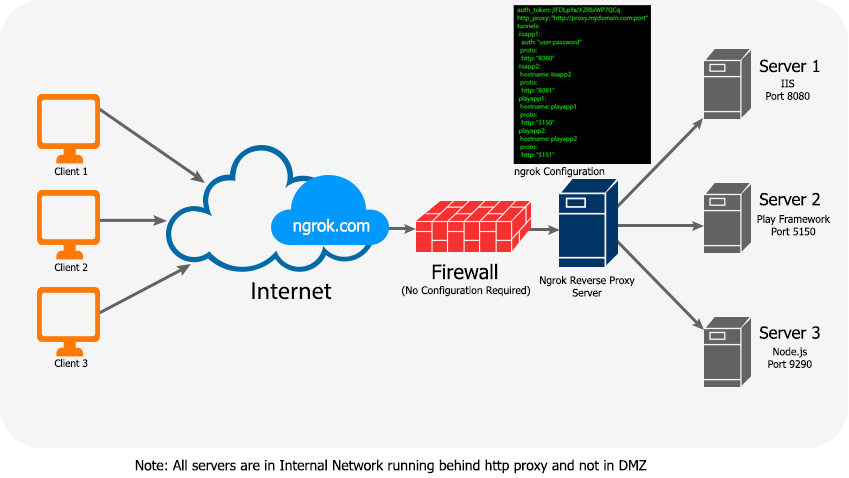
ngrok is a free tool that allows you to expose a web server running on your local machine to the internet. It includes additional functionality that makes it easy to install and manage itself as a native operating system service on Windows, OS X and Linux.

It is is a multiplatform tunnelling, reverse proxy software that establishes secure tunnels from a public endpoint such as internet to a locally running network service while capturing all traffic for detailed inspection and replay.

The following are the issues that we were facing before Ngrok deployment:

  1. Unable to expose localhost application directly to internet without DMZ & other network configuration
  2. Unable to demonstrate an application to Client on urgent basis
  3. Unable to share websites for testing purpose
  4. Develop any services which consume Webhooks (HTTP CallBacks)
  5. Can’t share a website temporarily that is running only on our developer machine
  6. Time Consuming on network and DNS configurations
  7. Can’t debug or inspect HTTP Traffic in a precise manner
  8. Can’t run networked services on machines that are firewalled off from the internet
  9. Unable to expose application behind http proxy
  10. Unable to forward non-http and non-local network services

It’s really easy to install and use

ngrok is built in Go so it is packaged as binaries for each major platform. To install ngrok do the following:

  1. Download the package for your system
  2. Unzip the package
  3. There is no step 3!

Once you have ngrok installed, using it to tunnel to an application running on, say, port 3000 is as easy as:

$ ./ngrok http 3000

Once you’ve unzipped the ngrok executable move it to a folder that’s in your $PATH then you can run ngrok from anywhere you want on the command line by just typing:

$ ngrok http 3000

It has a dashboard
http://127.0.0.1:4040

You can secure your tunnels

$ ngrok http -auth "user:password" 3000

You can use custom subdomains

$ ngrok http -subdomain=thisisreallycool 3000

Tagged : /