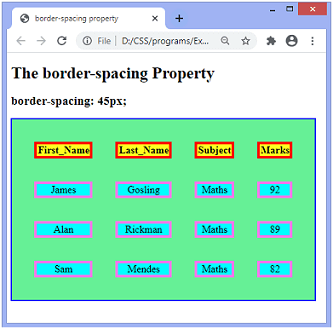
This CSS property is used to set the distance between the borders of the adjacent cells in the table. It applies only when the border-collapse property is set to seprate. There will not be any space between the borders is the border-collapse is set to collapse.
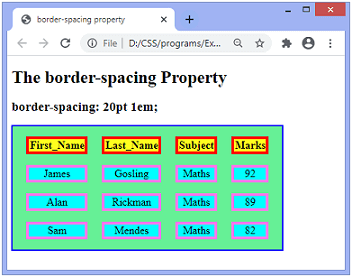
It can be defined as one or two values for determining the vertical and horizontal spacing. When only one values is specified, then it sets both horizontal and vertical spacing. When we use the two value syntax, then the first one is used to set the horizontal spacing, and the second value sets the vertical spacing.
syntax:-
border-spacing: length | initian | inherit;
property values:-
length:- This value sets the distance between the borders of the adjacent table cell in px, cm, pt, etc. Negative values are not allowed.
initial:- It sets the property to its default value.
inherit:- It inherit the property from its parent element.
Example:-
Using the value of the border-spacing property. The border- collapse property is set to separate, and value of the border-spacing is set to 45px.
Example:-
Using two values of teh border spacing property. The border-collapse property is set to separate, and the value of teh border-spacing is set to 20pt 1em. The first value, i.e., 20pt sets the horizontal spacing, and the 1 em set the vertical spacing.
This property set the border of the table cells ans specifies wheather the table cells share the seprate or common border.
This property has two main values that are seprate and collapse. When it is set to the value seprate, distance between the cells can be defined using the border-specing property. When the border-collapse is set to the value collapse, then the inset value of the border-style property behaves like groove, and the outset value behave like ridge.
seprate:- It is the default value that seprates the border of the table cell. Using the value, each cell will display its own border.
collapse:- The value is used to collapse the borders into a single border. Using this, two adjacent table cells will share a border. When this value is applied, the border-spacing property does not affect.
initial:- It sets the property to its default value.
inherit: It inherits the propperty form its parent element.
CSS border-property:- The css property sets the rounded borders and provides the rounded corners around an element, tag, or div. It defines the radius of the corners of an element.
It is shorthand for border top-left-radius, border-top-right, border-bottom- right-radius and border-bottom-left-radius. It gives the rounded shape to the corners of the border of an element. We can specify the border for all four corners of the box in a single declaration using the border-radius. The values of this property can be defined in percentage or length units.If the bottom-left value is omitted, then it will be same as the top-right. If the value of bottom-right is eliminated, then it will be same as the top-left. Similarly, if top-right is eliminated, then it will be the same as top-left.
Let’s see what happens when we provide a single value, two values, three values, and four values to this property.
If we provide a single value (such as border-radius: 30px;) to this property, it will set all corners to the same value.
When we specify two values (such as border-radius: 20% 10% 😉, then the first value will be used for the top-left and bottom-right corners, and the second value will be used for the top-right and bottom-left corners.
When we use three values (such as border-radius: 10% 30% 20%;) then the first value will be used for the top-left corner, the second value will be applied on top-right, and bottom-left corners and the third value will be applied to the bottom-right corner.
Similarly, when this property has four values (border-radius: 10% 30% 20% 40%;) then the first value will be the radius of top-left, the second value will be used for the top-right, the third value will be applied on bottom-right, and the fourth value is used for bottom-left.
example:-
Border-radius for specific corners:-
It sets the border radius for the top-left corner.
Example:- border-top-right-radius
It sets the border-radius for the top-right corner.
Example- border-bottom-right-radius
It sets the border-radius for the bottom-right corner.
Example- border-bottom-left-radius
It sets the border-radius for the bottom-left corner.
We can specify seprate horizontal and vertical values by using the slash(/) symbol. The values before the slash (/) is used for the horizontal radius and the values after the slash(/) are for the vertical radius.
There is an example given below using the slash(/) symbol.
The CSS border is a property is used to set the border on an element.
The CSS border properties are use to specify the style, color and size of the border of an element. The CSS border properties are given below
border-style
border-color
border-width
border-radius
1.CSS border-style:- The Border style property is used to specify the border type which you want to display on the web page.
There are some border style values which are commenly used for boder-style property. Try it yourself:-
2. CSS border-width:- This property is used to set the border’s width. It is set in pixels. we can also use the one of the three pre-defined values, thin, medium or thick to set the width of the border. Example:-
3. CSS border-colour:- This property is used to set the border color. There are methods to set the color of the border.
Name: It specifies the color name. For example:”red”.
RGB: It specifies the RGB value of the color. For example: “rgb(255,0,0)”.
Hex: It specifies the hex value of the color. For example: “#ff0000”
There is also a border color named “transparent”. If the border color is not set it is inherited from the color property of the element.
CSS selector are used to select those content which we want to style. CSS selector is used to select HTML elements according to its id, class, type, attribute etc.
Types of CSS selector:-
CSS element selector
CSS Id selector
CSS Class selector
CSS universal selector
CSS Group selector
Css Element selector:- CSS element selector selects the HTML element by name.
CSS Id Selector:- The Id selector selects the id attributes of an HTML element to select a specific element. An id is always unique within the page so it is chosen to select a single, unique element.
CSS Class Selector:- It select the HTML elements with a specific class attribute. It is used with a period character .(full stop symbol) followed by the class name.
CSS Universal Selector:- The universal selector is used as a wildcard character. It selects all elements on the page.
CSS Group Selector:- It is used on those elements which have same style definations. Grouping selector is used to minimize the code. Commas are used to separate each selector in grouping.
CSS Comments:- CSS comments are generally written to explain your code. It is very helpful fir the users who reads your code so that they can easily understand the code. Comments are ignored by the browsers. Comments are the single line or multiple line statements and written in /*……..*/ .
CSS Background:- This property is used to define the backgroud effects on elements. There are 5 CSS background properties that affect the HTML elements.
background-color
background-image
background-repeat
background-attachment
CSS Background-color:- This property is used to specify the background color of element.
You can set the background color like this:
2.CSS background-image:- The background-image property is used to set an image as a background of an element. By default the image covers the entire element. Example:-
3. CSS background-repeat:- BY default,
the background-image property repeats the background image horizontally and vertically. Some images are repeated only horizontally or vertically.
The background looks better if the image repeated horizontally only.
4. CSS background-attachment:- Thisproperty is used to specify if the background image is fixed or scroll with the rest of the page in browser window. If you set fixed the background image then the image will not move during scrolling in the browser. example:-
5.CSS background-position:- The background-position property is used to define the initial position of the background image. By default, the background image is placed on the top-left of the webpage. we can set the following positions:-
CSS is the language we use to style the web pages. CSS stands for Cascading Styles Sheets. It describes how HTML elements are displayed on the screen. It can control the layout of multiple web pages all at once.
CSS Syntax:-
The selector points the HTML elemet you want to style.
The declaration block contains one or more declarations seprated bs semicolons.
Each declaration includes a css property name and value, seprated by a colons.
Multiple CSS declarations are seprated with semicolons, and declarations block are surrounded by curly braces.
Advantages of CSS:-
Time saving:-We can write css once and then reuse same sheet in multiple HTML pages. It saves lots of time.
Faster load pages:- If we use CSS, we do not need to write HTML tag attributes everytime. Just write one CSS rule of a tag and apply it to all the occurrences of that tag. So less code means faster download times.
Easy maintenence:- To make a global change, simply change the style, and all elements in all the web pages will be updated automatically.
Multiple device compatiblity:- Style sheets allow content to be optimized for more than one type of device.
Global web standards:- Now HTML attributes are being deprecated and it is bieng recommended to use CSS.
Ways of inserting CSS:-
External style sheets
Internal style sheets/Embedded Style sheets
Inline css
External Style Sheets:-
An external style sheet is a separate document that contains only CSS rules. An external style sheet helps to change the look of an entire website by changing just one css file. It should not contain any HTML Tags. It has .css extension.
Example:-
p { color: red; font-size: 24px;}
h1{ color: blue; font-size: 24em;}
1. Open notepad++ or any other Editor or IDE
2. Write CSS Code
3. Save with .css extension for example geekyshows.css
How to link Web Page to an External Style Sheet:-
The href attribute with <link> element inside the <head> tag is used to link web page to an external style sheet.
<html>
<head>
<title>Welcome to Geekyshows</title>
<link rel=“stylesheet” href=“geekyshows.css”>
</head>
<body>
<h1>I am Heading</h1>
<p>I am first Paragraph.</p>
<p>I am second Paragraph</p>
</body>
</html>
Internal Style Sheets:-
Internal Style sheet is a set of style that is created as a part of HTML document. An internal style sheet may be used if one single page has a unique style.
Internal Style sheets are created using <style> element, which is added inside the <head> element of the HTML document.
Example:-
<html>
<head>
<title>Hello CSS</title>
<style type=“text/css”>
p { color: red; font-size: 24px;}
h1{ color: blue; font-size: 24em;}
</style>
</head>
<body>
<h1>I am Heading</h1>
<p>I am first Paragraph.</p>
<p>I am second Paragraph</p>
</body>
</html>
Inline Styles:-
Inline style is useful when we need to define specific style for individual elements present on a web page. The style attribute in a specific Tag or element, is used to create inline style. The style attribute can contain any CSS property between double quotes.
Ex:-
For paragraph:-
<p style=“color: red; font-size: 22px;”> I am first paragraph</p>
<p> I am second paragraph</p>
For Heading: –
<h1 style=“color: red; font-size: 22px;”> I am Heading</h1>
HTML provides a way of displaying Web pages with text and images or multimedia content. HTML is not a programming language, it is a markup language. An HTML file is a text file containing small markup tags. The markup tags tell the web browser, such as Google chrome or internet explorer, how to display the page. An HTML file must have an htm or html file extension. HTML stands for HyperText Markup Language.
HTML Tags:-
A tag is a bit of text acts as a point demarcation. To create a tag, HTML gives certain characters special meaning: th e angle brackets <and>. putting characters within the brackets creates a tag. types of tags: there are two types of tags.
Start tag
End tag/Closing tag End tag is same as start tag except that it has an extra forward slash after opening angle bracket.
Element:- The combination of start tag,end tag and things between the two tags are known as contents of teh element. Attribute:- Attributes provide additional information about the contents of an element. They appear on the opening tag of the element and are made up of two parts:- a name and a value, seprated by an equals sign. the attributes name indicate what type of extra information you are supplying about the element content.
HTML headings:- HTML headings are defined with the <h1> to <h6> tags. <h1>defines the most important tags and <h6> defines the least important tags.
HTML paragraphs:- HTML paragraphs are defined with the tag.
HTML links:- HTML links are defined with the <a> tag.
It is also called anchor tag. The link destination is specified in href attribute. example:- <a href=”https://www.facebook.com”>This is a link.</a>
HTML images:- HTML images are defined with teh tag. The source file(src), alternative text(alt), width and height are the attributes used with the with this tag. example:- <img src=”pic.jpg” alt=”facebook.com” width=”104″ height=”142″>
How to view HTML source? To see the source code of the html page, right click on the HTML page and then select view page source, or we can use a shortcut key ctrl+u.
Some important attributes:-
src attribute:– Ths attribute id used in img tag. The src attribute specifies the path to the image to be displayed. Example:-<img src=”img_girl.jpg”>
There are two ways to specify the URL in the src attribute:
Absolute URL-Links to an external image that is hosted on another website. Example: src=”https://www.facebook.com/images/img_girl.jpg”.
Rekative URL- Links to an image that is hosted within the website. Here, the URL does not include the domain name. If the URL begins without a slash, it will be relative to the current page. Example: src=”img_girl.jpg”. If the URL begins with a slash, it will be relative to the domain. Example: src=”/images/img_girl.jpg”.
2. Width and height attribute:- the tag contain the width and height attribute, it defines the width and height of the image diaplayed.
The Alt attribute:- The required alt attribute for the tag specifies an alternate text for an image, if the image for some reason cannot be displayed. This can be due to slow connection, or an error in the src attribute, or if the user uses a screen reader.
The style attribute:- the style attribute is used to add atyle to the elment, such as colour, font, size etc. exmple:-This is a red paragraph.
The lang attribute:- The lang attribute is used inside the tag, to declare the language of the web page.
HTML styles:-
The HTML styles attributes is used to add styles to an element, such as color font size etc. Background color:- The CSS background-color property defines the background color for an HTML element.
example:-
<body style=”background-color:powderblue;”>
<h1>This is a heading</h1> <p>This is a paragraph.</p>
</body>
Text color:-The CSS color property defines the text color for an HTML element.
example:-
<h1 style=”color:blue;”>This is a heading</h1> <p style=”color:red;”>This is a paragraph.</p>
Fonts:-The CSS font-family property defines the font to be used for an HTML element.
example:-
<h1 style=”font-family:verdana;”>This is a heading</h1> <p style=”font-family:courier;”>This is a paragraph.</p>
Text size:- The CSS font-size property defines the text size for an HTML element.
example:-
<h1 style=”font-size:300%;”>This is a heading</h1> <p style=”font-size:160%;”>This is a paragraph.</p>
Text allignment:-The CSS text-align property defines the horizontal text alignment for an HTML element.
WordPress is a free open source content management system. It is an online site which is based on PHP and MySQL. it was mainly designed as a blogging tool but now it is a versatile CMS. we can create simple blog and fullt operational website and also mobile application using WordPress.
It is considered as the easiest and most popular CMS tool due to its features. The main feature of WordPress is its versatility and feasibility to use. There is no use of coding and designing skills for creating a website on this. Even a non-technical person can also create a website with the help of WordPress easily.
WordPress was released on 27th may 2003 by its founders Mike Little and Matt Mullenweg.
WordPress Versions
Version
Released date
Musician
Purpose
0.7
May 27, 2003
none
Numbering is continued with last release of b2
1.0
Jan 3, 2004
Davis
Additions of search engine friendly links
1.2
May 22, 2004
Mingus
Plugin support added
1.5
Feb 17, 2005
Strayhorn
Added features to manage static page and theme system
2.0
Dec 31, 2005
Duke
Added features like rich editing, faster posting, image uploading and many more
2.1
Jan 22, 2007
Ella
Redesigned interface, corrected security issues, improved editing tools and content management system
2.2
May 16, 2007
Getz
Widget support for templates were added
2.3
Sept 24, 2007
Dexter
Some security fixes, added native tagging support and brought easy notification of updates
2.5
Mar 29, 2008
Brecker
Improved systems like plugin, editor, multi-file upload, extended search
2.6
Jul 15, 2008
Tyner
Made WordPress as more powerful CMS, enables track changes to every post and page and allows posting from anywhere
Redesigned widget interface, added improvement in speed
2.9
Dec 19, 2009
Carmen
Added built-in image editor, global undo, batch plugin updating
3.0
June17,2010
Thelonious
Added a new theme APIs, new default theme “Twenty Ten”, new UI
3.1
Feb23, 2011
Reinhardt
Added admin bar which is displayed in all pages when admin is logged in, a new writing interface
3.2
Jul 4, 2011
Gershwin
Made WordPress faster and lighter seeing growing speed in WordPress community
3.3
Dec 12, 2011
Sonny
Focus on making WordPress familiar for tablet users and beginners
3.4
June13,2012
Green
Improvements on theme customization and other minor changes
3.5
Dec 11,2102
Elvin
new theme “Twenty Twelve”, support for color picker, retina display
3.6
Aug 1, 2013
Oscar
New theme “Twenty Thirteen”, autosave, post locking, admin enhancements
Older Supported Versions
Version
Released date
Musician
Purpose
3.7
Oct 24, 2013
Basie
Automatic apply maintenance and security updates in background, recommendation of strong password
3.8
Dec 12, 2013
Parker
New theme “Twenty Fourteen”, responsive for mobile devices, improved admin interface, easy main dashboard
3.9
Apr 16, 2014
Smith
New theme browser, improvements in live widget, header previews
4.0
Sept 4, 2014
Benny
Easy language change, plugin compatibility with PHP 5.5 and MySQL 5.6
4.1
Dec 18, 2014
Dinah
New theme “Twenty Fifteen”, vine embeds and distraction free writing
4.2
Apr 23, 2015
Powell
“Press This” feature, emoji and improved character support
4.3
Aug 18, 2015
Billie
More focus on mobile users, improved customizer and better passwords
4.4
Dec 8, 2015
Clifford
New theme “Twenty Sixteen”, improved responsive images
4.5
Apr 12, 2016
Coleman
Added live responsive features, inline linking and some other updates
Latest Version
Version
Released date
Musician
Purpose
4.6
Aug 16, 2016
Pepper
Added native fonts, streamline updates and content recovery
Future Version
Version
Released date
Musician
Purpose
4.7
Dec 2016
none
Release is scheduled for December 2016
Reasons to use WordPress
Anyone can design his/her own website without any designing skills.
To create a website on WordPress we only need n Internet connection.
It provides a wide range of themes.
It provides many free plugins which add extra functionality to our websites.
It is free and open source.
Adding blog is very easy.
It is very fate and secure.
very easy to use.
How to create a WordPress website
Creating a site on WordPress is very easy. WordPress is designed in such a way that even non-tech users can also design their own websites easily and attractively.
Here, we’ll discuss each and every step involved in creating a WordPress site.
Selecting a right platform
Choosing a domain name and host
Choosing a theme/template
Creating new pages
Adding Content
Adding Media
Installing plugins
Selecting a right platform
First you have to decide a suitable platform to build your website with. Here platform means either you want to create your website using HTML, CSS or using a CMS (Content Management Systems).
There are various popular CMS in the market like WordPress, Drupal, Joomla, DotNetNuke, etc.
Why choosing WordPress
For a beginner WordPress will be the best as it doesn’t need any technical skills and due to its flexibility it is suited for all type of users.
You’ll get a lot of options to select a theme as a wide range of community design themes for WordPress. It can handle any type of website whether large or small. Most known websites like CNN, NASA, eBay use WordPress.
Above all, it gives you a responsive site which makes it compatible with small screen devices like mobile phones and tablets.
Shared hosting is best choice for beginners. You can later upgrade your site’s hosting according to the site’s traffic.
Choosing a domain name and host
You need a domain name and a hosting space to get your website online.
Domain name enables you to give your site your own name while hosting gives a space to your site on a server which makes sure your website loads quickly and won’t go down for hours.
Domain name should be short and easy to remember, brand able and catchy which defines your business.
Choosing a domain name is not easy with fulfilling all the criteria as million of domain names are active.
Choosing a theme/template
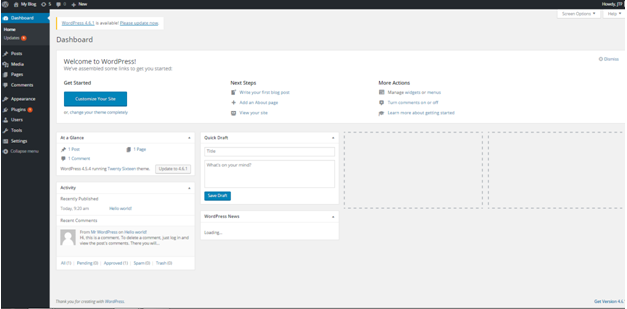
After installing WordPress, a site appears very plain. To make it more attractive, users install best suitable themes for their site. It adds visuals and views to the front page.
First of all, login to your WordPress site. By default, first screen will be your dashboard.
Accessing Free themes
After login, you’ll get access for 150 free themes.
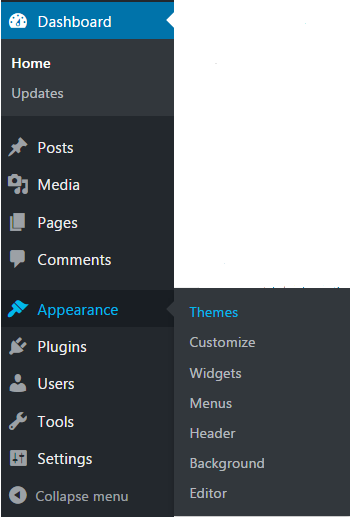
Look at the above snapshot, to look at the free themes, got the side bar menu of your dashboard, select Appearance >Themes.
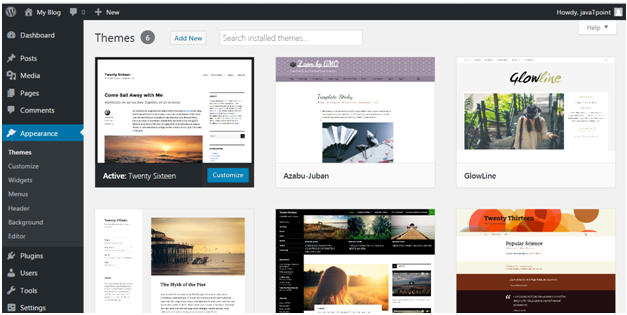
Below screen will appear including all the installed themes.
Look at the above snapshot, if you want to install more themes click on Add New button above and install it.
To install a theme, click on Install followed by Activate button.
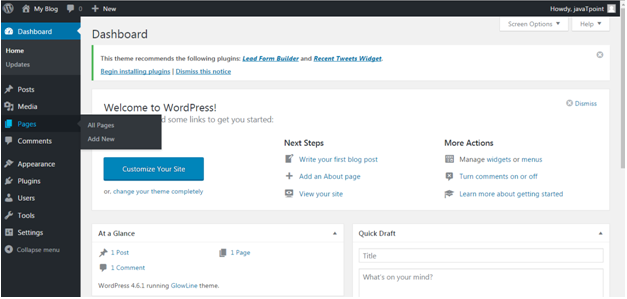
Creating new pages
Look at the above snapshot, go the sidebar menu, click Pages > Add New option.
Adding Content
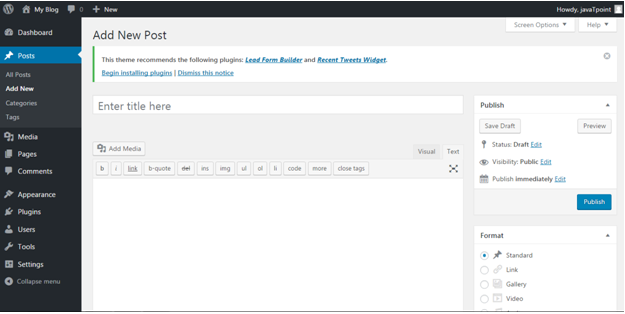
Adding new post
At the end we all will come to this point to make our site popular. We need to post different things to increase the popularity of our site.
Clicking on Post > Add New option, the above page will appear on the screen.
There are two ways to write a post, either you may write in Visual editor or in Text editor (in HTML format). Currently this snapshot is of Text editor.
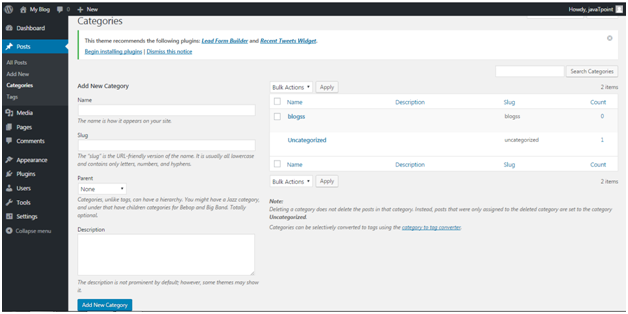
Adding Categories
You can divide your content in different categories by adding categories to them. This tool is handy when you are publishing content for more than one field.
Click on Posts > Categories, you will be directed to the above page.
Here, in Name add a title to your new category. In Slug, you can add some words which will become part of URL while searching.
Tags
Tags are very much similar to Categories with only one difference that each post has its own set of tags.
Enabling or Disabling Comment
Comment creates a debate on some posts or sites. Some users don’t want their visitors to comment. They can shut comment off in WordPress.
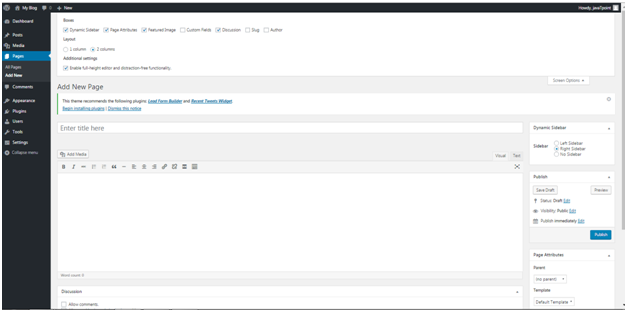
To disable a comment for a particular page
Go to Pages > Add New
Click on Screen Options on top right
Tick on Discussions box
Scroll down, untick Allow Comments option.
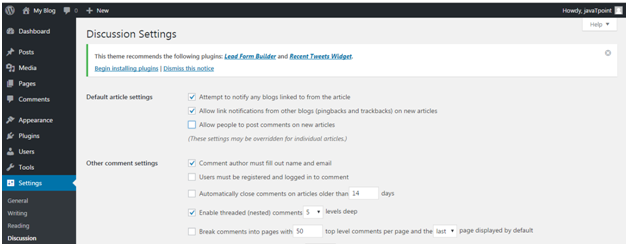
Go to Settings > Discussions
Untick “Allow people to post comments on new articles”
Editing sidebar
Sidebar which generally appears on the right side (sometimes appears on left) contains widgets like Archives, Categories and Meta, etc.
To edit the side bar, go to Appearance > Widgets
Use drag n drop method to either use a widget or remove a widget.
Adding Media
Every website needs some photos and videos to describe its content and value. WordPress also provide functionality to add a media. You can add image caption, title and description along with media. Also add alt text helps search engine to identify the image.
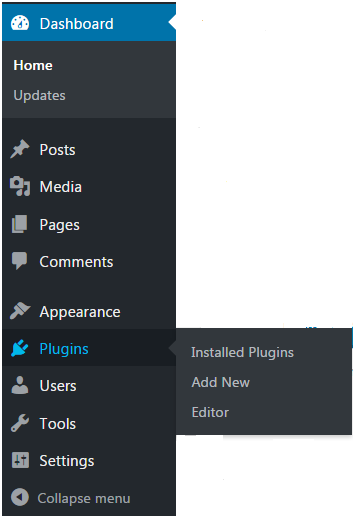
Installing plugins
Plugins are the extensions in the WordPress with certain piece of coding expanding specific function to you site. They are not built-in.
There are almost 25,000 different plugins options to choose from.
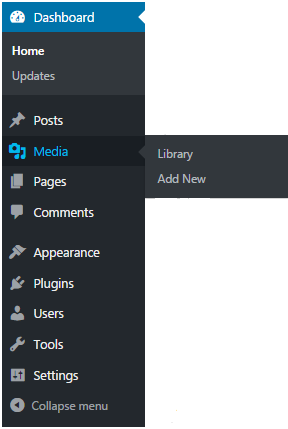
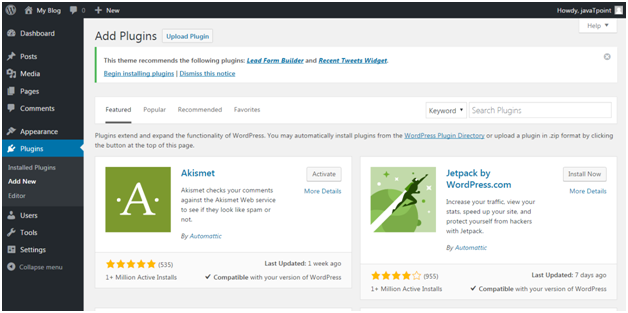
Installation a plugin is very simple. Click Plugins. You will see three options, as shown in the snapshot below.
Click on Plugins > Add New. Following screen will appear in front of you.
You can choose a plugin from the given options. Just click Install Now and you will be able to use it.
DevOps is the combination of two words, one is Development and other is operation. This allows a single person to handle the entire lifecycle of an application. DevOps helps in collaboration between Development and Operations team to deploy code to production faster. it helps to organization speed to deliver application and services. It is a sequence of development and it operation with better communication and collaboration.
Features of DevOps architecture:
Automation
Automation reduces time consumption during testing and development phase. The productivity increases by automation. This will help in catching bugs so that it can be fixed easily.
2. Collaboration
The Development and Operations team collaborates as a DevOps team, which improves the cultural model as the teams become more productive with their productivity, which strengthens accountability and ownership. The teams share their responsibilities and work closely in sync, which in turn makes the deployment to production faster.
3. Integration
The Applications need to integrate with other components in the environment. In integration phase the existing code is combined with new code and tested. The continious integration and testing enables continious development.continious integration helps in to execute delivery in a quicker, safer and reliable manner.
4. Configuration management
It helps the application to interact with only those resources which are concerned with the environment.
Advantages of DevOps:-
It is a collective responsibility which help in better team engagement and productivity.
It improves customer satisfaction and experience.
It is an excellent approach of development and deployment.
DevOps respond faster to the market changes and improve bussiness and growth.
it places all the tools in the cloud for customer easy access.
Disadvantages of DevOps:-
Less availablity of DevOps professionals.
DevOps is expensive.
DevOps technology is hard to manage.
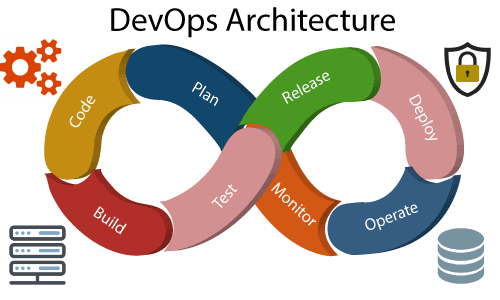
DevOps Architecture:-
1. Build
Without DevOps the cost of the consumption of the resource was evaluated based on the pre defined individualsusage with fixed hardware allocation. But DevOps usages the cloud for resource sharing, it is a mechanism to control usage of resources.
2. Code
Many good practices like Git helps in writing the code for bussiness, track changes, getting notified about the freason behind the changes and if necessary reverting to the original code developed.
3.Test
The application will be ready for production after testing. In the case of manual testing, it consumes more time in testing and moving the code to the output. The testing can be automated, which decreases the time for testing so that the time to deploy the code to production can be reduced as automating the running of the scripts will remove many manual steps.
4. Plan
Devops use Agile methodology to plan the development.
5. Monitor
Monitering is used to identify any risk of falilure. It also help in tracking the system accurately so that the health of the application can be monitered easily.
6. Deploy
Many systems can support the scheduler for automated deployment. The cloud management platform enables users to capture accurate insights and view the optimization scenario, analytics on trends by the deployment of dashboards.
7. Operate
The teams operate in a collaboration where both the teams actively participate throughout the services lifecycle.
8. Relaese
Deployment to an environment can be done by automation. But when the deployment is made to the production environment, it is done by manual triggering. many processes involved in release management commonly used to do the deployment in the production environment manually to lessen the impact on the customers.
when we got to any of popular site to register, we notice that they provide feedback when we didn’t fill the data or filled in correct format. we will get message such as:-
“This field is requied(when we leave the field blank).”
“Please enter your phone number in the format XXXXX”(When the data entered is not in correct format).
“Please enter the valid email address.”( when the email entered is not in correct format).
” Password needs to be between 8 to 20 character long and must contain one upper case letter, one symbol and a number.”( A very specific data format is required for the data).
This is called form validation.
OR
Before submitting the data to the server, it is important to ensure that all the fieds are correctly filled. This is called client side validation. It help us to ensure that the data entered matches the requirement. If the data entered is incorrect or simply missing, the server send the data back to the client requesting to resubmit the form with correct data.
There are two types or validation:-
Client side validation:- When the validation is done on the browser is called client side validation.
Server side validation:- when then the validation is done on server is called server side validation.
Three main reasons of validation:
We want to get the right data, in the right format.
We want to protect our users data.
We want to protect ourselves.
Different types of client side varification:-
There are two types of validation:-
built-in form validation:– It uses the HTML5 validation features. This validation generally doesn’t require much JavaScript. Built-in form validation has better performance than JavaScript, but it is not customizable as JavaScript validation.
JavaScript:- JavaScript validation is coded using JavaScript. this is completely customizable, but we need to create it or use a library.
Form validation performs 2 functions:-
Basic validation:- In this validation the is checked that all the mandatary fields must be filled.
Data Format Validation:- In this validation it is checked that all the filled data must be of correct form and value.
Using built-in form validation
One of the most significant features of html5 is the ability to validate user data without relying on JavaScript. This is done by using the validation attributes on form elements. Some of the attributes are written below:
required: It specifies that whether a form field needs to be filled in before submitting.
minlength: Specifies minimum length of the data.
maxlength: Specifies the max length of the data.
pattern: Specifies a regular expression that defines the entered data need to be follow.