How to Become a Blockchain Developer?

Blockchain development is one of the fastest growing areas. Companies are looking for blockchain developers to implement new ones, upgrade their existing systems, and move forward in the industry. Technology is always evolving, and if you want to make a career for the future, is the way to go Blockchain.

What is Blockchain Developer?

Blockchain developer skills are a combination of hard skills and soft skills from an abstract point of view. They can handle the entire life cycle of a blockchain application. This means that you will be responsible for the execution of the application as well as research.

Types of Blockchain Developers:

There are two types of Blockchain Developer.

  • Blockchain software developer
  • Core blockchain developer

They are both involved in blockchain development, but they have different responsibilities.

Blockchain Software Developer

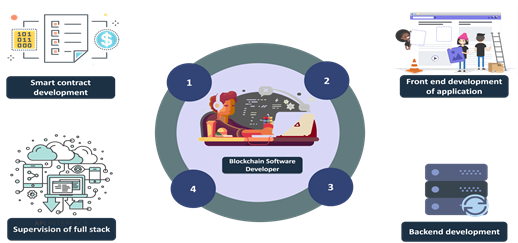
Blokchain software developers to create applications based on Blokchain architectures and protocols. Their apps also run on the blockchain. You can compare them to web developers, who use the products of a web architect (protocol and design) to develop web applications.

Blockchain software developers create dapps or decentralized applications. They are responsible for the back-end development as well as front-end of Daps. They also monitor the stack running the dapps.

Core Blockchain Developer

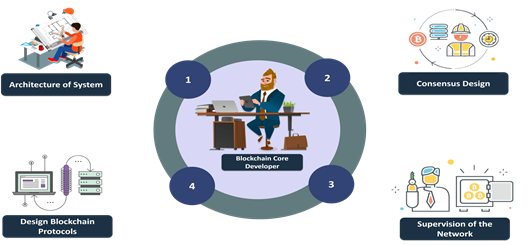
These developers focus on the architecture development of blockchain systems. They design their own consensus protocol and make most of the important decisions related to the blockchain. They monitor the network and design the architecture of the same. Core blockchain developers are also responsible for the security of their blockchain network.

Role and Responsibilities of Blockchain Developer:

  • Research, design, develop, and test blockchain technologies.
  • Brainstorm and help evaluate applications for new tools and technologies as they continually evolve.
  • Maintain and extend current client- and server-side applications responsible for integration and business logic.
  • Collaborating with managers to determine blockchain technology needs and envisaged functionalities.
  • Maintaining client and server-side applications.
  • Optimizing and securing blockchain applications by integrating new tools and technologies.
  • Taking into account the current blockchain technologies and cryptography methods.

Blockchain Developer Skills:

Blockchain developers have many responsibilities. To handle those responsibilities well, they must possess certain skills as well.

Cryptography:

Cryptography is the study of protocols that prevent unwanted parties from accessing your data. There are several essential concepts in cryptography that you should be familiar with as you will need them during blockchain development.

Data Structures:

To become a blockchain developer you need to have extensive knowledge of data structures. This is because blockchain developers regularly work with different data structures as they need to build and implement networks.

Blockchain Architecture:

To become a blockchain developer, you must be familiar with blockchain architecture. You should know what a ledger means in a blockchain, what is consensus, and how smart contracts work.

Web Development:

As a blockchain developer, you will be developing web apps in most cases. Learning web development will you familiar with all its aspects, and you can create robust web apps that use Blokchain technology using this knowledge.

Java:

Java is popular among blockchain developers due to its many properties. It is easy to learn, but it is capable of developing many complex solutions.

C++:

C++ is a popular language among blockchain developers. You can do a lot of things related to blockchain with its help. The creators used C++ to create Bitcoin Core, so it’s definitely a must-see for any aspiring blockchain developer.

Python:

Python is one of the most popular programming languages on the planet. It is versatile, and its various libraries enable you to use it for both front-end as well as back-end development. So you should also familiar yourself with Python.

You can learn JavaScript, Ruby, and C# in addition to the languages mentioned above. The ability to learn and work with multiple languages is one of the important blockchain developer skills.

What Blockchain Developer do?

Blockchain software developers build applications based on the blockchain architecture and protocol. Blockchain software developers create dapps or decentralized applications. They are responsible for the front-end as well as back-end development of Dapps. They also monitor the stack running the dapps.

Blockchain developers enable secure digital transactions by the system to record and store Blockchain data which prevents changes or hack.

  • They design secure blockchain technologies.
  • Develop application features and interfaces.
  • Maintain client and server-side applications.

At present, Blockchain is considered one of the most revolutionary technologies as it transforms the way we interact, transact, and share information. Many technocrats and Blockchain Experts also believe that it is going to be the most disruptive technology in the next decade.

Today, this technology is not only used by tech giants, enterprises, federal agencies, and even startups have started adopting Blockchain. In fact, they are looking for Certified Blockchain Experts and are considering certified professionals over the non-credential peers.

Thank you!!

Tagged : / / / / / / / /

CSS border-spacing property

This CSS property is used to set the distance between the borders of the adjacent cells in the table. It applies only when the border-collapse property is set to seprate. There will not be any space between the borders is the border-collapse is set to collapse.

It can be defined as one or two values for determining the vertical and horizontal spacing. When only one values is specified, then it sets both horizontal and vertical spacing. When we use the two value syntax, then the first one is used to set the horizontal spacing, and the second value sets the vertical spacing.

syntax:-

border-spacing: length | initian | inherit;

property values:-

length:- This value sets the distance between the borders of the adjacent table cell in px, cm, pt, etc. Negative values are not allowed.

initial:- It sets the property to its default value.

inherit:- It inherit the property from its parent element.

Example:-

Using the value of the border-spacing property. The border- collapse property is set to separate, and value of the border-spacing is set to 45px.

CSS border-spacing property

Example:-

Using two values of teh border spacing property. The border-collapse property is set to separate, and the value of teh border-spacing is set to 20pt 1em. The first value, i.e., 20pt sets the horizontal spacing, and the 1 em set the vertical spacing.

CSS border-spacing property
Tagged : / /

CSS border- collapse property

This property set the border of the table cells ans specifies wheather the table cells share the seprate or common border.

This property has two main values that are seprate and collapse. When it is set to the value seprate, distance between the cells can be defined using the border-specing property. When the border-collapse is set to the value collapse, then the inset value of the border-style property behaves like groove, and the outset value behave like ridge.

Syntax:-

border-collapse: separate| collapse| initial | inherit;

Property values:-

seprate:- It is the default value that seprates the border of the table cell. Using the value, each cell will display its own border.

collapse:- The value is used to collapse the borders into a single border. Using this, two adjacent table cells will share a border. When this value is applied, the border-spacing property does not affect.

initial:- It sets the property to its default value.

inherit: It inherits the propperty form its parent element.

Example- Using seprate value

Example:- Using collapse property:-

Tagged : / /

CSS tutorial (CSS Border-radius)

CSS border-property:- The css property sets the rounded borders and provides the rounded corners around an element, tag, or div. It defines the radius of the corners of an element.

It is shorthand for border top-left-radius, border-top-right, border-bottom- right-radius and border-bottom-left-radius. It gives the rounded shape to the corners of the border of an element. We can specify the border for all four corners of the box in a single declaration using the border-radius. The values of this property can be defined in percentage or length units.If the bottom-left value is omitted, then it will be same as the top-right. If the value of bottom-right is eliminated, then it will be same as the top-left. Similarly, if top-right is eliminated, then it will be the same as top-left.

Let’s see what happens when we provide a single value, two values, three values, and four values to this property.

  • If we provide a single value (such as border-radius: 30px;) to this property, it will set all corners to the same value.
  • When we specify two values (such as border-radius: 20% 10% 😉, then the first value will be used for the top-left and bottom-right corners, and the second value will be used for the top-right and bottom-left corners.
  • When we use three values (such as border-radius: 10% 30% 20%;) then the first value will be used for the top-left corner, the second value will be applied on top-right, and bottom-left corners and the third value will be applied to the bottom-right corner.
  • Similarly, when this property has four values (border-radius: 10% 30% 20% 40%;) then the first value will be the radius of top-left, the second value will be used for the top-right, the third value will be applied on bottom-right, and the fourth value is used for bottom-left.

example:-

Border-radius for specific corners:-

It sets the border radius for the top-left corner.

Example:- border-top-right-radius

It sets the border-radius for the top-right corner.

Example- border-bottom-right-radius

It sets the border-radius for the bottom-right corner.

Example- border-bottom-left-radius

It sets the border-radius for the bottom-left corner.

We can specify seprate horizontal and vertical values by using the slash(/) symbol. The values before the slash (/) is used for the horizontal radius and the values after the slash(/) are for the vertical radius.

There is an example given below using the slash(/) symbol.

Example:-

Tagged : / /

CSS tutorial part-2

CSS Selector:-

CSS selector are used to select those content which we want to style. CSS selector is used to select HTML elements according to its id, class, type, attribute etc.

Types of CSS selector:-

  1. CSS element selector
  2. CSS Id selector
  3. CSS Class selector
  4. CSS universal selector
  5. CSS Group selector
  1. Css Element selector:- CSS element selector selects the HTML element by name.
  2. CSS Id Selector:- The Id selector selects the id attributes of an HTML element to select a specific element. An id is always unique within the page so it is chosen to select a single, unique element.
  3. CSS Class Selector:- It select the HTML elements with a specific class attribute. It is used with a period character .(full stop symbol) followed by the class name.
  4. CSS Universal Selector:- The universal selector is used as a wildcard character. It selects all elements on the page.
  5. CSS Group Selector:- It is used on those elements which have same style definations. Grouping selector is used to minimize the code. Commas are used to separate each selector in grouping.

CSS Comments:- CSS comments are generally written to explain your code. It is very helpful fir the users who reads your code so that they can easily understand the code. Comments are ignored by the browsers. Comments are the single line or multiple line statements and written in /*……..*/ .

CSS Background:- This property is used to define the backgroud effects on elements. There are 5 CSS background properties that affect the HTML elements.

  1. background-color
  2. background-image
  3. background-repeat
  4. background-attachment
  1. CSS Background-color:- This property is used to specify the background color of element.

You can set the background color like this:

2.CSS background-image:- The background-image property is used to set an image as a background of an element. By default the image covers the entire element. Example:-

3. CSS background-repeat:- BY default,

the background-image property repeats the background image horizontally and vertically. Some images are repeated only horizontally or vertically.

The background looks better if the image repeated horizontally only.

4. CSS background-attachment:- Thisproperty is used to specify if the background image is fixed or scroll with the rest of the page in browser window. If you set fixed the background image then the image will not move during scrolling in the browser. example:-

5.CSS background-position:- The background-position property is used to define the initial position of the background image. By default, the background image is placed on the top-left of the webpage. we can set the following positions:-

  1. centre
  2. top
  3. bottom
  4. left
  5. right
Tagged : / /

Introduction to CSS(Cascading Style Sheets) Part-1:-

CSS is the language we use to style the web pages. CSS stands for Cascading Styles Sheets. It describes how HTML elements are displayed on the screen. It can control the layout of multiple web pages all at once.

CSS Syntax:-

CSS selector

The selector points the HTML elemet you want to style.

The declaration block contains one or more declarations seprated bs semicolons.

Each declaration includes a css property name and value, seprated by a colons.

Multiple CSS declarations are seprated with semicolons, and declarations block are surrounded by curly braces.

Advantages of CSS:-

  1. Time saving:-We can write css once and then reuse same sheet in multiple HTML pages. It saves lots of time.
  2. Faster load pages:- If we use CSS, we do not need to write HTML tag attributes everytime. Just write one CSS rule of a tag and apply it to all the occurrences of that tag. So less code means faster download times.
  3. Easy maintenence:- To make a global change, simply change the style, and all elements in all the web pages will be updated automatically.
  4. Multiple device compatiblity:- Style sheets allow content to be optimized for more than one type of device.
  5. Global web standards:- Now HTML attributes are being deprecated and it is bieng recommended to use CSS.

Ways of inserting CSS:-

  1. External style sheets
  2. Internal style sheets/Embedded Style sheets
  3. Inline css

External Style Sheets:-

An external style sheet is a separate document that contains only CSS rules. An external style sheet helps to change the look of an entire website by changing just one css file. It should not contain any HTML Tags. It has .css extension.

Example:-

p { color: red; font-size: 24px;}

h1{ color: blue; font-size: 24em;}

1. Open notepad++ or any other Editor or IDE

2. Write CSS Code

3. Save with .css extension for example geekyshows.css

How to link Web Page to an External Style Sheet:-

The href attribute with <link> element inside the <head> tag is used to link web page to an external style sheet.

<html>

  <head>

    <title>Welcome to Geekyshows</title>

    <link rel=“stylesheet” href=“geekyshows.css”>

  </head>

  <body>

  <h1>I am Heading</h1>

  <p>I am first Paragraph.</p>

  <p>I am second Paragraph</p>

  </body>

</html>

Internal Style Sheets:-

Internal Style sheet is a set of style that is created as a part of HTML document. An internal style sheet may be used if one single page has a unique style.

Internal Style sheets are created using <style> element, which is added inside the <head> element of the HTML document.

Example:-

<html>

  <head>

    <title>Hello CSS</title>

    <style type=“text/css”>

    p { color: red; font-size: 24px;}

  h1{ color: blue; font-size: 24em;}

    </style>

  </head>

  <body>

  <h1>I am Heading</h1>

  <p>I am first Paragraph.</p>

  <p>I am second Paragraph</p>

  </body>

</html>

Inline Styles:-

Inline style is useful when we need to define specific style for individual elements present on a web page. The style attribute in a specific Tag or element, is used to create inline style. The style attribute can contain any CSS property between double quotes.

Ex:-

For paragraph:-

<p style=“color: red; font-size: 22px;”> I am first paragraph</p>

<p> I am second paragraph</p>

For Heading: –

<h1 style=“color: red; font-size: 22px;”> I am Heading</h1>

Tagged : / /

Introduction to HTML.

What is HTML?

HTML provides a way of displaying Web pages with text and images or multimedia content. HTML is not a programming language, it is a markup language. An HTML file is a text file containing small markup tags. The markup tags tell the web browser, such as Google chrome or internet explorer, how to display the page. An HTML file must have an htm or html file extension. HTML stands for HyperText Markup Language.

HTML Tags:-

A tag is a bit of text acts as a point demarcation. To create a tag, HTML gives certain characters special meaning: th e angle brackets <and>. putting characters within the brackets creates a tag.
types of tags:
there are two types of tags.

  1. Start tag
  2. End tag/Closing tag End tag is same as start tag except that it has an extra forward slash after opening angle bracket.

Element:-
The combination of start tag,end tag and things between the two tags are known as contents of teh element.
Attribute:-
Attributes provide additional information about the contents of an element. They appear on the opening tag of the element and are made up of two parts:- a name and a value, seprated by an equals sign. the attributes name indicate what type of extra information you are supplying about the element content.

HTML headings:-
HTML headings are defined with the <h1> to <h6> tags. <h1>defines the most important tags and <h6> defines the least important tags.

HTML paragraphs:-
HTML paragraphs are defined with the tag.

HTML links:-
HTML links are defined with the <a> tag.

It is also called anchor tag. The link destination is specified in href attribute.
example:- <a href=”https://www.facebook.com”>This is a link.</a>

HTML images:-
HTML images are defined with teh tag. The source file(src), alternative text(alt), width and height are the attributes used with the with this tag.
example:- <img src=”pic.jpg” alt=”facebook.com” width=”104″ height=”142″>

How to view HTML source?
To see the source code of the html page, right click on the HTML page and then select view page source, or we can use a shortcut key ctrl+u.

Some important attributes:-

  1. src attribute:– Ths attribute id used in img tag. The src attribute specifies the path to the image to be displayed.
    Example:-<img src=”img_girl.jpg”>

    There are two ways to specify the URL in the src attribute:
    • Absolute URL-Links to an external image that is hosted on another website. Example: src=”https://www.facebook.com/images/img_girl.jpg”.
    • Rekative URL- Links to an image that is hosted within the website. Here, the URL does not include the domain name. If the URL begins without a slash, it will be relative to the current page. Example: src=”img_girl.jpg”. If the URL begins with a slash, it will be relative to the domain. Example: src=”/images/img_girl.jpg”.

2. Width and height attribute:- the tag contain the width and height attribute, it defines the width and height of the image diaplayed.

  1. The Alt attribute:- The required alt attribute for the tag specifies an alternate text for an image, if the image for some reason cannot be displayed. This can be due to slow connection, or an error in the src attribute, or if the user uses a screen reader.
  2. The style attribute:- the style attribute is used to add atyle to the elment, such as colour, font, size etc.
    exmple:-This is a red paragraph.
  3. The lang attribute:- The lang attribute is used inside the tag, to declare the language of the web page.

HTML styles:-

The HTML styles attributes is used to add styles to an element, such as color font size etc.
Background color:- The CSS background-color property defines the background color for an HTML element.

example:-

<body style=”background-color:powderblue;”>

<h1>This is a heading</h1>
<p>This is a paragraph.</p>

</body>

Text color:-The CSS color property defines the text color for an HTML element.

example:-

<h1 style=”color:blue;”>This is a heading</h1>
<p style=”color:red;”>This is a paragraph.</p>

Fonts:-The CSS font-family property defines the font to be used for an HTML element.

example:-

<h1 style=”font-family:verdana;”>This is a heading</h1>
<p style=”font-family:courier;”>This is a paragraph.</p>

Text size:- The CSS font-size property defines the text size for an HTML element.

example:-

<h1 style=”font-size:300%;”>This is a heading</h1>
<p style=”font-size:160%;”>This is a paragraph.</p>

Text allignment:-The CSS text-align property defines the horizontal text alignment for an HTML element.

example:-

<h1 style=”text-align:center;”>Centered Heading</h1>
<p style=”text-align:center;”>Centered paragraph.</p>

Tagged : /

Explanation of Database Migrations in Laravel 5.8

Migration is a way that allows us to create a table in our database, without accessing the database manager such as phpmyadmin or sql lite.

To create a migration we should execute the command:

php artisan make:migration [options] [--] <name>

Here, in the option we have number options to enter depending upon the requirement. We can see all the options given below:

–create[=CREATE]The table to be created
–table[=TABLE] The table to migrate
–path[=PATH] The location where the migration file should be created
–realpath Indicate any provided migration file paths are pre-resolved absolute paths
–fullpath Output the full path of the migration
-h, –help Display this help message
-q, –quiet Do not output any message
-V, –version Display this application version
–ansi Force ANSI output
–no-ansi Disable ANSI output
-n, –no-interaction Do not ask any interactive question
–env[=ENV] The environment the command should run under
-v|vv|vvv, –verbose Increase the verbosity of messages: 1 for normal output, 2 for more verbose output and 3 for debug

Once we create the migration we can see a file under Migration-> database. Migrations are files which contain a class definition with both an up() and a down() method. The up() method helps to apply changes to the database and the down() method is used to rollback the changes in the database.

Example:-

class CreateCustomersTable extends Migration
{
    /**
     * Run the migrations.
     *
     * @return void
     */
    public function up()
    {
        Schema::create('customers', function (Blueprint $table) {
            $table->bigIncrements('id');
            $table->string('name');
            $table->timestamps();
        });
    }

    /**
     * Reverse the migrations.
     *
     * @return void
     */
    public function down()
    {
        Schema::dropIfExists('customers');
    }
}

To run all of our outstanding migrations, we can execute the Artisan command given below:

php artisan migrate

Also once we execute our migrations in the database we do have the option to roll back the latest migration operation, by using the rollback Artisan command. This command rolls back the last “batch” of migrations, which may include multiple migration files:

php artisan migrate:rollback

In Laravel we also have an option to rollback and execute the migration simultaneously with an Artisan command:

php artisan migrate:refresh

To see a video for the topic you can follow the video given below:-

Follow the other blog in which we will learn about creating tables in the database.

Tagged : / /

WHAT IS HTML?

HTML provides a way of displaying Web pages with text and images or multimedia content. HTML is not a programming language, but a markup language. An HTML file is a text file containing small markup tags. The markup tags tell the Web browser, such as Mozila Firefox or Google Chrome, how to display the page. An HTML file must have an htm or html file extension. HTML stands for HyperText Markup Language.

HTML pages are of two types:

Static Pages – Static pages, as the name indicates, comprise static content (text or images). So you can only see the contents of a web page without being able to have any interaction with it.

Dynamic Pages – Dynamic pages are those where the content of the web page depend on user input. So interaction with the user is required in order to display the web page. For example, consider a web page which requires a number to be entered from the user in order to find out if it is even or odd. When the user enters the number and clicks on the appropriate button, the number is sent to the web server, which in turn returns the result to the user in an HTML page.

Tags

A tag is a bit of text that acts as a point demarcation. To create a tag, HTML gives certain characters special meaning: the angle brackets < and >.

  Putting characters within angle brackets creates a tag.

	<h1> A heading </h1>

There are two tags:

Start tag or opening tag and End tag or closing tag. An end tag always matches a start tag, except that it has an extra forward slash after the opening angle bracket.

  <h1> A heading </h1>

Type of Tag

Container Tag – Which has opening and closing Tag.
Ex: –
<html> ……. </html>
<head> ……. </head>
<body> ……. </body>


Empty Tag – which has only opening tag.
Ex: –
<br>
<area>
<base>
<hr>
<img>
<input>

Element

The combination of a start and end tags define an element. Everything between the two tags is referred to as the contents of the element.

    <h1> A heading </h1>

Attribute

Attributes provide additional information about the contents of an element. They appear on the opening tag of the element and are made up of two parts: – a name and a value, separated by an equals sign.

<p lang = “en-us”>Paragraph in English </p>

The attribute name indicates what kind of extra information you are supplying about the element’s content. It should be written in lowercase.

The value is the information or setting for the attribute. It should be placed in double quotes. Different attributes can have different values.

 In this example an attribute called lang is used to indicate the language used in this element. The value of this attribute on this page specifies it is in US English.

Note: – HTML5 allows you to use uppercase attribute names and omit the quote marks, but this is not recommended.

HTML Tag

<HTML> is a starting tag. To delimit the text inside, add a closing tag by adding a forward slash “/” to the starting tag. Most but not all tags have a closing tag. It is necessary to write the code for an HTML page between <HTML> and </HTML>. This <HTML> tells the browser is ‘this is the start of an HTML document’ and </HTML> ‘this is the end of an HTML document’.

<html>

……………………..

………………………

………………………….

</html>

Head Tag

Before the <body> element you will often see a <head> element. This contains information about the page, rather than information that is shown within the main part of the browser. You will usually find a <title> element inside the <head> element. <head> is opening head tag and </head> is closing head tag.

<html>

  <head>

  <title> Hello </title>

  </head>

</html>

Title Tag

The contents of the <title> element are either shown in the top of the browser, above where you usually type in the URL of the page you want to visit, or on the tab for that page (if your browser uses tabs to allow you to view multiple pages at the same time). <title> is opening title tag and </title> closing title tag.

<html>

  <head>

  <title> Hello </title>

  </head>

</html>

Body Tag

Everything inside this element is shown inside the main browser window.  <body> is opening body tag and </body> is closing tag.

<html>

  <head>

  <title> Hello </title>

  </head>

        <body>

  <h1> Body of Page </h1>

        </body>

</html>

HTML

VersionYear
HTML1991
HTML 2.01995
HTML 3.21997
HTML 4.011999
XHTML2000
HTML 52014

HTML 4.01

HTML 4.01 Strict

<!DOCTYPE HTML PUBLIC “-//W3C//DTD HTML 4.01//EN” “http://www.w3.org/TR/html4/strict.dtd”>

HTML 4.01 Transitional

<!DOCTYPE HTML PUBLIC “-//W3C//DTD HTML 4.01 Transitional//EN” “http://www.w3.org/TR/html4/loose.dtd”>

HTML 4.01 Frameset

<!DOCTYPE HTML PUBLIC “-//W3C//DTD HTML 4.01 Frameset//EN” “http://www.w3.org/TR/html4/frameset.dtd”>

HTML 5

HTML 5 enables to create more interactive websites by embedding audio, video and graphics on the web page.

The purpose of HTML5 is primarily to make it easier for web developers.

New features: –Browser Support –Geolocation –Offline Application Cache –Web Storage –Error Handling –New Application Programming Interface (API) –New Structure

Application Programming Interface

•2D drawing on a web page

•Drag and Drop

•Timed Media Playback

•Browser History Management

New Structure

•<article>

•<aside>

•<header>

•<details>

DOCTYPE declaration

<!DOCTYPE html>

It is an instruction to the web browser about what version of HTML the page is written in.

The <!DOCTYPE> declaration is not case sensitive.

<br>

The <br> tag in the HTML code inserts a line break in the text.

Headings

Heading defines the format and structure of a document. There are six heading tag: – •<h1> …… </h1> •<h2> …… </h2> •<h3> …… </h3> •<h4> …… </h4> •<h5> …… </h5> •<h6> …… </h6>

Any text inside these tags is displayed differently depending on the heading number.

Note : – 1.<h1>…… </h1> is largest heading tag and <h6>……. </h6> is smallest. 2.Heading get their own line on the web pages by starting from a new line.

Paragraph

The <p> tag is used to create new paragraph on web page. It has a closing tag </p> which is optional because a paragraph automatically ends when we start another paragraph.

<p> ………………………. </p>

Note : – –Number of line in a paragraph depends on the size of web browser window. –If we resize the browser window, the number of lines in this paragraph will change.

Subscript

A subscript is a text that appears smaller than a regular text.

The <sub>….. </sub> tag is used to create a subscript on a web page.

Superscript

A Superscript is a text that appears smaller size above the regular text.

The <sup>…… </sup> tag is used to create a subscript on a web page.

Tagged : /

Laravel 5.8 CRUD Tutorial with examples

Create Route for View:

Syntax: Route::get('uri', function(){return view('view_name')});

To write it in a simpler way:

Syntax:- Route::view method

Example:- Route::view(‘about’,’aboutme’)

-We should create view in structured way(inside folder) that means all the views should not be in the view folder and we can make it in structured way by making folder in views.

-To create route for view which is inside folder:

Syntax:- Route::get(‘uri’, Function(){
return view(‘folder_name.view_name’)});

Example:- Route::get(‘aboutprofile’, Function(){return view(‘admin.profile’)});

-Passing data from Route to view:

*Data should be in array and in key value/pair.

*Inside the view, we can then access each value using its corresponding key.

Example 1:-

Route::get(‘contact’, function(){
Return view(‘contactme’,[‘name’=>’Sonam’]);
});

 *We can also use the with method to add individual pieces of date to the view.

Example:-

Route::get(‘contact’, function(){
return view(‘contactme’)->with(‘name’,’Sonam’)
});

-Accessing the data which is passed from Route to view:

<h1>Hello{{$name}}</h1>

-Returning view from web.php using parameter:

Route::get(‘user/(u_id}’, function($id){
Return view(‘myuser’,[‘id’=>$id]);
});

(In the User View)

<body>
<h1>User page </h1>
<h1>{{$id123}}</h1>
</body>

-For multiple parameter:

(In web.php)

Route::get(‘post/{post_id}/comment/{comment_id}’, function($post_id, $comment_id){
Return view(‘mypost’,[‘postid’=>$post_id, ‘commentid=>’$comment_id’]);
});

(In the Post View)

<body>
<h1>User page </h1>
<h1>Post Id:{{$postid}}</h1>
<h1>Comment Id:{{$commentid}}</h1>
</body>

-For making optional parameter:

(In web.php)

Route::get(‘user/(name?}’, function($name=null){
Return view(‘myuser’,[‘name’=>$name]);

(In User view)

<body>
<h1>User page </h1>
</body>

For calling this in the server we can type 127.0.0.1.8000 or 127.0.0.1.8000/name and it will display the content in both scenario without giving error. Though it will not return any name if we do not enter /name.

-For regular expression

(In web.php)

Route::get(‘product/{p_name}’, function($name){
Return view(‘myproduct’,[name’=>$name]);
})->where(‘p_name’=>‘[A-za-z]+’);

(In myproduct view file)

<body>
<h1>Product page </h1>
<h1>{{$name}}</h1>
</body>

To redirect from one view to another view:

(In web.php)

Route::view(‘login’, ‘mylogin’);
Route::view(‘register’,’myregister’)
Route::redirect(‘login’, ‘register’);

(In View file)

<body>
<h1>Login</h1>
</body>

To fallback:

(In web.php)

Route::fallback(function(){
Return view(‘default;);
});

In Default View:

<body>
<h1>Default</h1>
</body>

Controllers

 Controllers can group related request handling logic into a single class. Instead of defining all of your request handling logic as closures in route files, you may wish to organize this behaviour using controller classes.

– Controllers are stored in the app/Http/Controllers

-Controller extends the base controller class included with Laravel.

Defining Controller Class

Run command: php artisan make:controller controller_name

Example: php artisan make:controller AboutController

Creating Route for Controller Class

(In AboutController.php)

<?php

namespace App\Http\Controllers;

use Illuminate\Http\Request;

class HomeController extends Controller
{
	Function show(){
		Return ‘Hello Controller’;}
}

(In Web.php)

Use App\Http\Controllers\AboutControllers;

Route::get(‘about’,[AboutController::class,’show’]);

Syntax:

Route::get(‘URI’,[ControllerName::class,’method_name’]);

Getting parameter in Controller

In AboutController.php

<?php

namespace App\Http\Controllers;

use Illuminate\Http\Request;

class HomeController extends Controller
{
	Function show(){
		Return ‘Hello Controller’,$name;}
}

In web.php

Use App\Http\Controllers\AboutController;

Route::get(‘about/{name}’),[AboutController::class,’show’]);

To import controller in web.php

Use App\Http\Controllers\AboutController;

Controller returning string with parameter

In AboutController

function show($name){
return “Hello Controller”.$name;

In web.php

Route::get(‘about/{name}’,[Aboutcontroller::class,’show’]};

Returning View from Controller Class

In AboutControllers

<?php

namespace App\Http\Controllers;

use Illuminate\Http\Request;

class HomeController extends Controller
{
	function show(){
		return view(‘Hello Controller’);}
}

In web.php

Use App\Http\Controllers\AboutController;

Route::get(‘about’,[AboutController::class,’show’]);

In Views:

<body>
<h1>About my controller</h1>
</body>

Tagged : / / / /