How to Use Change Attributes Properties in jQuery?

So in this blog, we’re going to learn that How to Use Change Attributes Properties in jQuery?

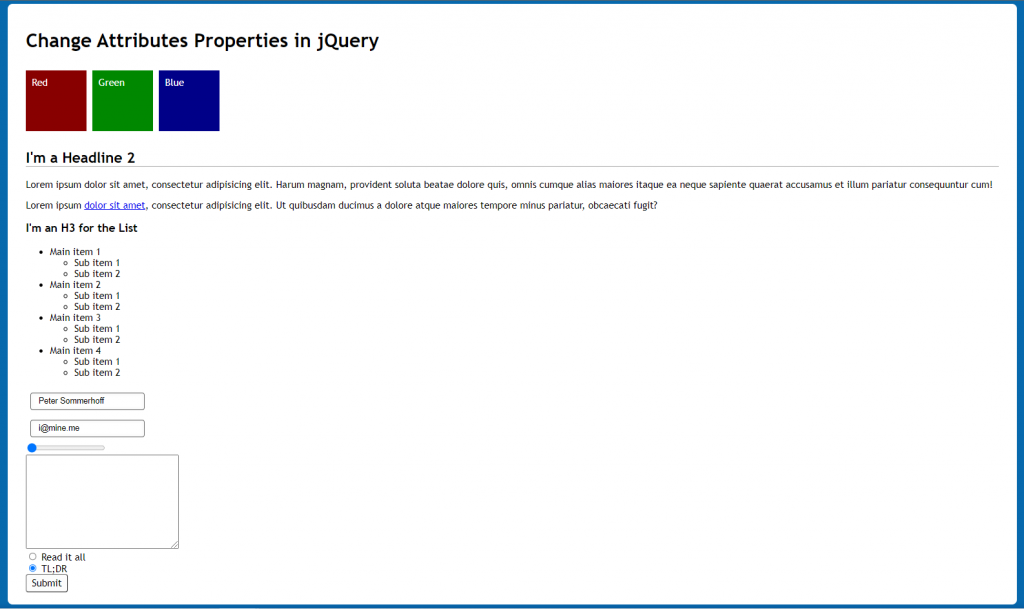
So let’s go ahead and do that for first in index.html, with help of style.css & main.js and define-

In this main.js To read the current value of an attribute, use attr() with only one argument: the name of the attribute you want to read. after that Retrieve the value of the href attribute of the “<a>” tag This is logged into the console. To see it, press F12 in Firefox/Chrome to open the Developer Tools and click on the Console tab.

Change Attributes Properties in jQuery

Tagged : / / / / / /

Alter Table in MySql

In this tutorial we will see the commands which we can use to make changes in our table (as per April 2k21).

  • To add a column in an existing table:
Syntax: ALTER TABLE table_name ADD column_name DATATYPE;
  • To delete a column in an existing table:
Syntax: ALTER TABLE table_name DROP column_name;
  • To change the data type of a column in an existing table:
Syntax: ALTER TABLE table_name MODIFY COLUMN column_name NEW DATA TYPE;
  • To rename a column in an existing table:
Syntax: ALTER TABLE table_name CHANGE column_name NEW_COLUMN_NAME;
  • To update the column as NOT NULL Constraint:
Syntax: ALTER TABLE table_name MODIFY column_name DATATYPE NOT NULL;
  • To Sort the data in the Table:
Syntax: SELECT "column_name" FROM "table-name" [WHERE "condition"] ORDER BY "column_name" [ASC/DESC];

Tagged : / / / / /

How to revert the changes once its submitted in Gerrit

How to revert the changes once its submitted in Gerrit

The Revert button is available if the change has been submitted. This Reverts the change via creating a new one. When the Revert button is pressed, a panel will appear to allow the user to enter a commit message for the reverting change.

Once a revert change is created, the original author and any reviewers of the original change are added as reviewers and a message is posted to the original change linking to the revert.

However, patchsets can not be reverted. so first you have to checkout one of the previous patchset. you can get the command from Gerrit review board at each patchset download panel. After checking it out amend it to generate new commit hash then pushed again as a new patchset.

If I have multiple patch set versions for one change in Gerrit, You can only submit the latest patch set version. The design assumes that the most recent patch set is the one developers will review and test, and as such older patch sets can not be submitted.

Good Read
http://www.saros-project.org/node/155

Tagged : / / / / / /

What is a Change and Patch set in Gerrit?

Here is the short and quick description of Gerrit key teminology.

Change

Every time you push a commit with a new Change-Id Gerrit allocates a new change. Every change has a unique Change-Id and a Change Number. The change contains a number of patch sets, comments on the patch sets and a code review rating (+2, +1, 0, -1, -2). Each change has a dedicated page that shows information about it called individual change page. This includes dependencies between different changes, patch sets and the review comments.

Submit

Once a change has received a +2 in the Code Review and no negative voting in the other categories the last patchset can be submitted. This means Gerrit will now try to cherry-pick your patch set and mark the change as merged.

Patch set

If you want to modify your change, you don’t have to push a new change to Gerrit but only a new patch set . Imagine a patch sets as different versions or revisions of a change. Each patch set can receive inline comments. Gerrit uses the Change-Id of a commit message to identify patch sets of a change. This is why all patch sets of a change have the same Change-Id.

To create a new Patch when new changes are submitted
Step 1: Install commit-msg hooks for gerrit

$ scp -p -P 29418 localhost:hooks/commit-msg .git/hooks/


Step 2: Create normal commit and push (for Patchset1)

for example:

git add Server.java
git commit -m "server added"
git push origin HEAD:refs/for/master


Step 3: After doing some changes to Server.java

Finally to create new Patchset (Patchset 2)

git add Server.java
git commit --amend
git push origin HEAD:refs/for/master
Repeat step 3 for further Patches

Understanding the Patch set in Git perspective

Git is a very advanced distributed source code control system. Maintaining patch sets (often called a topic branch) in Git. Git includes a rebase capability that is very useful for a number of different operations related to maintaining a branch of code including moving a branch forward, moving a branch around on an upstream branch to look for breakage, and merging changesets to create patch files.

Git: How to create and apply patches

Creating a patch

Make your changes and commit them.
Run $ git format-patch COMMIT_REFERENCE #to convert all commits since the referenced commit (not including it) into patch files.
$ git format-patch HEAD~~

This will create 2 files, one for each commit since HEAD~~, like these:
0001-make-stuff-more-awesome.patch
0002-allow-users-to-be-locked.patch

Applying patches
You can use git apply some.patch to have the changes from the .patch file applied to your current working directory. They will be unstaged and need to be committed by you.

To apply a patch as a commit (with its commit message), use git am some.patch. \
For all patches to be applied, simply run:
$ git am *.patch

Note that in some previous version you could pass the latest patch filename of a list of patches to apply all previous patches as wel
$ git am 0002-allow-users-to-be-locked.patch # May no longer work for you

You then have the 2 unpushed commits from the patch file created earlier.

Tagged : / / / /

Changed, Added and Deleted SLOC

An important consideration for Software Project Managers is whether the requirements are being altered in a given project without their knowledge or consent. The impact of unauthorized or unscheduled departure from requirements can lead to considerable problems in maintaining and managing large source projects.

Having received requests from several major C/C++ and Java projects to measure ‘changes’ in source code projects, Power Software was commissioned to manufacture an automated tool to measure changed lines of source code.

The first question we asked was ‘are there any existing tools that can already accomplish this task?’ The obvious starting place was ‘Change Management’ tools like CMVC (Configuration Management Version Control) systems. These tools indicate which files have changed between projects but do not gather and present the information in the format our customers’ required. One problem with CMVC systems was that a file shown to be ‘changed’ might have changed only by time and date. This is misleading if we are looking for actual changes in source code.

The next place we looked was at existing Software Metrics tools. These tools measure source code parameters including SLOC (source lines of code). However it is possible that a Software Metrics tool could report that the compared files or projects have the same total number of source lines but these could have changed intrinsically. The actual lines of code could have changed but the total number of lines will be unchanged so the ‘changed line’ is not detected.

For our customers the particular information required is ‘changed source lines of code’, ‘added source lines of code’ and ‘deleted source lines of code’. This needs to be gathered across two releases of the same project to show exactly what has ‘changed’. The information needs to be presented as ‘changed lines’ at the file and project level to assist management in their job of maintaining highest quality through proper control mechanisms.

Tagged : / / / / / /

How to build when a change is pushed to Bitbucket

bitbucket-tutorials


Bitbucket plugin is designed to offer integration between Bitbucket and Jenkins.


It exposes a single URI endpoint that you can add as a WebHook within each Bitbucket project you wish to integrate with. This single endpoint receives a full data payload from Bitbucket upon push (see their documentation), triggering compatible jobs to build based on changed repository/branch.


Step 1 – Install “Bitbucket Plugin” at your Jenkins


Step 2 – Add a normal Post as Hook to your Bitbucket repository (Settings -> Hooks) and use following url:


https://YOUR.JENKINS.SERVER:PORT/bitbucket-hook/
and if you have setup authentication on jenkins then URL must be like


https://USERNAME:PASSWORD@YOUR.JENKINS.SERVER:PORT/bitbucket-hook/


Step 3 – Configure your Jenkins project as follows:


Step 4 – Under build trigger enable Build when a change is pushed to BitBucket


Step 5 – under Source Code Management select GIT; enter your credentials and define Branches to build (like **feature/*)


Note 1 – Make sure to include the slash (‘/’) on the end of the URL or the hook won’t work.


Note 2 – Please read the BitBucket Plugin info page as well https://wiki.jenkins.io/display/JENKINS/BitBucket+Plugin


Reference 1  
Reference 2 – Login issues with Jenkins url
Tagged : / / / / / /

How to build when a change is pushed to GitHub in Jenkins?

build-when-a-change-is-pushed-to-github-in-jenkins
The GitHub plugin for Jenkins is the most basic plugin for integrating Jenkins with GitHub projects. If you are a GitHub user, this plugin enables you to:
  • Schedule your build
  • Pull your code and data files from your GitHub repository to your Jenkins machine
  • Automatically trigger each build on the Jenkins server, after each Commit on your Git repository

This saves you time and lets you incorporate your project into the Continuous Integration (CI) process.

How to Start Working with the GitHub Plugin for Jenkins
Install the Github Jenkins plugin
Go to “Manage Jenkins” –> “Manage Plugins” –> “Available” Tab –> Search for “GitHub plugin” and install it.
Configure the plugin with github accounts and keys
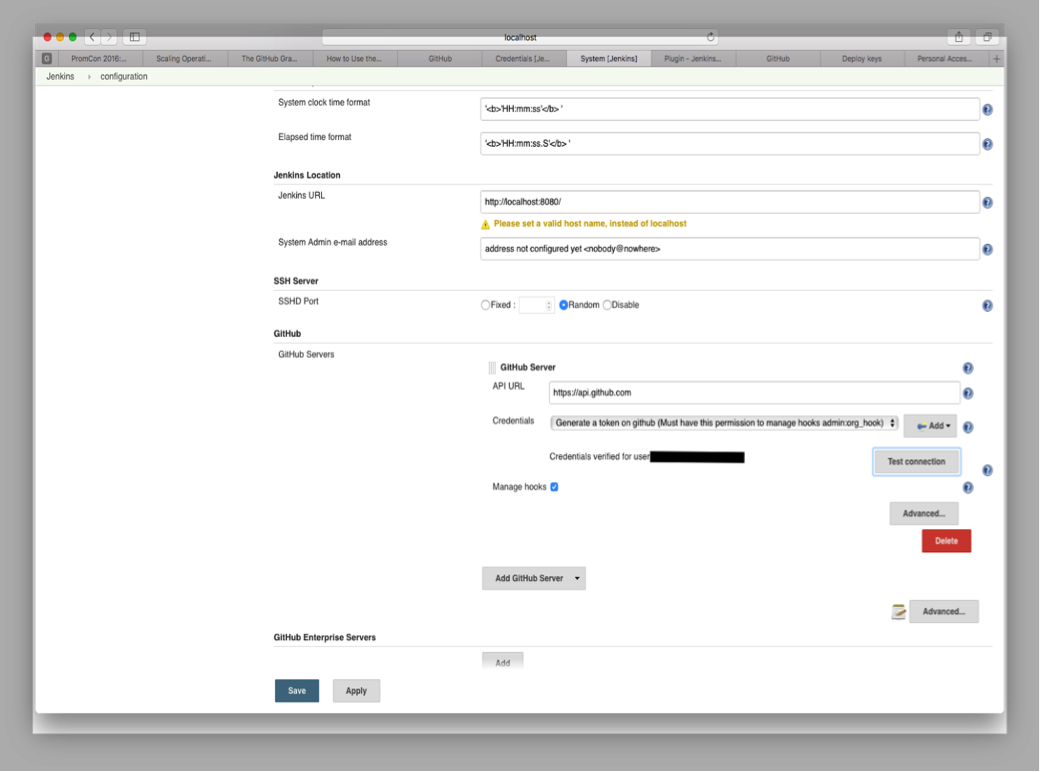
Go to “Manage Jenkins” –> “Configure System” –> Locate “Github” section and “Add Github Server”.

API URL – If you server is github.com, your “API URL” would be “https://api.github.com” Otherwise if you use GitHub Enterprise, specify its API endpoint here (e.g., https://ghe.acme.com/api/v3/).

Credentials – You can create your own personal access token in your account GitHub settings.
Token should be registered with scopes: Refer https://github.com/settings/tokens/new.
Add credentials (your Github token), Apply and “Test Connection”.

Open your Jenkins Project

a) Check the GitHub project checkbox and set the Project URL to point to your GitHub Repository

b) Under Source Code Management, check Git and set the Repository URL to point to your GitHub Repository
c) Under Build Triggers, check the “Build when a change is pushed to GitHub” checkbox
4. Install the Jenkins (GitHub plugin) and set a webhook to your Jenkins machine
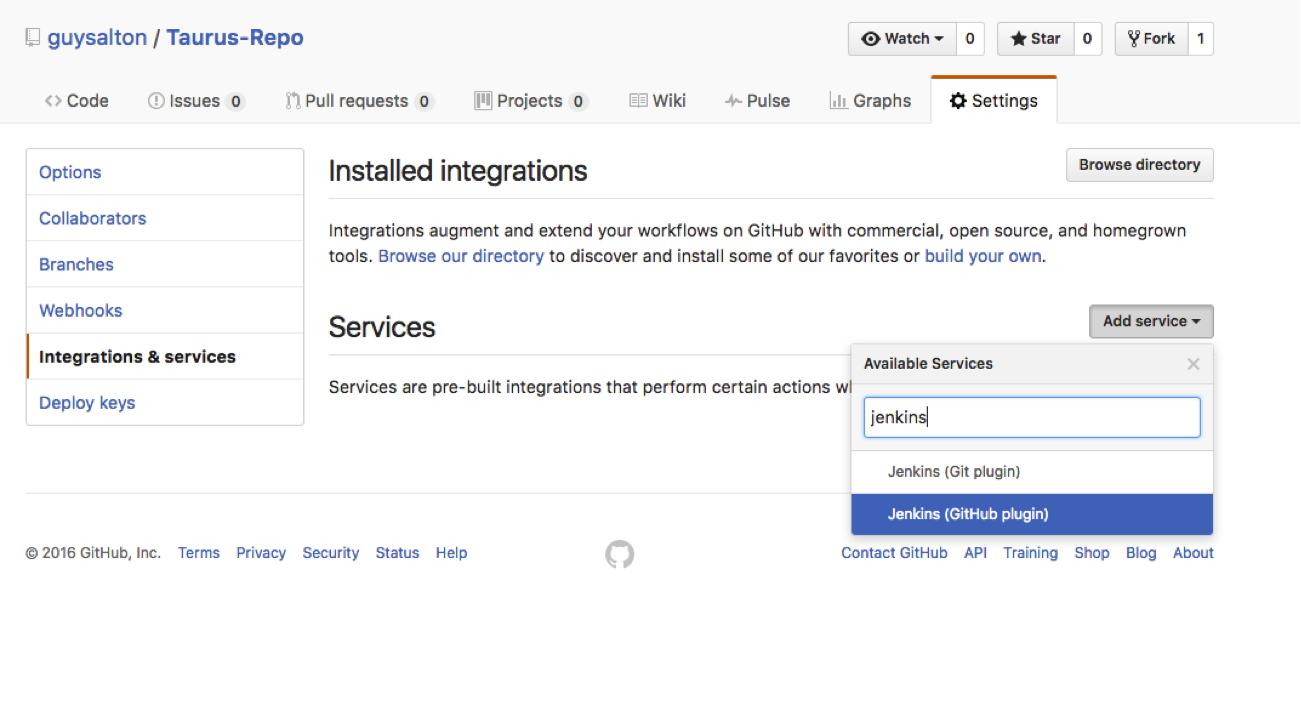
a) From your GitHub repository, go to Settings and then to Integrations & Services
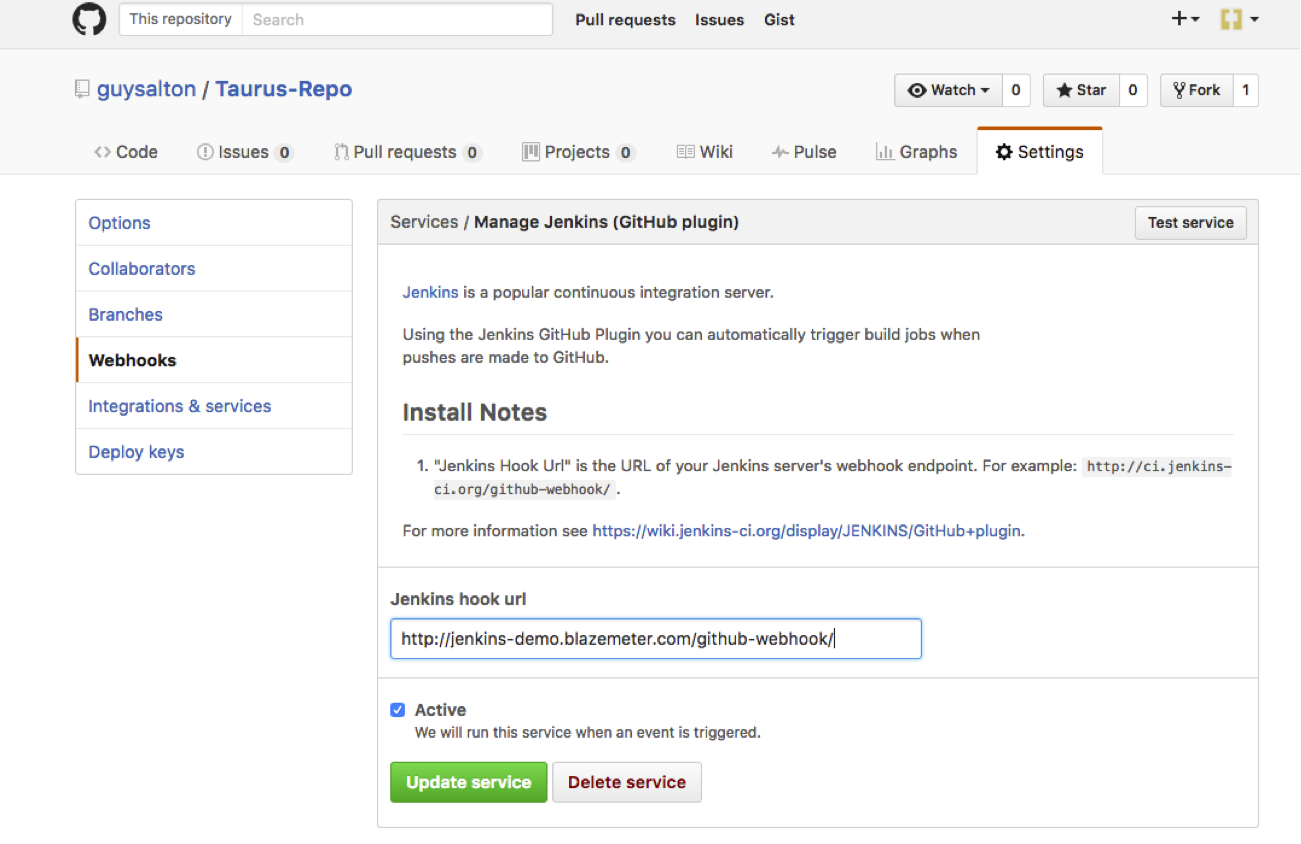
b) Click on Add Service and add ‘Jenkins (GitHub plugin)’

c) Set the Jenkins hook URL as the URL for your Jenkins machine, and add /github-webhook/


Congratulations! Every time you publish your changes to Github, GitHub will trigger your new Jenkins job.
Another Approach noted by suprakash
Actually if you do the web hook settings from Jenkins -> Github plugin configuration (mentioned above), you will still see webhooks get created in github. So , above two approaches basically doing the same thing.
I personally like it to create webhook from Github, because in this way you don’t have to share or store github user info in jenkins.
Steps : 1. Login into Github (with Admin) 2. Go to the repository you want to hook with jenkins 3. Click on settings tab -> webhooks & services 4. Click on Add Webhook 5. Enter payload url : like : http://:8080/github-webhook/ 6. Select content type as json 7. you are done

Now you do the changes and commit , you will see jenkins build get trigger automatically. Don’t forget to do the settings in jenkins jobs to start the build when push code in github.

Reference

Tagged : / / / / / / / /