What’s the use of the method in JavaScript?

method in JavaScript

  • Concat ( ) Method
  • Join ( ) Method
  • Reverse ( ) Method
  • Slice( ) Method
  • Splice ( ) Method
  • toString( ) Method
  • Array.isArray ( ) Method
  • IndexOf ( ) Method
  • Fill ( ) Method
  • unshift ( ) Method
  • Shift( ) Method
  • Shift( ) Method
  • pop( ) Method
  • Map ( ) Method

Concat ( ) Method

The concat() method is used to merge two or more arrays. This method does not change
the existing arrays, but instead returns a new array.

Syntax:- new_array = old_array.concat(value1, value2, value_n);
Syntax:- new_array = old_array1.concat(old_array2, old_array_n);

Join ( ) Method

The join() method joins the elements of an array into a string, and returns the string. The elements will be separated by a specified separator. The default separator is the comma (,).

Syntax: – array_name.join(separator);

Reverse ( ) Method

The reverse() method reverses the order of the elements in an array.

Syntax :- array_name.reverse( );

Ex:- dev.reverse( );

Slice( ) Method

The slice( ) method returns a shallow copy of a portion of an array into a new array object selected from beginning to
end (end not included). The original array will not be modified.

Syntax: – array_name.slice(start, end)

Start
If begin is undefined, the slice begins from index 0.
If begin is greater than the length of the sequence, an empty array is returned.
A negative index can be used, indicating an offset from the end of the sequence. slice(-2) extracts the last two
elements in the sequence.

End
If end is omitted, slice extracts through the end of the sequence (arr.length).
If end is greater than the length of the sequence, slice extracts through to the end of the sequence (arr.length).
A negative index can be used, indicating an offset from the end of the sequence. slice(2,-1) extracts the third
element through the second-to-last element in the sequence.
slice extracts up to but not including end.

Splice ( ) Method

The splice() method changes the contents of an array by removing existing elements and/or adding new elements. This method changes the original array.

Syntax:- array_name.splice (start, deletecount, replacevalues);

Start – The first argument start specifies at what position to add/remove items, uses negative values to specify the position from the end of the array.

Deletecount – The second argument deletecount, is the number of elements to delete
beginning with index start.

Replacevalues – replacevalues are inserted in the place of the deleted elements. If more
than one separate it by a comma.

toString( ) Method

The toString ( ) method returns a string containing the comma-separated values of the array. This method is invoked automatically when you print an array. It is equivalent to invoking the join ( ) method without any arguments. The
the returned string will separate the elements in the array with commas.

Syntax: – array_name.toString();

Array.isArray ( ) Method

The Array.isArray() method determines whether the passed value is an Array. This function returns true if the object is an array, and false if not.

Syntax:- Array.isArray(value);

IndexOf ( ) Method

This method allows us to easily find the occurrence of an item in an array.

  • If the item is not found, it returns -1.
  • The search will start at the specified position, or at the beginning if no start position is specified, and end the search at the end of the array.
  • If the item is present more than once, the indexOf method returns the position of the first occurrence.

Syntax: – var position = array_name.indexOf(item, start);

Ex:- var position = dev.indexOf(“Rohit”, 2);

Fill ( ) Method

The fill() method fills all the elements in an array with a static value.

Syntax:- array_name.fill(value, start, end)

unshift ( ) Method

The unshift() method adds one or more elements to the beginning of an array and returns the new length of the array.
This method changes the length of an array.

Syntax: –
Array_name.unshift(value1, value2, value_n);

Push ( ) Method

The push() method adds one or more elements to the end of an array and returns the new length of the array.
The new item will be added at the end of the array.
This method changes the length of the array.

Syntax: –
Array_name.push(value1, value2, value_n);

Shift( ) Method

The shift() method removes the first element from an array and returns that removed element. This method changes the length of the array.

Syntax: – array_name.shift( );

Ex: – geek.shift( );

pop( ) Method

The pop() method removes the last element from an array and returns that removed element. This method changes the length of the array.

Syntax: – array_name.pop( );

Ex: – geek.pop( );

Map ( ) Method

The map() method creates a new array with the results of calling a provided function on every element in the calling array.
The map() method calls the provided function once for each element in an array, in order.

map() does not execute the function for array elements without values.
map() does not change the original array.

Syntax:- array_name.map(function(currentValue, index, array)
{
}, thisValue

Tagged : / / / /

Advance PHP

What was easy in any language was made core and what became difficult was made an advance. What happens in Core is of basic level and what happens in Advance is of upper-level.

Object Oriented Progrmming

Object-Oriented Programming is a Technic that solves the problem. In this, the code breaks the object. And you see your problem on the side of the object. In which you find your problem similar to the real-world problem and it is easy to maintain, and it has to be solved.

Class

The PHP class has a group of values. To manipulate whatever value you write inside the class, you also write operations in it. The class gives you this facility, that if the user does not need to know the information. So you can also hide the information. To use the application, you can keep it hidden for security purposes. Or if it will be accessed from the outside users or from an outside viewer then your application may be damaged. That’s why you can keep your application hidden, it gives class facility. You can define type using class.

Rule

  • The class name can be any valid label.
  • It can’t be PHP reserved world.
  • The class name must start with a letter or an underscore. Following by any number of letters, numbers, or underscore all this will work. Lwkin should not start with number.
class Classname
{
	var $variable_name;  (It is also called Data Member/Properties or Attribute.)
	var $variable_name;
	
	function Method_name()
	{
		Body of method;
	}
	function Method_name(parameter_list)     (And these methods are called methods or member functions.)
	{
		Body of Method;
	}

}

See your problem in the real world.

class Mobile
{
	public $model;
	function show Model (Sumber)
	{
		$this->model = $number;
		echo "Model Number: $this->model";
	}
	
}

Object

The object is a variable of class data type. Whenever you create an object, for that object, whatever is proper inside the class, a copy of it is prepared and it is prepared for that object. If there are 2 objects then 2 copies of that variable or that property will be created and one copy for the first object and a second copy for the second object. Whatever object you make, its copy will be ready and one copy will be distributed. But this is not the case with the member function. The member function is the same, all the objects share with it.

The new Operator is used to create an object.

Syntax:

class Mobile
{
	public $model;
	function show Model (Sumber)
	{
		$this->model = $number;
		echo "Model Number: $this->model";
	}
	
}
$samsung = new Mobile;
$samsung->showModel('A5');

$lg = new Mobile;
$lg->showModel('M30');

You will not need to write the class, again and again, you just have to create an object of it. And call this method with the help of that object. It will show its own model number.

Important thing

A class is of no importance unless it has an object.

Accessing class member using object

How would you make accessing a member of a class into a user object?

-> This operator is used to access the member of the class.

object_name->variable_name;
$samsung->model;

access to method
Object_name->method_name();
$samsung->showModel();

in parameter
Object_name->method_name(parameter_list)
$samsung->showModel(‘A8’);

Tagged : / / / /

Laravel 5.5 Method paginate does not exist

When I am trying to put some value in my input search box and after pressing enter button showing above issue.
But when I am trying to filter data with my search button then it’s working fine. so i dig into it. i found one solution on it.

FilterController.php
$users = DB::table('users')
->where(function($query) use ($countryId, $stateId, $cityId) {
	if (isset($countryId) && $countryId !== null && $countryId !== '' && $stateId == 'Select State') {
		$query->where('country_id', '=', $countryId);
	}
	if (isset($countryId) && $countryId !== null && $countryId !== '' && isset($stateId) && $stateId !== 'Select State' && $stateId !== '') {
		$query->where([
							['country_id', '=', $countryId],
							['state_id', '<>', $stateId]
						]);
		
	}
})->get()->paginate(5);

Solution :

Just remove the get() and your code will work fine.

$users = DB::table('users')
->where(function($query) use ($countryId, $stateId, $cityId) {
	if (isset($countryId) && $countryId !== null && $countryId !== '' && $stateId == 'Select State') {
		$query->where('country_id', '=', $countryId);
	}
	if (isset($countryId) && $countryId !== null && $countryId !== '' && isset($stateId) && $stateId !== 'Select State' && $stateId !== '') {
		$query->where([
							['country_id', '=', $countryId],
							['state_id', '<>', $stateId]
						]);
		
	}
})->paginate(5);

References :

  1. Click here
  2. Click here
Tagged : / /

How to Setup Configure Hudson Master Slave? – Complete Guide

hudson-master-slave-setup
The tasks can be scheduled to run on the same machine (Master), or on a different machine (Slave). A master is a installation of Hudson, that can manage one or more slaves. The role of master remains same in Master slave setup. It serves HTTP requests, and it can still build projects on it’s own.
Slaves are computers that are setup to build projects triggered from the master. A separate program called slave agent runs on slave computer. In this article we’ll discuss about how to setup Hudson to executed distributed builds using Master slave. One computer can be configured to execute multiple slave agents.

How it works

When the slaves are registered to a master, the master starts distributing loads to slaves. The delegation depends on the specific job. The job can be configured to either execute on the master, or it can be tied to a specific slave. On the other hand, the jobs can be configured to freely roam between slaves, wherein the job is executed using the free slave. As per the user is concerned, the setup is transparent. The results for all jobs are viewable using the Master, irrespective of the Slave that executed the job.
The slave may be built using any Operating system. The Master slave setup is highly helpful while the user has to execute the job on different Operating system. Consider this use case: The application is expected to run on different operating system, Linux, Solaris and Windows system. To address this need, the user can install Hudson on any machine, say Linux, and add 2 slaves: Solaris and Windows. The user can add 3 different jobs, one running on Master itself and others running on slave machines.

Methods to set up Slave agents

The slave can be launched from Master using any of below methods:
  1. Launch Slave agents on Unix machines via SSH.
  2. Launch Slave agents via JNLP.
  3. Launch Slave agents via execution of command on the master.
  4. Let Hudson control windows slave as a windows service.

The following screenshot illustrates the list of modes under which the Hudson slave can be launched.

Set up Slave agents on Unix machines via SSH

Hudson has a built-in SSH client implementation that it can use to talk to remote sshd and start a slave agent. This is the most convenient and preferred method for Unix slaves, which normally has sshd out-of-the-box. Click Manage Hudson, then Manage Nodes, then click New Node. In this set up, the connection information is supplied, including SSH host name, user name and authentication credentials. The authentication is performed using password or ssh keys. If it is configured to use ssh keys, the SSH public key should be copied to ~/.ssh/authorized_keys file. Hudson will do the rest of the work by itself, including copying the binary needed for a slave agent, and starting/stopping slaves.


Depending on the project and hardware resource availability, the user Desktop can be used as one of Slave, without affecting his day-to-day activities, thus avoiding the need for dedicated Slaves.

Establish slave agent via Java Web Start

Another way of launching slave is to start a slave agent through Java Web Start (JNLP). In this approach, the user will login to the slave node, open a browser and open the slave page using the URL pointed to the Master. It may look like the following URL:
http://masterserver:port/hudson/jnlpJars/slave.jar
The user is presented with the JNLP launch icon. If user click the icon, the Java Web Start kicks in and it launches a slave agent on this computer.
This mode is convenient when the master cannot initiate a connection to slaves, such as when it runs outside a firewall while the rest of the slaves are in the firewall. The disadvantage is, if the machine with a slave agent goes down, the master has no way of re-launching it on its own.

Set up slave agent headlessly

This launch mode uses a mechanism very similar to Java Web Start, except that it runs without using GUI, making it convenient for an execution as a daemon on Unix. To do this, the user should configure this slave to be a JNLP slave by downloading slave.jar, and then from the slave, run a command like this:
 
java -jar slave.jar -jnlpUrl http://yourserver:port/computer/slave-name/slave-agent.jnlp

The slave.jar file is downloaded from the above mentioned URL. Make sure to replace slave-name with the name of the slave setup in Master.

By default, Hudson runs on port 8080. It can be installed and managed without the need for super user privilege. The super user privilege is not required to manage both Master and Slave.

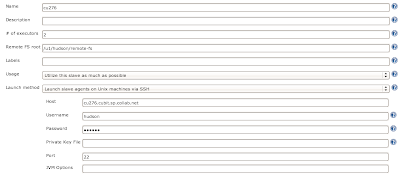
The below diagram illustrates the list of configuration parameters specific to a slave.


set up Slave Agent using own scripts

If the above modes is not flexible, the user can write his own script to launch the Slave agent. The script is placed in the Master computer and Hudson runs this script whenever it should connect to the slave. The script may use the remote login program like SSH, RSH to establish connection between Master and slave.
The script would execute the slave agent program like java -jar slave.jar. The stdin and stdout for the script should be connected to the master. For example, the script that does ssh myslave java -jar ~/bin/slave.jar would satisfy this need, when it is executed from the Master web interface. For this reason, running this script manually from the command line does no good.
The copy of slave.jar can be downloaded from the above mentioned URL. Launching the slave agent using this mode requires additional setup in the Slave. The benefit is that when the connection goes bad, the user can use Hudson web interface to re-establish the connection.
Tagged : / / / / / / / / / / / / / / / /

How to put comment in Ant | Comments in Apache Ant

comments-in-apache-ant

How to put comment in Ant | Comments in Apache Ant

Method 1:

<!– Comments are just as important in buildfiles, do not –>
<!– avoid writing them! –>
<!– Example build file for “Ant: The Definitive Guide” –>
<!– and its sample project: irssibot –>

Method 2: Echo
Description
Writes a message to the Ant logging facilities. A message may be supplied
as nested text to this task.
Echoes a message to the current loggers and listeners which means System.out unless overridden. A level can be specified, which controls at what logging level the message is filtered at.
The task can also echo to a file, in which case the option to append rather than overwrite the file is available, and the level option is ignored

Parameters

Attribute Description

Required

message the message to echo.

No. Text may also be included in a character section within this element. If neither is included a blank line will be emitted in the output.

file the file to write the message to.

No

append Append to an existing file (or open a new file / overwrite an existing file)?

No – default is false.

level Control the level at which this message is reported. One of “error”, “warning”, “info”, “verbose”, “debug” (decreasing order)

No – default is “warning”.

encoding encoding to use, default is “”; the local system encoding. since Ant 1.7

No

Examples
Style 1:
<echo message=”Hello, world”/>

Style 2:
<echo message=”Embed a line break:${line.separator}”/>

Style 3:
<echo>Embed another:${line.separator}</echo>

Style 4:
<echo>This is a longer message stretching over
two lines.
</echo>

Style 5:
<echo>
This is a longer message stretching over
three lines; the first line is a blank
</echo>

Style 5:
<echo message=”Deleting drive C:” level=”debug”/>
A message which only appears in -debug mode.

Style 6:
<echo level=”error”>
Imminent failure in the antimatter containment facility.
Please withdraw to safe location at least 50km away.
</echo>
A message which appears even in -quiet mode.

Style 7:
<echo file=”runner.csh” append=”false”>#\!/bin/tcsh
java-1.3.1 -mx1024m ${project.entrypoint} $$*
</echo>
Generate a shell script by echoing to a file. Note the use of a double $ symbol to stop Ant filtering out the single $ during variable expansion
Depending on the loglevel Ant runs, messages are print out or silently ignored:

Ant-Statement

-quiet, -q

no statement

-verbose, -v

-debug, -d

<echo message=”This is error message.” level=”error” />

ok

ok

ok

ok

<echo message=”This is warning message.” />

ok

ok

ok

ok

<echo message=”This is warning message.” level=”warning” />

ok

ok

ok

ok

<echo message=”This is info message.” level=”info” />

not logged

ok

ok

ok

<echo message=”This is verbose message.” level=”verbose” />

not logged

not logged

ok

ok

<echo message=”This is debug message.” level=”debug” />

not logged

not logged

not logged

ok

Method 3:
Description

Tagged : / / / / / / / / / / / / /

How we reduced build time from 8 hours to 1 hour ? – Complete Guide

hudson-master-slave-setup

Situation

  1. For one of our clients, Build is taking 8 hours and nightly build is failing frequently.
  2. Test case execution is consuming more time than the compilation.
  3. Low confidence levels for developers on nightly builds and subsequently during integration cycle.

Approach

  1. We reviewed the whole set of build scripts being used and test case suite to check how we can refatcor them.
  2. Verified the build infrastructure i.e., build server capacity from hardware point of view.
  3. Feasibility study done to check how a CI environment help in giving faster feedback on the quality.


Solution

  1. Refactoring done for build scripts to make modules compilation parallel (wherever possible).
  2. Some test cases are selected (which don’t require external services like database) to run as part of the build.
  3. CI environment (using open source cruise control) is established to run builds per commit and execute only above set of test cases as part of the build.
  4. Set up low-cost remote agent machine which will run remaining test suite once per day.

Results

  1. Build took only 1 hour and gave faster feedback to dev team.
  2. CI environment provided good confidence to dev team.
  3. Team is able to implement more best practices.
  4. Effective use of existing build  infrastructure (hardware) ensured no further cost is required.
  5. This helped the client in ensuring smooth release management.


Tagged : / / / / / / / / / / / / / /