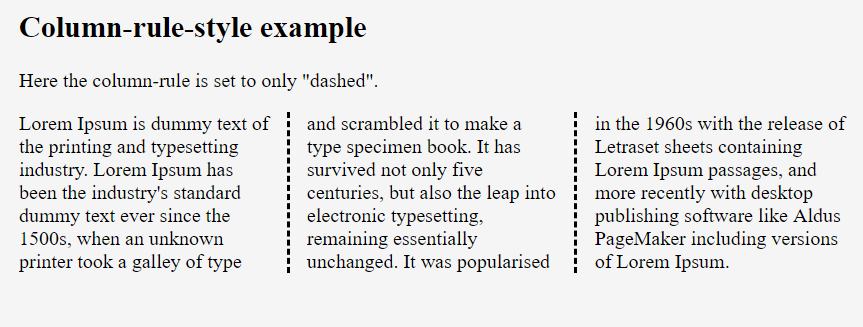
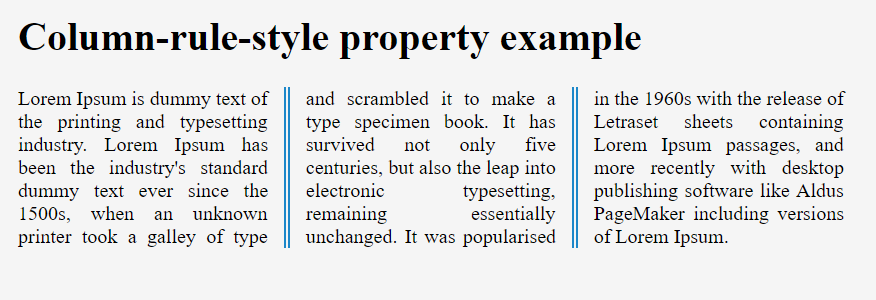
This property is used to specify the style of the rule between columns. We can set this property to none (default), hidden, dotted, dashed, solid, double, groove, ridge, inset and outset.
Ex: –
div { column-rule-style: double;}
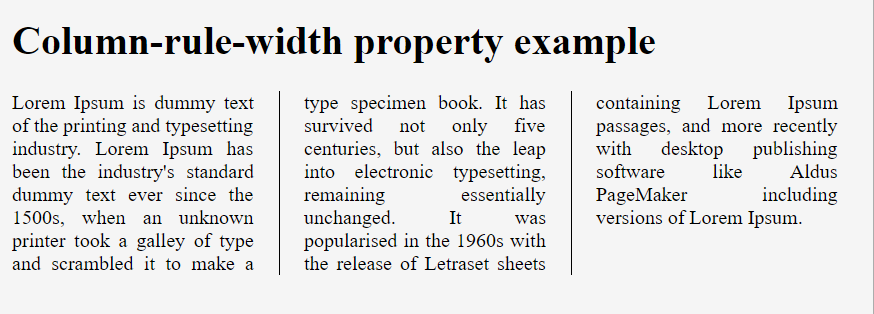
column-rule-width–
This property is used to specify width of the rule between columns. We can set this property to medium (default), thin, thick and length.
Ex: –
div { column-rule-width: 5px;}
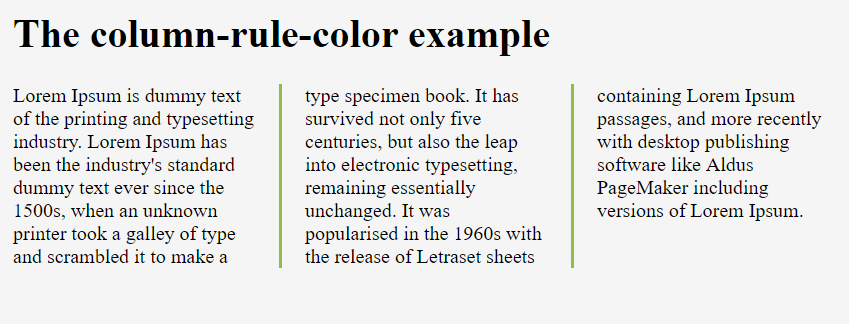
column-rule-color
This property is used to specify color of the rule between columns. We can set this property to color value.
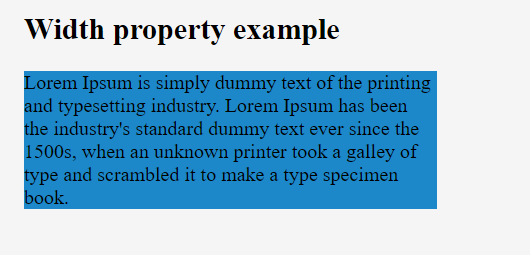
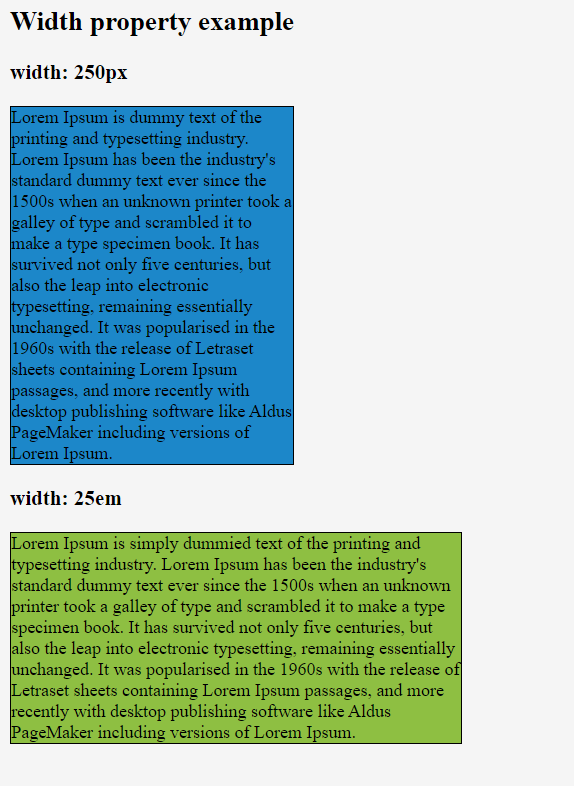
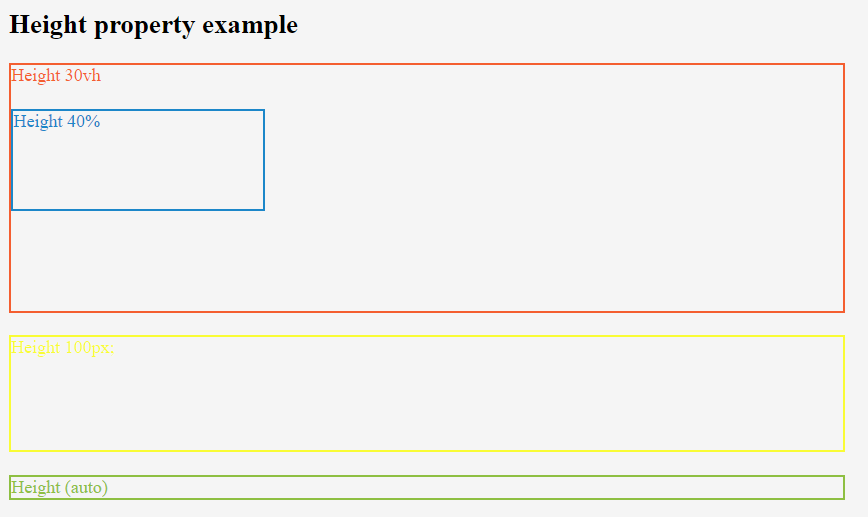
Width & Height Property usually uses in Images, Card, fonts, tables etc… for responsive & attractive design. So, in this blog, you can learn that how can use the width & height property in CSS?
Width–
This property is used to set the width of an element. We can set this property to auto and length in the form of px, cm, % etc.
Ex:-
div { width: 100px; }
Height–
This property is used to set the height of an element. We can set this property to auto and length in the form of px, cm, % etc.
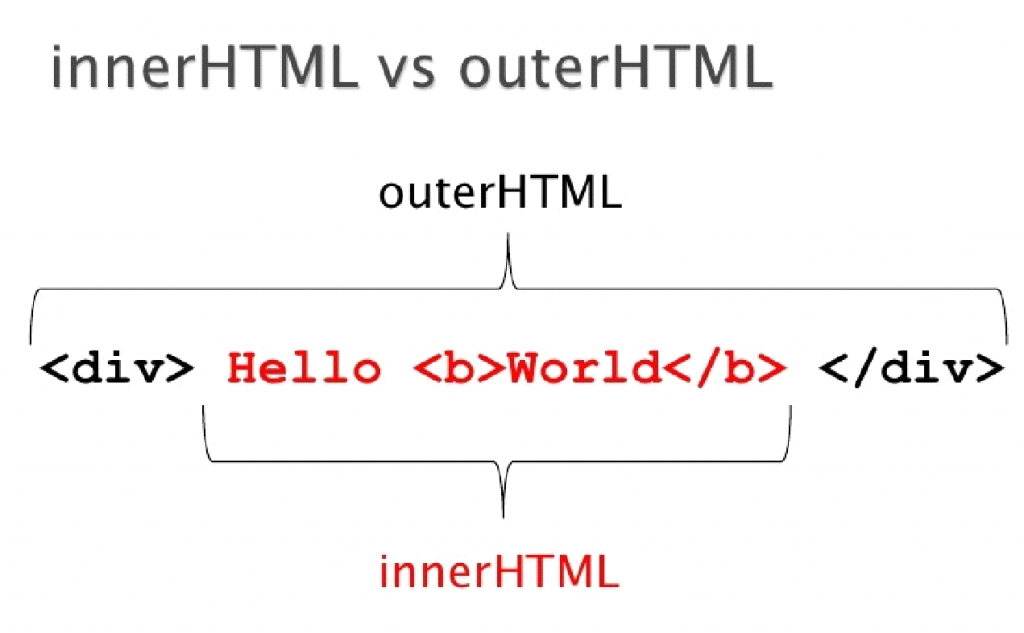
The Element property innerHTML gets or sets the HTML or XML markup contained within the element. Setting the value of innerHTML lets you easily replace the existing contents of an element with new content. HTML5 specifies that a <script> tag inserted with innerHTML should not execute. It is recommended you should not use innerHTML when inserting plain text; instead, use textContent.
outerHTML
The outerHTML is the HTML of an element including the element itself. Use the outerHTML when you want to completely replace an element and its contents. Use innerHTML when you only want to replace the contents of the element.
What is the difference between innerText and outerText?
The innerText property works similarly to the innerHTML property, except that it is focused solely on the textual content contained within an element. The innerText property sets or returns the text content of the specified node, and all its descendants. If you set the innerText property, any child nodes are removed and replaced by a single Text node containing the specified string. This feature was originally introduced by Internet Explorer and was formally specified in the HTML standard in 2016 after being adopted by all major browser vendors. To set or return the HTML content of an element, use the innerHTML property.
outerText
outerText property works similarly to the outerHTML property, modifies the element itself, and replaces it with a single text node. This feature is non-standard and is not on a standards track. Do not use it on production sites facing the Web: it will not work for every user.
The insertBefore() method is used to insert a node before the reference node as a child of a specified parent node. If the given child is a reference to an existing node in the document, insertBefore( ) moves it from its current position to the new position.
If referenceNode is null, the newNode is inserted at the end of the list of child nodes.
Syntax: –
parentNode.insertBefore(newNode, referenceNode);
insertAdjacentElement ( ) Method
The insertAdjacentElement() method inserts the specified element into a given specified position. It returns the element that was inserted, or null if the insertion failed.
Syntax:-
element – The element to be inserted into the tree. The beforebegin and afterend positions work only if the node is in a tree and has an element parent.
insertAdjacentHTML ( ) Method
The insertAdjacentHTML() method is used to insert a text as HTML (parses the specified text as HTML or XML) into a specified position.
Syntax:-
text – The string to be parsed as HTML or XML and inserted into the tree. It is recommended you not use insertAdjacentHTML when inserting plain text instead, use the node.textContent property
insertAdjacentText ( ) Method
The insertAdjacentText() method inserts the specified element into a specified position.
Syntax:-
text – The text which is about to insert. The beforebegin and afterend positions work only if the node is in a tree and has an element parent.
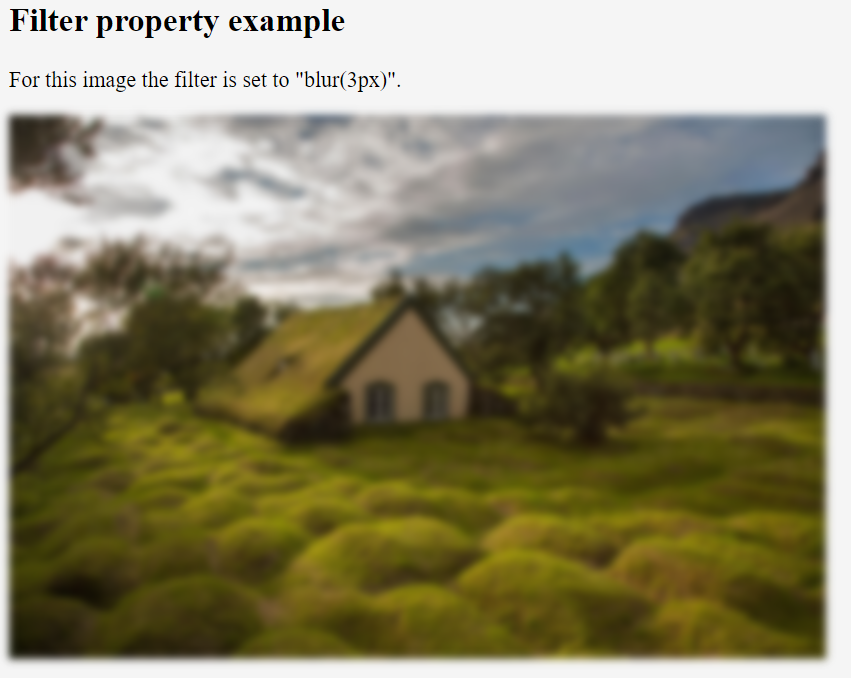
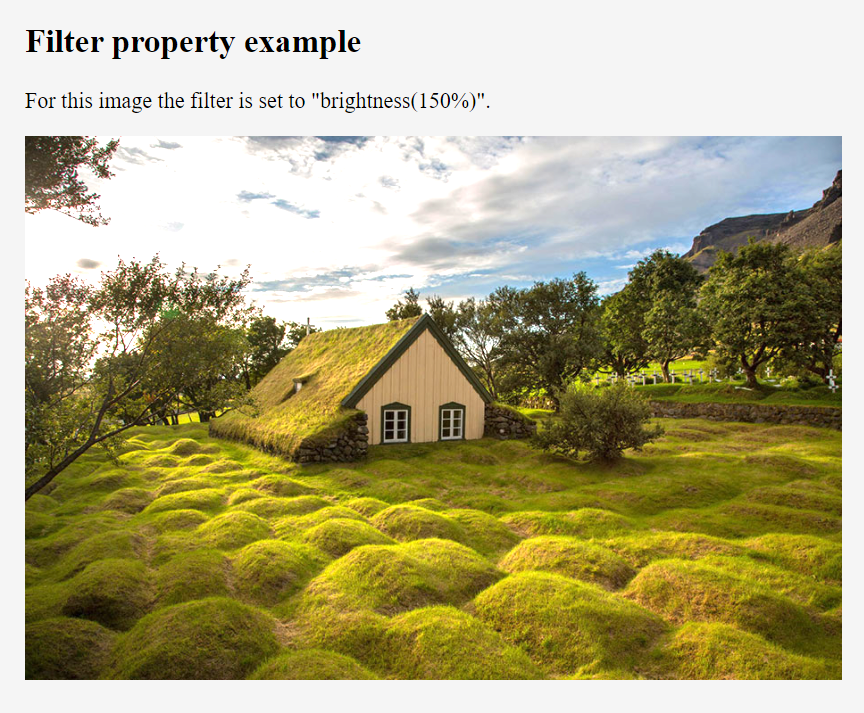
This property is used to define visual effects like blur and brightness to an element.
Ex:-
img { filter: blur(10px);}
Syntax-
none – Default value. Specifies no effects
blur(px) – This is used to apply blur effect to the image. A larger value will create more blur.
brightness(%) – This is used to adjust the brightness of the image. 0% will make the image completely black. 100% is default and represents the original image. Values over 100% will provide brighter results.
contrast(%) – This is used to adjust the contrast of the image. 0% will make the image completely black. 100% is default and represents the original image. Values over 100% will provide results with less contrast.
grayscale(%) – This is used to convert the image to grayscale. 0% is default and represents the original image. 100% will make the image completely gray. Negative values are not allowed.
hue-rotate(deg) – This is used to specify a hue rotation on the image. 0deg is default, and represents the original image. Maximum value is 360deg.
invert(%) – This is used to invert the samples in the image. 0% is default and represents the original image. 100% will make the image completely inverted. Negative values are not allowed.
opacity(%) – This is used to set the opacity level for the image. This is similar to the opacity property. 0% is completely transparent. 100% is default and represents the original image. Negative values are not allowed.
saturate(%) – This is used to saturate the image. 0% will make the image completely un-saturated. 100% is default and represents the original image. Values over 100% provides higher-saturated results. Negative values are not allowed.
sepia(%) – This is used to convert the image to sepia. 0% is default and represents the original image. 100% will make the image completely sepia. Negative values are not allowed.
url() – The url() function takes the location of an XML file that specifies an SVG filter, and may include an anchor to a specific filter element. filter: url(svg-url#element-id)
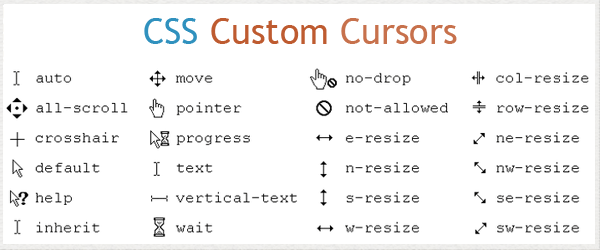
When You create a WebPage using HTML & CSS then you can change the cursor property using CSS as you wish. So, Some below Cursor Property for using-
Cursor–
default – The default cursor
auto – Default. The browser sets a cursor
all-scroll – The cursor indicates that something can be scrolled in any direction
none – No cursor is rendered for the element
not-allowed – The cursor indicates that the requested action will not be executed
text – The cursor indicates text that may be selected
URL – A comma separated list of URLs to custom cursors. Always specify a generic cursor at the end of the list, in case none of the URL-defined cursors can be used
row-resize – The cursor indicates that the row can be resized vertically
s-resize – The cursor indicates that an edge of a box is to be moved down (south)
se-resize – The cursor indicates that an edge of a box is to be moved down and right (south/east)
sw-resize – The cursor indicates that an edge of a box is to be moved down and left (south/west)
n-resize – The cursor indicates that an edge of a box is to be moved up (north)
ne-resize – The cursor indicates that an edge of a box is to be moved up and right (north/east)
nesw-resize – Indicates a bidirectional resize cursor
ns-resize – Indicates a bidirectional resize cursor
nw-resize – The cursor indicates that an edge of a box is to be moved up and left (north/west)
nwse-resize – Indicates a bidirectional resize cursor
copy – The cursor indicates something is to be copied
alias – The cursor indicates an alias of something is to be created
e-resize – The cursor indicates that an edge of a box is to be moved right (east)
ew-resize – Indicates a bidirectional resize cursor
pointer – The cursor is a pointer and indicates a link
progress – The cursor indicates that the program is busy (in progress)
zoom-out – The cursor indicates that something can be zoomed out
zoom-in – The cursor indicates that something can be zoomed in
vertical-text – The cursor indicates vertical-text that may be selected
w-resize – The cursor indicates that an edge of a box is to be moved left (west)
wait – The cursor indicates that the program is busy
context-menu – The cursor indicates that a context-menu is available
col-resize – The cursor indicates that the column can be resized horizontally
cell – The cursor indicates that a cell (or set of cells) may be selected
no-drop – The cursor indicates that the dragged item cannot be dropped here
crosshair – The cursor render as a crosshair
grab – The cursor indicates that something can be grabbed
grabbing – The cursor indicates that something can be grabbed
help – The cursor indicates that help is available
move – The cursor indicates something is to be moved
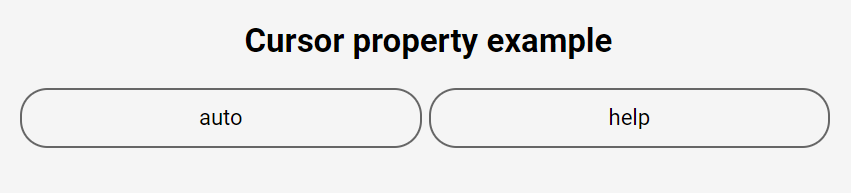
Output for above code but when you using cursor then shown result. as below image-
If the value is “none” or if the specified image can not be found, the border styles will be used.
border-image-slice-
This property is used to specify how to slice the image specified by border-image-source property. The image is always sliced into nine sections: four corners, four edges and the middle. The “middle” part is treated as fully transparent, unless the fill keyword is set. We can set this property to number, % and fill.
Ex:-
#borderis { border-image-slice: 10; }
#borderis { border-image-slice: fill); }
border-image-width-
This property is used to specify width of the border image. We can set this property to number, length and auto.
Ex:-
#borderis { border-image-width: 10; }
#borderis { border-image-width: 10px; }
#borderis { border-image-width: 10%; }
#borderis { border-image-width: auto; }
border-image-outset-
This property is used to specify the amount by which the border image area extends beyond the border box. We can set this property to number and length.