Laravel crud operation:-(version 5.8)
1st step:-First we have to download laravel (version-5.8).to download laravel we have to go to command prompt, and then go to the folder path in which you want to download laravel. After this run the composer command.(command givel below):-
composer create-project laravel/laravel=5.8 crud –prefer-dist
2nd step:- After downloading laravel, we have to make MySql database.
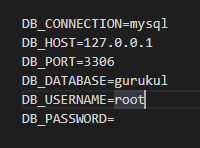
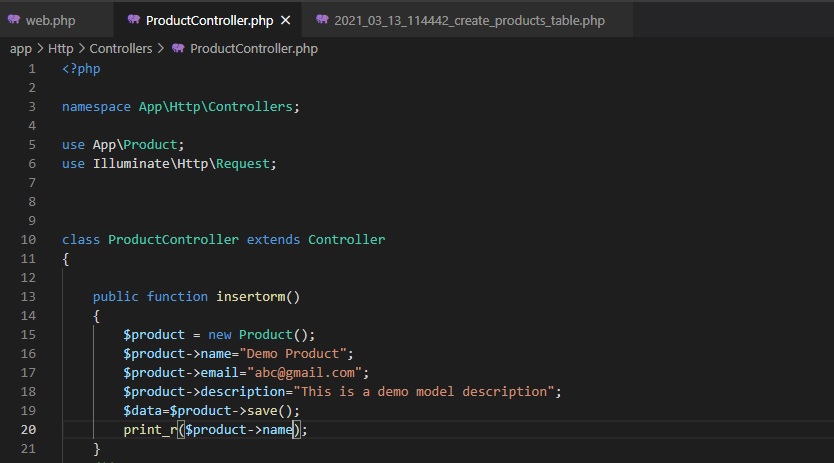
3rd step:- now open .env file of the model and configure like the image given below:
4th step:- Make the migration folder by the writing the command given below on command prompt:
php artisan make:migration create_crud_table –create=crud
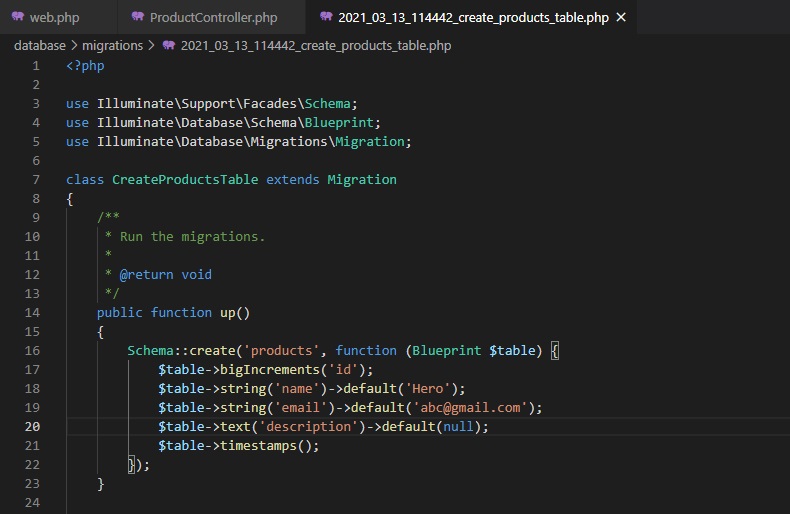
This command make a migration file in database\migration in this file we have to define the required column which we want to create in the database table.
The code for migration:-
<?php
use Illuminate\Support\Facades\Schema;
use Illuminate\Database\Schema\Blueprint;
use Illuminate\Database\Migrations\Migration;
class CreateCrudsTable extends Migration
{
/**
* Run the migrations.
*
* @return void
*/
public function up()
{
Schema::create(‘cruds’, function (Blueprint $table) {
$table->bigIncrements(‘id’);
$table->string(‘first_name’);
$table->string(‘last_name’);
$table->string(‘image’);
$table->timestamps();
});
}
/**
* Reverse the migrations.
*
* @return void
*/
public function down()
{
Schema::dropIfExists(‘cruds’);
}
}
Now we have to migrate the table to the database. The command to migrate the table to tahe database is:-
Php artisan migrate
Write the above code in command prompt.
5th step:- Now make a model by using the command
Php artisan make:moedel model_name –m
By the above command a new file is created with .php extension in app folder.
6th step:- Paste the code given below in the file created in 5th step
<?php
namespace App;
use Illuminate\Database\Eloquent\Model;
class crud extends Model
{
protected $fillable =[
‘first_name’, ‘last_name’, ‘image’
];
}
7th step:- Now create controller. The code to create controller is given below
Php artisan make:controller CrudController –resource
Note: crud of CrudController is name of the model.
8th step:- This is the most important step. In this step we set up the route for all the CrudController class method. Write the below code in route\web.php file.
<?php
/*
|————————————————————————–
| Web Routes
|————————————————————————–
|
| Here is where you can register web routes for your application. These
| routes are loaded by the RouteServiceProvider within a group which
| contains the “web” middleware group. Now create something great!
|
*/
Route::get(‘/’, function () {
return view(‘welcome’);
});
Route::resource(‘crud’,’CrudsController’);
9th step:- Now code the view file in resource\views folder. All the html,css and javascript code is written in this file.
We make new file for the view in resource\views\filename.blade.php
Code is given below
<!DOCTYPE html>
<html lang=”en”>
<head>
<meta charset=”UTF-8″>
<meta http-equiv=”X-UA-Compatible” content=”IE=edge”>
<meta name=”viewport” content=”width=device-width, initial-scale=1.0″>
<title>Document</title>
</head>
<body>
@extends(‘Crud.parent’)
@section(‘main’)
<div align=”right”>
<a href=”{{route(‘crud.create’)}}”class=”btn btn-success btn-sm”>Add</a>
</div>
@if ($message = Session::get(‘success’))
<div class=”alert alert-success”>
<p>{{$message}}</p>
</div>
@endif
<table class=”table table-bordered table-striped”>
<tr>
<th width=”10%”>Image</th>
<th width=”35%”>First Name</th>
<th width=”35%”>Last Name</th>
<th width=”30%”>Action</th>
</tr>
@foreach($data as $row)
<tr>
<td><img src=”{{ URL::to(‘/’) }}/images/{{ $row->image }}” class=”img-thumbnail” width=”75″ /></td>
<td>{{ $row->first_name }}</td>
<td>{{ $row->last_name }}</td>
<td>
<a href=”{{route(‘crud.show’, $row->id) }}” class=”btn btn-primary”>Show</a>
<a href=”{{route(‘crud.edit’, $row->id) }}” class=”btn btn-warning”>Edit</a>
<form action=”{{route(‘crud.destroy’,$row->id) }}”
method=”post”>
@csrf
@method(‘DELETE’)
<button type=”submit” class=”btn btn-danger”>Delete</button>
</form>
</td>
</tr>
@endforeach
</table>
{!! $data->links() !!}
@endsection
</body>
</html>
10th step:- Now code the controller.
Code for the controller
<?php
namespace App\Http\Controllers;
use Illuminate\Http\Request;
use App\Crud;
class CrudsController extends Controller
{
/**
* Display a listing of the resource.
*
* @return \Illuminate\Http\Response
*/
public function index()
{
$data = Crud::latest()->paginate(5);
return view(‘Crud.index’, compact(‘data’))
->with(‘i’, (request()->input(‘page’, 1) – 1) * 5);
}
/**
* Show the form for creating a new resource.
*
* @return \Illuminate\Http\Response
*/
public function create()
{
return view(‘Crud.create’);
}
/**
* Store a newly created resource in storage.
*
* @param \Illuminate\Http\Request $request
* @return \Illuminate\Http\Response
*/
public function store(Request $request)
{
$request->validate([
‘first_name’ => ‘required’,
‘last_name’ => ‘required’,
‘image’ => ‘required|image|max:2048’
]);
$image = $request->file(‘image’);
$new_name = rand() . ‘.’ . $image->getClientOriginalExtension();
$image->move(public_path(‘images’), $new_name);
$form_data = array(
‘first_name’ => $request->first_name,
‘last_name’ => $request->last_name,
‘image’ => $new_name
);
Crud::create($form_data);
return redirect(‘crud’)->with(‘success’, ‘Data Added successfully.’);
}
/**
* Display the specified resource.
*
* @param int $id
* @return \Illuminate\Http\Response
*/
public function show($id)
{
$data = Crud::findOrFail($id);
return view(‘Crud.view’, compact(‘data’));
}
/**
* Show the form for editing the specified resource.
*
* @param int $id
* @return \Illuminate\Http\Response
*/
public function edit($id)
{
$data = Crud::findOrFail($id);
return view(‘Crud.edit’, compact(‘data’));
}
/**
* Update the specified resource in storage.
*
* @param \Illuminate\Http\Request $request
* @param int $id
* @return \Illuminate\Http\Response
*/
public function update(Request $request, $id)
{
$image_name = $request->hidden_image;
$image = $request->file(‘image’);
if($image != ”)
{
$request->validate([
‘first_name’ => ‘required’,
‘last_name’ => ‘required’,
‘image’ => ‘image|max:2048’
]);
$image_name = rand() . ‘.’ . $image->getClientOriginalExtension();
$image->move(public_path(‘images’), $image_name);
}
else
{
$request->validate([
‘first_name’ => ‘required’,
‘last_name’ => ‘required’
]);
}
$form_data = array(
‘first_name’ => $request->first_name,
‘last_name’ => $request->last_name,
‘image’ => $image_name
);
Crud::whereId($id)->update($form_data);
return redirect(‘crud’)->with(‘success’, ‘Data is successfully updated’);
}
/**
* Remove the specified resource from storage.
*
* @param int $id
* @return \Illuminate\Http\Response
*/
public function destroy($id)
{
$data = Crud::findOrFail($id);
$data->delete();
return redirect(‘crud’)->with(‘success’, ‘Data is successfully deleted’);
}
}
Code for index file
resources/views/index.blade.php
<!DOCTYPE html>
<html lang=”en”>
<head>
<meta charset=”UTF-8″>
<meta http-equiv=”X-UA-Compatible” content=”IE=edge”>
<meta name=”viewport” content=”width=device-width, initial-scale=1.0″>
<title>Document</title>
</head>
<body>
@extends(‘Crud.parent’)
@section(‘main’)
<div align=”right”>
<a href=”{{route(‘crud.create’)}}”class=”btn btn-success btn-sm”>Add</a>
</div>
@if ($message = Session::get(‘success’))
<div class=”alert alert-success”>
<p>{{$message}}</p>
</div>
@endif
<table class=”table table-bordered table-striped”>
<tr>
<th width=”10%”>Image</th>
<th width=”35%”>First Name</th>
<th width=”35%”>Last Name</th>
<th width=”30%”>Action</th>
</tr>
@foreach($data as $row)
<tr>
<td><img src=”{{ URL::to(‘/’) }}/images/{{ $row->image }}” class=”img-thumbnail” width=”75″ /></td>
<td>{{ $row->first_name }}</td>
<td>{{ $row->last_name }}</td>
<td>
<a href=”{{route(‘crud.show’, $row->id) }}” class=”btn btn-primary”>Show</a>
<a href=”{{route(‘crud.edit’, $row->id) }}” class=”btn btn-warning”>Edit</a>
<form action=”{{route(‘crud.destroy’,$row->id) }}”
method=”post”>
@csrf
@method(‘DELETE’)
<button type=”submit” class=”btn btn-danger”>Delete</button>
</form>
</td>
</tr>
@endforeach
</table>
{!! $data->links() !!}
@endsection
</body>
</html>
Code for create file
resources/views/create.blade.php
<!DOCTYPE html>
<html lang=”en”>
<head>
<meta charset=”UTF-8″>
<meta http-equiv=”X-UA-Compatible” content=”IE=edge”>
<meta name=”viewport” content=”width=device-width, initial-scale=1.0″>
<title>Document</title>
</head>
<body>
@extends(‘Crud.parent’)
@section(‘main’)
@if($errors->any())
<div class=”alert alert-danger”>
<ul>
@foreach($errors->all() as $error)
<li>{{ $error }}</li>
@endforeach
</ul>
</div>
@endif
<div align=”right”>
<a href=”{{ route(‘crud.index’) }}” class=”btn btn-default”>Back</a>
</div>
<form method=”post” action=”{{ route(‘crud.store’) }}” enctype=”multipart/form-data”>
@csrf
<div class=”form-group”>
<label class=”col-md-4 text-right”>Enter First Name</label>
<div class=”col-md-8″>
<input type=”text” name=”first_name” class=”form-control input-lg” />
</div>
</div>
<br />
<br />
<br />
<div class=”form-group”>
<label class=”col-md-4 text-right”>Enter Last Name</label>
<div class=”col-md-8″>
<input type=”text” name=”last_name” class=”form-control input-lg” />
</div>
</div>
<br />
<br />
<br />
<div class=”form-group”>
<label class=”col-md-4 text-right”>Select Profile Image</label>
<div class=”col-md-8″>
<input type=”file” name=”image” />
</div>
</div>
<br /><br /><br />
<div class=”form-group text-center”>
<input type=”submit” name=”add” class=”btn btn-primary input-lg” value=”Add” />
</div>
</form>
@endsection
</body>
</html>
Code for view file
resources/views/view.blade.php
<!DOCTYPE html>
<html lang=”en”>
<head>
<meta charset=”UTF-8″>
<meta http-equiv=”X-UA-Compatible” content=”IE=edge”>
<meta name=”viewport” content=”width=device-width, initial-scale=1.0″>
<title>Document</title>
</head>
<body>
@extends(‘parent’)
@section(‘main’)
<div class=”jumbotron text-center”>
<div allign=”right”>
<a href=”{{ route(‘crud.index’) }}” class=”btn btn-default”>Back</a>
</div>
<br />
<img src=”{{ URL::to(‘/’) }}/images/{{ $data->image }}” class=”img-thumbnail” />
<h3>First Name – {{ $data->first_name }} </h3>
<h3>Last Name – {{ $data->last_name }}</h3>
</div>
@endsection
</body>
</html>
Code for edit file
resources/views/edit.blade.php
<!DOCTYPE html>
<html lang=”en”>
<head>
<meta charset=”UTF-8″>
<meta http-equiv=”X-UA-Compatible” content=”IE=edge”>
<meta name=”viewport” content=”width=device-width, initial-scale=1.0″>
<title>Document</title>
</head>
<body>
@extends(‘parent’)
@section(‘main’)
@if ($errors->any())
<div class=”alert alert-danger”>
<ul>
@foreach ($errors->all() as $error)
<li>{{ $error }}</li>
@endforeach
</ul>
</div>
@endif
<div align=”right”>
<a href=”{{ route(‘crud.index’) }}” class=”btn btn-default”>Back</a>
</div>
<br />
<form method=”post” action=”{{ route(‘crud.update’, $data->id) }}” enctype=”multipart/form-data”>
@csrf
@method(‘PATCH’)
<div class=”form-group”>
<label class=”col-md-4 text-right”>Enter First Name</label>
<div class=”col-md-8″>
<input type=”text” name=”first_name” value=”{{ $data->first_name }}” class=”form-control input-lg” />
</div>
</div>
<br />
<br />
<br />
<div class=”form-group”>
<label class=”col-md-4 text-right”>Enter Last Name</label>
<div class=”col-md-8″>
<input type=”text” name=”last_name” value=”{{ $data->last_name }}” class=”form-control input-lg” />
</div>
</div>
<br />
<br />
<br />
<div class=”form-group”>
<label class=”col-md-4 text-right”>Select Profile Image</label>
<div class=”col-md-8″>
<input type=”file” name=”image” />
<img src=”{{ URL::to(‘/’) }}/images/{{ $data->image }}” class=”img-thumbnail” width=”100″ />
<input type=”hidden” name=”hidden_image” value=”{{ $data->image }}” />
</div>
</div>
<br /><br /><br />
<div class=”form-group text-center”>
<input type=”submit” name=”edit” class=”btn btn-primary input-lg” value=”Edit”/>
</div>
</form>
@endsection
</body>
</html>