In this blog, I am using fade in jQuery with help of HTML & CSS. So, Let’s create an index.html & style.css below-
In this blog, I am using fade in jQuery with help of HTML & CSS. So, Let’s create an index.html & style.css below-
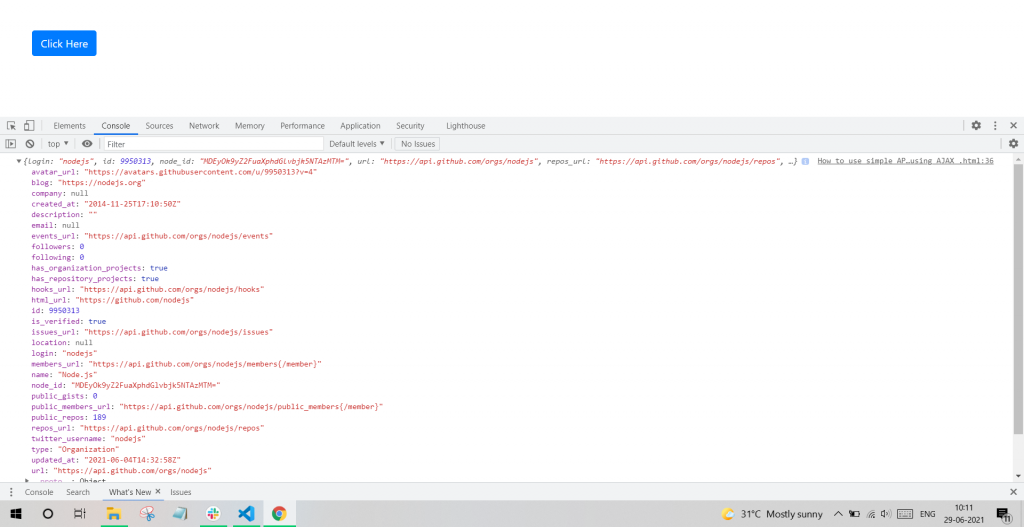
In this blog in am going to explain that How to use JQuery AJAX Method to Call an API for to load data from external website or external File of etc, by calling APIs, and get the response in JSON or XML formats. So first thing I am going to create a html file and import jquery cdn. If you want to bootstrap css, & js cdn the you can copy from this link Click Here as below-
In this code I am using bootstrap cdn with jQuery cdn after that a Script tag in this script tag ajax function call with json data for getting data showing in cosole.log. If you using first time jQuery then you can right button of mouse and select inspect (Ctrl+shift+i) after that showing below tab then select console tab. When you click Here button from document then showing all data which retrieve.

Step 1 – Install Laravel 5.8
First we want to Download Laravel 5.8 version for developing Crud application using Ajax. For this you have to open your terminal or command prompt and write below command. It will download Laravel 5.8 in your define directory.
composer create-project laravel/laravel=5.8 ajax-crud –prefer-dist
Step 2 – Laravel 5.8 Database Connection
Once Laravel 5.8 has been downloaded then after we have to make Database connection. For this first you have to open config/database.php and define Mysql Database configuration.
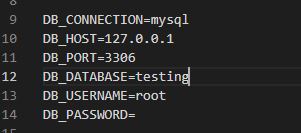
After this you have to open .env file and in that file also you have to define Mysql Database configuration, which you can find below.
Step 3 – Create Table
For Create Crud Application, first we have to create Mysql table. For create Mysql table from Laravel 5.8 application we have to write following artisan command in your command prompt.
php artisan make:migration create_ajax_cruds_table –create=ajax_crudsAbove command will command create migration file in database/migrations folder. In that file we have to define table column which you want to define in Mysql table. Below you can find source code of migration file.
Lastly for create Mysql table in your Database, you have to write following command in your terminal or command prompt. It will create ajax_cruds table in your define Database.
php artisan migrateStep 4 – Create Model in Laravel 5.8
Now we want to make Model in Laravel 5.8, For this you have to write following command in your terminal or command prompt. It will create model file here app/AjaxCrud.php.
php artisan make:model AjaxCrud -mUnder this app/AjaxCrud.php file, you have to define table column for database operation which source code you can find below.
Step 5 – Create Blades Files
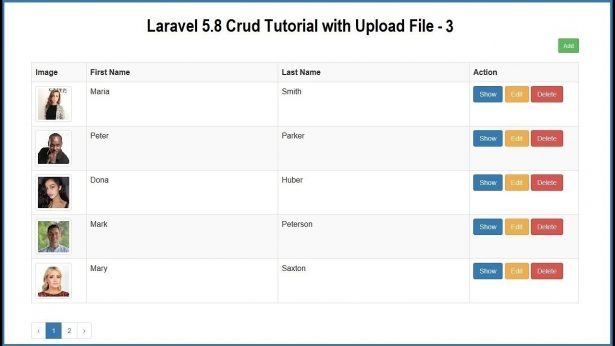
For display output data in browser, in Laravel 5.8 we have to create blade file in resources/views folder. Under this folder we have create ajax_index.blade.php file. In this file you can find HTML code and jQuery code for display data in jQuery Datatable.
Step 6 – Set Resource Route
Step 7 – Create Controller in Laravel 5.8
Lastly, We need to set resource route for ajax crud application. For this we have to open routes/web.php file.
Controller mostly used for handle HTTP request. Create new controller in Laravel 5.8 framework, we have to write following command.
php artisan make:controller AjaxCrudController –resourceThis command will create AjaxCrudController.php file in app/Http/Controllers folder. In this controller file you can find all in build required method for do Crud operation. Under this controller for use AjaxCrud model, first we have to define use App\AjaxCrud; this statement at the header of the AjaxCrudController.php file.
index() – This is the root method of this controller. This method will received Ajax request for load data in jQuery DataTables plugin. If this method received ajax request then it will load data in jQuery DataTables plugin. In this ajax block you can find yajra datatables package code.
store() – For Insert Data into Mysql table using ajax in Laravel 5.8, here we have use store() method of AjaxCrudController.php. This method will received Ajax request for insert or add data. Under this method first it has validate for data. If there is any validation fails then it will send response to ajax request in JSON format. But there is no any validation fails then it will continue execution of code and first it will upload profile image of user and then after it will insert data into mysql table. And lastly it will send json response to ajax request.
edit() – This method is used for fetch single row of data from mysql table, and send data to ajax request in json formate which will be display under Bootstrap modal form.
update() – This method has received ajax request for update existing mysql table data. In this method first it check user has select profile image or not. If User is select image then in this method it will validate form data with selected file is image or not. But Suppose user has not select image then it will only validate textbox data only. If there is any validation error occur then it will send data to ajax request in json formate. After successfully validate form data then it will update data.
destroy() – For delete or remove mysql data, ajax request will be send to destroy() method. It will delete or remove mysql data in Laravel 5.8 by using ajax.
For run Laravel 5.8 application, you can write following command.
php artisan serveFor see Laravel 5.8 application in your browser, you have to write following url.
http://localhost:8000/ajax-crudHey friends, I am trying to show database column data in my edit form of a Laravel project. yesterday I failed to show data from database in a select list using ajax. so let’s see the below blade file and ajax also to get your solution.
<div class="form-group">
  <label for="Blood_Group">Blood Group</label>
	<select class="form-control" id="bgroup" name="bgroup">
	  <option value="" disabled selected>Select BG</option>
	  <option value="O+">O+</option>
	  <option value="O-">O-</option>
	  <option value="A+">A+</option>
	  <option value="A-">A-</option>
	  <option value="B+">B+</option>
	  <option value="B-">B-</option>
	  <option value="AB+">AB+</option>
	  <option value="AB+">AB-</option>
	</select>
</div>
$.ajax({
	type: "GET",
	url: 'addprofile',
	data: null,
	success: function(response) {
          let data = response.data;
          $("#bgroup").append('<option value=' + data[0].bgroup+ '>' + data[0].bgroup+
           '</option>');

        }
});
Error : updated data from database is not showing in selected list when i am trying to update it again.
$("#bgroup").val(data[0].bgroup).attr('selected','selected');
You can also use below code:
$('#bgroup option[value="' + data[0].bgroup+ '"]').prop('selected', true);
Above solution is working for me. so if you have more solution on select option then please feel free to comment and share your knowledge.
Resources :
Hey friends, I came again to all of you with a new article, must follow below steps to create a CRUD in Laravel using ajax.
📚 Step 1 : create a Laravel project using below command.
composer create-project laravel/laravel Studentsform
📚 Step 2 : Make a model for this, run below command: after running below command you will find a model name Student and one migration 2021_05_01_create_students_table
php artisan make:model Student -m
📚 Step 3 : Create a StudentController now using below command
php artisan make:controller StudentController
📚 Step 4 : Now open migration and add some column in it
Schema::create('students', function(Blueprint $table)) {
	$table->id();
	$table->string('firstname');
	$table->string('lastname');
	$table->string('email');
	$table->string('phone');
	$table->timestamps();
}
📚 Step 5 : Add table name in Student model and also write fillable area for it with your table column name.
    protected $table = 'students';
	protected $fillable = ['firstname','lastname','email','phone'];
📚 Step 6 : now migrate all your migration using below command , before migrating make sure to create a Database for it.
php artisan migrate
📚 Step 7 : And then Open StudentController.php (app/Http/Controllers/StudentController) and create a function name index().
public function index()
 {
	$students = Student::orderBy('id','DESC')->get();
	return view('students',compact('students'));
 }
📚 Step 8 : Let’s create a route for this. so now open web.php file situated under routes folder and add also controller location within web.php.
Use App\Http\Controllers\StudentController
Route::get('/students',[StudentController::class,'index']);
📚 Step 9 : Now create a view file under resources/views with name students.blade.php and below code in it
<!DOCTYPE html>
<html lang="en">
<head>
    <meta charset="UTF-8">
    <meta http-equiv="X-UA-Compatible" content="IE=edge">
    <meta name="viewport" content="width=device-width, initial-scale=1.0">
    <title>Ajax Crud</title>
    <link href="https://cdn.jsdelivr.net/npm/bootstrap@5.0.0-beta3/dist/css/bootstrap.min.css" rel="stylesheet" integrity="sha384-eOJMYsd53ii+scO/bJGFsiCZc+5NDVN2yr8+0RDqr0Ql0h+rP48ckxlpbzKgwra6" crossorigin="anonymous">
</head>
<body>
    <section style="padding-top:60px">
        <div class="container">
            <div class="row">
                <div class="col-md-12">
                    <div class="card">
                        <div class="card-header">
                            Students <a href="#" class="btn btn-success" data-bs-toggle="modal" data-bs-target="#StudentModal">Add New Students</a>
                        </div>
                        <div class="card-body">
                            <table id="studentTable" class="table">
                                <thead>
                                    <tr>
                                        <th>First Name</th>
                                        <th>Last Name</th>
                                        <th>Email</th>
                                        <th>Phone</th>
                                    </tr>
                                </thead>
                                <tbody>
                                    @foreach($students as $student)
                                        <tr>
                                            <td>{{$student->firstname}}</td>
                                            <td>{{$student->lastname}}</td>
                                            <td>{{$student->email}}</td>
                                            <td>{{$student->phone}}</td>
                                        </tr>
                                    @endforeach
                                </tbody>
                            </table>
                        </div>
                    </div>
                </div>
            </div>
        </div>
    </section>

    <!-- modal start -->

    <!-- Button trigger modal -->
    <!-- Modal -->
    <div class="modal fade" id="StudentModal" tabindex="-1" aria-labelledby="exampleModalLabel" aria-hidden="true">
        <div class="modal-dialog">
        <div class="modal-content">
            <div class="modal-header">
            <h5 class="modal-title" id="exampleModalLabel">Add new student</h5>
            <button type="button" class="btn-close" data-bs-dismiss="modal" aria-label="Close"></button>
            </div>
            <div class="modal-body">
            <form action="" id="studentForm">
                @csrf
                <div class="form-group">
                    <label for="FirstName">First Name</label>
                    <input type="text" class="form-control" id="firstname">
                </div>
                <div class="form-group">
                    <label for="LastName">Last Name</label>
                    <input type="text" class="form-control" id="lastname">
                </div>
                <div class="form-group">
                    <label for="email">Email</label>
                    <input type="text" class="form-control" id="email">
                </div>
                <div class="form-group">
                    <label for="phone">Phone</label>
                    <input type="text" class="form-control" id="phone">
                </div>
                <button type="submit" class="btn btn-primary">Submit</button>
            </form>
            </div>

        </div>
        </div>
    </div>
    <script>
        $("#studentForm").submit(function(e){
            e.preventDefault();
            let firstname = $("#firstname").val();
            let lastname = $("#lastname").val();
            let email = $("#email").val();
            let phone = $("#phone").val();
            let _token = $("input[name=_token]").val();

            $.ajax({
                url: "{{route('student.add')}}",
                type:"POST" ,
                data: {
                    firstname:firstname,
                    lastname:lastname,
                    email:email,
                    phone:phone,
                    _token:_token
                },
                success:function(response)
                {
                    if(response){
                        $("#studentTable tbody").prepend('<tr><td>'+response.firstname+'</td><td>'+response.lastname+' </td><td>'+response.email+'</td><td>'+response.phone+'</td></tr>');
                        $("#studentForm")[0].reset();
                        $("#studentModal").modal('hide');
                    }
                }
            });

        });
    </script>
    <script src="https://cdn.jsdelivr.net/npm/@popperjs/core@2.9.1/dist/umd/popper.min.js" integrity="sha384-SR1sx49pcuLnqZUnnPwx6FCym0wLsk5JZuNx2bPPENzswTNFaQU1RDvt3wT4gWFG" crossorigin="anonymous"></script>
    <script src="https://cdn.jsdelivr.net/npm/bootstrap@5.0.0-beta3/dist/js/bootstrap.min.js" integrity="sha384-j0CNLUeiqtyaRmlzUHCPZ+Gy5fQu0dQ6eZ/xAww941Ai1SxSY+0EQqNXNE6DZiVc" crossorigin="anonymous"></script>
    <script src="https://code.jquery.com/jquery-3.6.0.js" integrity="sha256-H+K7U5CnXl1h5ywQfKtSj8PCmoN9aaq30gDh27Xc0jk=" crossorigin="anonymous"></script>
</body>
</html>
📚 Step 10 : Create another function in StudentController.php
public function addStudent(Request $request)
	{
		$student = new Student();
		$student->firstname = $request->firstname;
		$student->lastname = $request->lastname;
		$student->email = $request->email;
		$student->phone = $request->phone;
		$student->save();
		return response()->json($student);
	}
📚 Step 11 : Now create a route for addStudent() function, so for this open web.php file again
Route::post('/add-student', [StudentController::class,'addStudent'])->name('student.add');
At last fill the data into popup form and you will see that your form is working fine. yay we did it. Let’s congratulate yourself that you create a CRUD using ajax in Laravel 8.
If you find any issue on above steps then feel free to comment. I will feel very happy to resolve your problems in it.
Introduction:- AJAX stands for Asynchronous Javascript And XML. AJAX is used for fast creating dynamic web pages. It allow web pages to be updated asynchronously by exchanging some amount of data with the server behind the scenes. It is possible to update some parts of a web page without reloading the whole page. There are many web applications that run on ajax example:- gmail,facebook,twitter,google map, youtube etc.
Understanding synchronous and asynchronous:-
Synchronous:- The synchronous request blocks the client until the operation completes.
Asynchronous:- Asynchronous request doesn’t block the client. At the time when the request is processing, user can perform another operation.
Some AJAX technologies:-
As we know ajax is not a technology but group of inter related technologies.some of the technologies is given below:
1.HTML/XHTML and CSS
2.XML and JSON
3.DOM
4.XMLHttpRequest
5.javascript
HOW AJAX WORKS:-
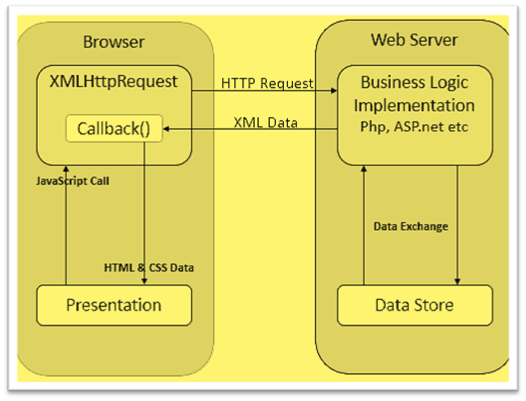
AJAX communicates with the server using XMLHttpRequest. The user sends the request from the UI and the javascript call goes to XMLHttpRequest object. Then the Http request is send to the server. Then the server interact with the database and data is retrived. The server sends te data to the XMLHttpRequest callback function. And HTML and CSS data is displayed on the browser.
Ajax is a web development technique designed to create highly responsive/ interactive websites. To have a better understanding of AJAX we need to have knowledge of javascript and somewhat XML.
The easiest way of implementing AJAX, is by using jQuery.
To add jQuery
We can use the downloaded version from (jquery.com/download/) and we need to include the file location of the file in the script under the header tag, or we can use the CDN in the head of HTML as
<head>

<script src="https://ajax.googleapis.com/ajax/libs/jquery/3.5.1/jquery.min.js"></script>

</head>
After we are good to go with the operations we need to perform. If we wanna test that the CDN works fine we can use the function below in the body of the HTML script
<script>
$(document).ready(function(){
    alert("jQuery Works")
});
</script>
If we see the jQuery works alert, That mean we can congratulate ourselves on our success.
For knowing what is AJAX and its procedure https://www.scmgalaxy.com/tutorials/a-brief-description-of-ajax/
AJAX stands for Asynchronous JavaScript And XML.
It is a web development technique that helps to create a highly responsive website. by the use of AJAX, we get desktop-like software experience on the web browser. It is used in the web pages to be updated asynchronously by changing data with a web server behind the scene (in the background). This makes it possible to update parts of a web page, without reloading the whole page. It is the use of the XMLHttpRequest object to communicate with server-side scripts.
The easiest way of implementing AJAX, especially if we’re planning on communicating with servers is by using jQuery.
Most people get confused with the concept that ajax is a programming language. So, let’s be very clear that
Ajax is not a programming language, it is a web development technique designed to create highly responsive/ interactive websites. To have a better understanding of AJAX we need to have knowledge of javascript and somewhat XML.
Javascript is a scripting language that helps to make web pages interactive, CSS (Cascading style sheet) style sheet to the makeup of the webpage and XML (extensible markup language ) is a markup language that defines a set of rules for encoding documents in a format that is both human-readable and machine-readable. here javascript and CSS are essentials and XML is less essential for the beginners
Why use AJAX
How AJAX works
Ajax uses XMLHttpRequest object (also called XHR objects) to achieve this
For knowing the installation/setup procedure link is given below https://www.scmgalaxy.com/tutorials/ajax-setup-installation/