Limited Time Offer!

For Less Than the Cost of a Starbucks Coffee, Access All DevOpsSchool Videos on YouTube Unlimitedly.
Master DevOps, SRE, DevSecOps Skills!

Enroll Now

How to Install and Configure Jira in Linux | Jira Tutorial

jira-installation-and-configuration-in-linux

Download JIRA package from 

https://www.atlassian.com/software/jira/download?b=j

Linux Installation:

wget https://www.atlassian.com/software/jira/downloads/binary/atlassian-jira-6.4.12-x64.bin

chmod atlassian-jira-6.4.12-x64.bin

Execute the ‘.bin’ file to start the console wizard

stop iptables

service jira start/stop

http://uvo1kievugg76unbcj9.vm.cld.sr:8080/

& follow the instructions

Reference

https://confluence.atlassian.com/jira/installing-jira-on-linux-191501165.html

Tagged : / / / / / / / / / / / / /

How to setup Gitlab in local machine ?

gitlab-setup

Download gitlab from

https://www.gitlab.com/downloads/

Installation, setup, configuration, backup Instructions is given in…

https://gitlab.com/gitlab-org/omnibus-gitlab/blob/master/README.md
https://github.com/gitlabhq/gitlabhq/blob/6-1-stable/doc/install/installation.md

Tagged : / / / / / / / / / / / / / / / / /

How to Setup Configure Hudson Master Slave? – Complete Guide

hudson-master-slave-setup
The tasks can be scheduled to run on the same machine (Master), or on a different machine (Slave). A master is a installation of Hudson, that can manage one or more slaves. The role of master remains same in Master slave setup. It serves HTTP requests, and it can still build projects on it’s own.
Slaves are computers that are setup to build projects triggered from the master. A separate program called slave agent runs on slave computer. In this article we’ll discuss about how to setup Hudson to executed distributed builds using Master slave. One computer can be configured to execute multiple slave agents.

How it works

When the slaves are registered to a master, the master starts distributing loads to slaves. The delegation depends on the specific job. The job can be configured to either execute on the master, or it can be tied to a specific slave. On the other hand, the jobs can be configured to freely roam between slaves, wherein the job is executed using the free slave. As per the user is concerned, the setup is transparent. The results for all jobs are viewable using the Master, irrespective of the Slave that executed the job.
The slave may be built using any Operating system. The Master slave setup is highly helpful while the user has to execute the job on different Operating system. Consider this use case: The application is expected to run on different operating system, Linux, Solaris and Windows system. To address this need, the user can install Hudson on any machine, say Linux, and add 2 slaves: Solaris and Windows. The user can add 3 different jobs, one running on Master itself and others running on slave machines.

Methods to set up Slave agents

The slave can be launched from Master using any of below methods:
  1. Launch Slave agents on Unix machines via SSH.
  2. Launch Slave agents via JNLP.
  3. Launch Slave agents via execution of command on the master.
  4. Let Hudson control windows slave as a windows service.

The following screenshot illustrates the list of modes under which the Hudson slave can be launched.

Set up Slave agents on Unix machines via SSH

Hudson has a built-in SSH client implementation that it can use to talk to remote sshd and start a slave agent. This is the most convenient and preferred method for Unix slaves, which normally has sshd out-of-the-box. Click Manage Hudson, then Manage Nodes, then click New Node. In this set up, the connection information is supplied, including SSH host name, user name and authentication credentials. The authentication is performed using password or ssh keys. If it is configured to use ssh keys, the SSH public key should be copied to ~/.ssh/authorized_keys file. Hudson will do the rest of the work by itself, including copying the binary needed for a slave agent, and starting/stopping slaves.


Depending on the project and hardware resource availability, the user Desktop can be used as one of Slave, without affecting his day-to-day activities, thus avoiding the need for dedicated Slaves.

Establish slave agent via Java Web Start

Another way of launching slave is to start a slave agent through Java Web Start (JNLP). In this approach, the user will login to the slave node, open a browser and open the slave page using the URL pointed to the Master. It may look like the following URL:
http://masterserver:port/hudson/jnlpJars/slave.jar
The user is presented with the JNLP launch icon. If user click the icon, the Java Web Start kicks in and it launches a slave agent on this computer.
This mode is convenient when the master cannot initiate a connection to slaves, such as when it runs outside a firewall while the rest of the slaves are in the firewall. The disadvantage is, if the machine with a slave agent goes down, the master has no way of re-launching it on its own.

Set up slave agent headlessly

This launch mode uses a mechanism very similar to Java Web Start, except that it runs without using GUI, making it convenient for an execution as a daemon on Unix. To do this, the user should configure this slave to be a JNLP slave by downloading slave.jar, and then from the slave, run a command like this:
 
java -jar slave.jar -jnlpUrl http://yourserver:port/computer/slave-name/slave-agent.jnlp

The slave.jar file is downloaded from the above mentioned URL. Make sure to replace slave-name with the name of the slave setup in Master.

By default, Hudson runs on port 8080. It can be installed and managed without the need for super user privilege. The super user privilege is not required to manage both Master and Slave.

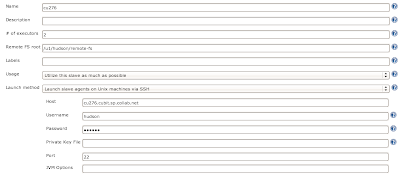
The below diagram illustrates the list of configuration parameters specific to a slave.


set up Slave Agent using own scripts

If the above modes is not flexible, the user can write his own script to launch the Slave agent. The script is placed in the Master computer and Hudson runs this script whenever it should connect to the slave. The script may use the remote login program like SSH, RSH to establish connection between Master and slave.
The script would execute the slave agent program like java -jar slave.jar. The stdin and stdout for the script should be connected to the master. For example, the script that does ssh myslave java -jar ~/bin/slave.jar would satisfy this need, when it is executed from the Master web interface. For this reason, running this script manually from the command line does no good.
The copy of slave.jar can be downloaded from the above mentioned URL. Launching the slave agent using this mode requires additional setup in the Slave. The benefit is that when the connection goes bad, the user can use Hudson web interface to re-establish the connection.
Tagged : / / / / / / / / / / / / / / / /

How to put comment in Ant | Comments in Apache Ant

comments-in-apache-ant

How to put comment in Ant | Comments in Apache Ant

Method 1:

<!– Comments are just as important in buildfiles, do not –>
<!– avoid writing them! –>
<!– Example build file for “Ant: The Definitive Guide” –>
<!– and its sample project: irssibot –>

Method 2: Echo
Description
Writes a message to the Ant logging facilities. A message may be supplied
as nested text to this task.
Echoes a message to the current loggers and listeners which means System.out unless overridden. A level can be specified, which controls at what logging level the message is filtered at.
The task can also echo to a file, in which case the option to append rather than overwrite the file is available, and the level option is ignored

Parameters

Attribute Description

Required

message the message to echo.

No. Text may also be included in a character section within this element. If neither is included a blank line will be emitted in the output.

file the file to write the message to.

No

append Append to an existing file (or open a new file / overwrite an existing file)?

No – default is false.

level Control the level at which this message is reported. One of “error”, “warning”, “info”, “verbose”, “debug” (decreasing order)

No – default is “warning”.

encoding encoding to use, default is “”; the local system encoding. since Ant 1.7

No

Examples
Style 1:
<echo message=”Hello, world”/>

Style 2:
<echo message=”Embed a line break:${line.separator}”/>

Style 3:
<echo>Embed another:${line.separator}</echo>

Style 4:
<echo>This is a longer message stretching over
two lines.
</echo>

Style 5:
<echo>
This is a longer message stretching over
three lines; the first line is a blank
</echo>

Style 5:
<echo message=”Deleting drive C:” level=”debug”/>
A message which only appears in -debug mode.

Style 6:
<echo level=”error”>
Imminent failure in the antimatter containment facility.
Please withdraw to safe location at least 50km away.
</echo>
A message which appears even in -quiet mode.

Style 7:
<echo file=”runner.csh” append=”false”>#\!/bin/tcsh
java-1.3.1 -mx1024m ${project.entrypoint} $$*
</echo>
Generate a shell script by echoing to a file. Note the use of a double $ symbol to stop Ant filtering out the single $ during variable expansion
Depending on the loglevel Ant runs, messages are print out or silently ignored:

Ant-Statement

-quiet, -q

no statement

-verbose, -v

-debug, -d

<echo message=”This is error message.” level=”error” />

ok

ok

ok

ok

<echo message=”This is warning message.” />

ok

ok

ok

ok

<echo message=”This is warning message.” level=”warning” />

ok

ok

ok

ok

<echo message=”This is info message.” level=”info” />

not logged

ok

ok

ok

<echo message=”This is verbose message.” level=”verbose” />

not logged

not logged

ok

ok

<echo message=”This is debug message.” level=”debug” />

not logged

not logged

not logged

ok

Method 3:
Description

Tagged : / / / / / / / / / / / / /

Clover and Maven working with Distributed Applications

clover-and-maven-working-with-distributed-applications

1.       Configure maven clover plugin.

2.       Build the all components with clover enabled.

3.       Deploy the clover enabled build to test server.

4.       Run the tests.

5.       Create & Review the Code Coverage Report.

Configure Maven Clover Plugin

Configure the maven plugin in pom.xml .If you are having multi module projects; you can configure the plugin in parent-pom instead of modifying each module’s pom xml.


Build all components with clover enabled.

Run the following command.


  “mvn -U clover2:setup package clover2:aggregate


                If you got something like this

[INFO] Loaded from: C:\Documents and Settings\Administrator\.m2\repository\com\cenqua\clover\clover\2.6.3\clover-2.6.3.jar

[INFO] Clover: Commercial License registered to ABC Corporation.

[INFO] Creating new database at ‘C:\p4_depot\trunk\4A\target\clover\clover.db’.

[INFO] Processing files at 1.5 source level.

[INFO] Clover all over. Instrumented 5 files (1 package).

[INFO] Elapsed time = 0.532 secs. (9.398 files/sec, 812.03 srclines/sec)

Congratulation, you get clover work with your source!!


Deploy the clover enabled build to test server.

Deploy the Clover enabled build to the server. The same process as normal

Copy the Clover registry file to the appropriate directory on each of the test servers


The registry file is the DB file create during compile, defined by initstring parametersclover‐setup task, this needs to occur after the Clover build is complete, and before you run your tests


Background: the Clover initstring


FileName: xxx.db

At build time, Clover constructs a registry of your source code, and writes it to a file at the location specified in the Clover initstring. When Clover‐ instrumented code is executed (e.g. by running a suite of unit tests), Clover looks in the same location for this registry file to initialise itself. Clover then records coverage data and writes coverage recording files next to the registry file during execution

Notes: gives the folder contains the registry file full control permissions


Recommended Permissions

Clover requires access to the Java system properties for runtime configurations, as well as read write access to areas of the file system to read the Clover coverage database and to write coverage information. Clover also uses a shutdown hook to ensure that it flushes any as yet unflushed coverage information to disk when Java exits. To support these requirements, the following security

permissions are recommended:


grant codeBase “file:/path/to/clover.jar” {

permission java.util.PropertyPermission “*”, “read”;

permission java.io.FilePermission “<>”, “read, write”;

permission java.lang.RuntimePermission “shutdownHooks”;

}


Grant Permissions to clover.jar

Edit the java.policy file of the java runtime on the test server

%JAVA_HOME%/jre/lib/security


Copy clover.jar and license file to the java runtime class path of the test servers

%JAVA_HOME%/jre/lib/ext


Run the test suite

Run the test suite as normal. Either automation test case or manual test case.


Create Code Coverage Report

Copy the coverage recording files to build machine.


Once test execution is complete, you will need to copy the coverage recording files from each remote machine to the initstring path on the build machine in order to generate coverage reports.


Background: CoverageRecording Files


Filename:xxx.dbHHHHHHH_TTTTTTTTTT or clover.dbHHHHHHH_TTTTTTTTTT.1 (where HHHHHHH and TTTTTTTTTT are both hex strings)

CoverageRecording files contain actual coverage data. When running instrumented code, Clover creates one or more Coverage Recorders. Each Coverage Recorder will write one CoverageRecording file. The number of Coverage Recorders created at runtime depends the nature of the application you are Clovering. In general a new Coverage Recorder will be created for each new ClassLoader instance that loads a Clovered class file. The first hex number in the filename (HHHHHHH) is a unique number based on the recording context. The second hex number (TTTTTTTTTT) is the timestamp (ms since epoch) of the creation of the Clover Recorder. CoverageRecording files are named this way to try to minimise the chance of a name clash. While it is theoretically possible that a name clash could occur, in practice the chances are very small.

CoverageRecording files are written during the execution of Clover‐instrumented code. CoverageRecording files are read during report generation or coverage browsing.


Run the generating report goal to create the report.

                                “mvn clover2:clover”


Tagged : / / / / / / / / / / / / / /

HOWTO: Install e17 from SVN/source on Ubuntu

install-e17-from-svn-source

E17 is a lightweight window manager/bundle of libraries for Unix based operating systems. E17 is designed to be both elegant and fast – two goals it succeeds at very well. The only problem is that installing E17 on Ubuntu (and it’s derivatives) is not a very straight forward process if you have never done it before, the following are the steps I have taken to get the E17 environment up and running on Ubuntu 9.10 (however it should work for all Ubuntu based systems).

Step 1: Install the build dependencies, to do this simply paste the following chunk of code into your favorite terminal and let it work it’s magik

sudo apt-get install xterm make gcc bison flex subversion cvs automake1.10 autoconf autotools-dev autoconf-archive libtool gettext libpam0g-dev libfreetype6-dev libpng12-dev zlib1g-dev libjpeg62-dev libtiff4-dev libungif4-dev librsvg2-dev libx11-dev libxcursor-dev libxrender-dev libxrandr-dev libxfixes-dev libxdamage-dev libxcomposite-dev libxss-dev libxp-dev libxext-dev libxinerama-dev libxft-dev libxfont-dev libxi-dev libxv-dev libxkbfile-dev libxkbui-dev libxres-dev libxtst-dev libltdl7-dev libglu1-xorg-dev libglut3-dev xserver-xephyr libdbus-1-dev liblua5.1-0-dev

Step 2: Now that we have all the dependencies installed, we are going to use the easy e17 script to download, compile, and install e17 from SVN. To do so click on the link I just provided to download the script. Then assuming you downloaded the file to the default Downloads folder run the following in terminal to get the install going

cd ~/Downloads && chmod +x easy_e17.sh && sudo ./easy_e17.sh -i

Go get a cup of coffee or something, the length of time the above command takes to complete depends on your Internet connection and computer speed.

Step 3: Now assuming the commands you ran in step 2 finishes without issues/errors check the output in terminal, it should mention some “environmental variables” that need to be set. Copy and paste each of the export lines it lists to you and run them in terminal.

Step 4: We need to copy the elightenment .desktop file to the proper location in your shared folder so it appears as a log in option in gdm/kdm. To do so run the following in terminal

sudo cp /opt/e17/share/xsessions/elightenment.desktop /usr/share/xsessions/enlightenment.desktop

Log out of your current desktop and select “Enlightenment” from the log in options you are presented with in your login manager.

Enjoy your new E17 powered desktop! Also please remember E17 is considered beta software – so it is not encouraged to use it on production machines. Lastly I would like to also say that while the default configuration of e17 appears crude at first, this is intentional. E17 is extremely customizable. Play with settings, move things around, add and remove objects and you will see creating a beautiful and customized desktop is just a few clicks away!

Source:

http://jeffhoogland.blogspot.com/2010/05/howto-install-e17-from-svnsource-on.html

Tagged : / / / / / / / / / / / / /

How to configure and use SSH authentication system server CVS

ssh-with-cvs

How to configure and use SSH authentication system server CVS

cvs (Concurrent Version System) is a very popular version control tool. Although its function as Perforce, Subversion and other powerful, but because of its easy configuration, simple to use and the introduction of longer, so in all a kind of software project widely used.

first is to install FreeBSD, and application security patches. This step is very simple, download a FreeBSD (the upcoming 5.2-RELEASE is a good choice, in this article was published, this version may have been able to download a) of the mini iso burning CD-ROM, then you can install the (choose “Minimum” installation). Note that, in order to be able to use ssh authentication, be sure to install the crypto. Configure the network for this machine, so after the restart just fine.

then install the necessary package. FreeBSD 4.x built-in perl, but in 5.x in, perl be deleted from the basic system. In order to better use, including ACL, commit mail, and a number feature, you must install perl.

I personally recommend using the ports in the 5.8.x version of perl. Before installing, first of all convinced that the system does not perl 5.6.x installed, the new system, they can safely execute the following command:

This will remove the existing any package. In general, the majority of FreeBSD users use cvsup to update the system, but the release of the CD, cvsup-without-gui is not included, while the ordinary cvsup package requires a series of X11 libraries. To avoid trouble, consider the following two different ways to complete the first code update:

1, using the FreeBSD’s cvs to synchronize code:

cvs-d: pserver: anoncvs@anoncvs.jp.FreeBSD.org: / home / ncvs login

enter “anoncvs”, Enter

cd / usr

cvs-R-d: pserver: anoncvs@anoncvs.jp.FreeBSD.org: / home / ncvs export-r RELENG_5_2 src ports

Note: If you are not using 5.2-RELEASE, please make appropriate amendments to RELENG_5_2 (for example ,4-STABLE is RELENG_4, – CURRENT is the HEAD, etc.)

2, install cvsup-without-gui:

pkg_add-r cvsup-without-gui

then use cvsup to synchronize code, space is limited, I will not repeat them

I recommend the first method, of course, the second method should be faster, and does not require manually compiling cvsup. Subsequently, the installation of Perl 5.8.x:

cd / usr / ports / lang / perl5.8 & & make all install clean & & rehash

Then we will face a very serious problem: ports inside use.perl script does not know the system had not installed perl, so the time to be wrong in the implementation – this time, just make a symbolic link to perl on it. Well, the implementation:

use.perl port

This script will help you complete use.perl modify configuration files (such as / etc / make.conf) and a series of work. Here is not the table, a little profile about OpenSSH (sshd) configuration, in general, add the following two lines:

Protocol 2

PasswordAuthentication no

the benefits of doing so: ( 1) only allow ssh2 protocol log, which can provide better security (2) does not allow password login, which no doubt will increase security.

1, create a cvs repository

Well, pre-configuration is basically over. Do not forget to create a user for the cvs group, for example, ncvs, as well as a cvs repository for the management of users, such as the repoman (which of course is ncvs that group), and then create a directory to save the cvs repository, in this case , we put it into / home / ncvs in:

rm-rf / home / ncvs

mkdir-p / home / ncvs

chown-R repoman: ncvs / home / ncvs

chmod-R 775 / home / ncvs

next step is to initialize the repository, and simple to implement:

su-l repoman

cvs-d / home / ncvs init

on it.

present, all the FreeBSD version of cvs are included in the safety of the existence of a small vulnerability, although this flaw only in local use, but we recommend that you put it back on is to find / usr / src / contrib / cvs / src / expand_path.c in

return current_parsed_root-> original;

line, turning it into a

return current_parsed_root-> directory;

Of course, the next step is to re-make world kernel of. Need to note is that if you are using a 5-CURRENT, also need to modify some code for it to reach 5.2-RELEASE as performance (-CURRENT in a large number of debugging options turned on), specific methods will not go into here.

2, the configuration commitmail and ACL

then configure cvs commitmail and ACL. I personally think that commitmail the team software development a very important thing to cvs, it is especially important because cvs is not atomic submit function, but commitmail just enough to make up for this.

FreeBSD development team used a very good perl script to complete commitmail function, while the hook they use cvs to achieve a simple access control function (ACL). I use the cvs repository based on FreeBSD’s CVSROOT, and made a few changes.

use the CVSROOT cover your CVSROOT, and you also need to freebsd directory mailsend.c which compiled the results into the / usr / local / bin (the script assumes that the CVSROOT in this matter). In addition, the CVSROOT need some modifications before it is put into use (for example, machine name, etc.). These settings can be found in the cfg_local.pm inside:

$ MAILADDRS = ‘cvs- all@example.org ‘;

commitmail this is the place to be sent to.

$ MAIL_BRANCH_HDR = “X-Phantasm-CVS-Branch”;

this is to be added to the commitmail head of information, if you use the mailing list, then it can help mailing list automatically sorted.

$ MAILBANNER = “The Phantasm Studio repository”;

this soon in commitmail said that they commit to which a repository.

if ($ hostname = ~ / ^ cvs \. Example \. Org $ / i)

commit to this is to determine the host name

$ CVSWEB_URL = “http://cvsweb.example.org/cgi-bin/cvsweb.cgi”;

This is cvsweb services at

a brief CVSROOT in the other documents

avail: the file used to control access to user group.

access: This file is used to control who can perform cvs operations.

exclude: This file is used to control those files do not need to check the cvs tag

options: this file used to control the commencement of cvs tag, for example, can define $ Phantasm $, etc.

3, configuration of users and restrict ssh permissions

ssh authentication using a more vexing question is, ssh means that users have a system account, and that they be able to log in.. If configured properly, they can get a shell, it is natural to be a potential security risk.

must therefore be very careful in handling the ssh cvs authentication issue. The underlying principle is: any action against the user, unless we allow them to do so.

create a user in accordance with the following rules:

user’s” primary “group is ncvs (This will not only restrict the user’s permission, so we can more easily control the other users in the cvs repository which can not be free to commit)

users do not use password authentication, which will ease because they do not properly set up ftp and other safety hazards caused by

still give the user a shell, the “shell” can be a perl script, it only allow the implementation of the beginning of the command cvs

then allow users to use openssh’s ssh-keygen to generate your own key pair. OpenSSH in most * BSD and Linux distributions can be found in, if the user uses the Windows Desktop, you need to install cygwin (in particular, the installation of net in OpenSSH), of course, the implementation of the command is the same:

ssh-keygen-t dsa-b 2048

for the paranoid security enthusiasts, can consider later in 2048 will be replaced by-b 4096. Of course, under the barrel theory, if you are a paranoid, then obviously you should be forced to use all the partners are also at least as long as your key:)

, the administrator should be user (committer) the key into the server, the user corresponding to the authorized_keys file in the folder inside. For example, one of my public key as follows:

ssh-dss AAAAB3NzaC1kc3MAAAEBAL +1 jinOw +86 RcTEaSM5/Hz4Lr9tIS0IQsX8ebo

TwLzWnqpOHRh2KBCGn/e0xGCIAai7PGz7c + SZCvrLiRvG9mCsMMMue8ZIL + QF4OAmMd

Cz8Qoyg0cc4YXImOd + UEpdOX29PC4aMAz28v/GO2yf58/Qa49Clfq1kHa/8q3IAgs9o

W95 / ArG + IWFOsN1Tv9nh4XJb5AQjpa5uMlB5SEmvKGTXQ2oYiRVIxL8vzHL6MtO/8×1

j8 + RioSH6FCpEXS7UJbYxE7vF3m5Fa5o6g2dIZewphsleOeHkvYJ442Hqvsly3p4 +4 N

dvim4bY2HMDha5r5zeTV8tTlOz4wQVgKyWoEAAAAVAINGzX7uU0vR8l63qhBhUeWGZt

C9AAABADWiO +9 bvV7DApsn08LR1eoEnMjJFQgEfGlbV + EvZHkO0bkHZAdRIKtVmgNUw

G6uufykkt2Tb + q5SbVNZkzeaFVv4ZMtnjSvEPIZrEXcQFFguGk1it5v5EYcmq4G8 + j1

BFTVHef4b1wMTSt11WtEz0LUYncuZ6LA48/WGTuZiSm8JkchgVm8HhR9NqjdeFJH8sO

RUhUBoxyWjo/hv7zFg7HqoJGzeNfrEhFg36psR2RDaRvSP0vN1W2q4j5OZy3gB6ZyVt

nsEPl1HELhlaCFifmdz1LVxDx + FyPy6wMsPQLTmB1g6N1J6PWy3qCTJ0NyQgarSt3 / A

TQ0InF1BOdJn8QAAAEAPb1OgswuMHdEsHk2ETZVmOKOkI9Rjf72vjZ3xG45iEbCH/7p

aTP8OQmJMW9FD4MHjdmtktPVYXDIa9Hj/IM44zhfMHEdKs9LlFUK5dBgNUps + yPj2Ns

Mr2rl771ODR0mB52FwrXm1FCmNTM7WQpFOEy/QhtZRpHK +7 / YZp7PBggt17Fw7rbjP2

zhWnZluoSKLgvfkhxhJuOMm/ElNJx2c + XHdxPqI3eR5UxzLNjDUNh59I8 + h + E69bFB3

b2uhKqziziHOQcqoH5r0Kud / DBBE79lU3mRUF8FQNygCRh/V3yFzed40rc0nF0PQpNZ

6zodDTJByrm6vX5wr2lI4RgA9w == bitripper@grimreaper.delphij.net

Description: public key is not allowed off-line, here is convenient for typesetting. We have just opened to the user shell, which is still potential pitfalls, so we tighten security in this regard, the public key by adding the following text before the project:

command = “/ usr / bin / cvs – allow-root = / home / ncvs server”

So, the whole line should look like this:

command =” / usr / bin / cvs – allow-root = / home / ncvs server “ssh-dss AAAAB

…… …………………..

X5wr2lI4RgA9w == bitripper@grimreaper.delphij.net

ssh this command means that up on the implementation of / usr / bin / cvs – allow-root = / home / ncvs server this command, and can only perform this command. Thus, unless there are loopholes in the cvs itself, otherwise, can not really cut out through ssh shell. – Allow-root limits the ability to use the repository, so users can not easily specify the other repository, thus trying to undermine the security will become more difficult. If you need multiple repository, you can specify the number of allow-root parameter.

be noted is that if users have multiple public key, you need to specify each public key before the command.

4, configuration cvsweb

configuration cvsweb is quite simple. First install the apache (I tried 1.3.x and 2.0.x), configure the ready, from the port which install cvsweb on it:

cd / usr / ports / devel / cvsweb & & make all installl clean

and then to modify it configuration file:

cd / usr / local / etc / cvsweb

vi cvsweb.conf

find

;

@ CVSrepositories = (

line, follow the example of an increase in following their own repository, For example:

‘ncvs’ => [‘ New CVS Repository ‘,’ / home / ncvs’],

write the number of how many, of course, @ CVSrepositories the first to directly access cvsweb.cgi when the repository.

in FreeBSD 5.1-CURRENT development process carried out by some of the changes caused by the ports in the cvsweb not normally call the cvs and rcs tools, which will cause it to not work properly. To solve this problem, can be found from the following web site the latest version of cvsweb:

http://www.freebsd.org/projects/cvsweb.html

the author of this writing, the latest cvsweb version is 2.9.1 beta. Before the installation, need to install the other two port:

cd / usr/ports/devel/p5-IPC-Run & & make all install clean

cd / usr/ports/net/p5-URI & & make all install clean

then downloaded tbz file unpack, copy to the appropriate location (cgi-bin and related images directory) can be used.

Tagged : / / / / / / / / / / / / / / /

SSARC Utility & SSRESTOR Utility – Archive, Restore VSS Project – Guide

ssarc-utility-ssrestor-utility

Question: 

How to Archive VSS Project in Visual Source Safe (VSS)?

How to Restore VSS Project in  Visual Source Safe (VSS)?

What is SSARC Utility?

What is SSRESTOR Utility?

SSARC Utility

Allows you to archive files, projects, or old versions from a Visual SourceSafe database. Each time you run SSARC (Ssarc.exe), the utility asks only once before it deletes the files/projects. Visual SourceSafe also implements archive operations through its Archive wizard, available in Visual SourceSafe Administrator.

The utility SSRESTOR is used for restoration of archived files. Use of SSARC and SSRESTOR together allows wide-area Visual SourceSafe installations to move files and projects among databases.

Limitation: SSARC cannot create an archive file that is greater than 2 GB. If you try to archive a project larger than this, you will receive an Out of Memory and/or a CRC mismatch error message. To work around this limitation, you will need to archive each subproject.


Syntax

ssarc [-C][-D][-I-][-O][-S][-V][-X][-Y] <archive file to create> <files/projects to archive>

If you are not familiar with the syntax conventions used, < and > are used to delimit arguments. The < and > characters are not typed in. The | means a choice of options. Items enclosed in square brackets, [] are optional, and items not enclosed in square brackets are mandatory.


Utility Options

The following table describes options available with SSARC.

-C

Specifies a comment (standard Visual SourceSafe parameter). The comment is inserted into the Visual SourceSafe history if the items are deleted from the database as part of the archived record. The comment is also inserted into the archive file itself, if there is one.

-C-

Specifies no comment.

-D

Deletes the archived items from the database.

Specifiying the -d option will delete from your project the items that you are archiving. This will delete your project from Sourcesafe if you use it! Of course, you can restore from your backup file, but for normal use, and for smaller projects I don’t recommend this. This function obviously has its uses, but be sure you want to do this.

-D-

Controls whether Visual SourceSafe actually deletes anything from the database. If this option is not used, the default is to ask.

If the -d- option is used, then SSARC will not delete the projects the items you are archiving. The default is to prompt the user interactively, so if you want to run this from a script, you will need to choose one of the options, or use the -i- flag

-I-

Specifies no prompt for input (standard Visual SourceSafe parameter).

-O

Paginates or redirects output (standard Visual SourceSafe parameter).

-S<srcsafe.ini path>, <data path>

Specifies a path to Srcsafe.ini and the Data directory. The full syntax looks like -Sc: \VSS, OldDB. The item before the comma is the full path to Srcsafe.ini, and the item after the comma is the string in parentheses in a Data_Path setting. If there is no comma, a Srcsafe.ini path is indicated, but no data string. If the first character after the –S is a comma, a data string is specified, but no Srcsafe.ini path.


-V[D|L]<version>

Specifies a version number to archive (standard Visual SourceSafe parameter). Enter the version number in standard Visual SourceSafe format (number, date, or label). If this option is not used, SSARC operates on entire files or projects, instead of all versions up to and including a certain version.

Note that SSARC is generally inclusive. That is, if you type –V9, you create an archive file that contains version 9.0 and everything before it. The delete pass is also inclusive, that is, version 9.0 is actually deleted unless it is in the label format. In the latter case, the label is stored in the archive file but is not deleted. If –V is specified, you never delete the current version, even if you specify -D9/9/99. If you are using a version the label format, and the label has a space in it, you must place the entire option in quotation marks, for example, “-VThisOne”.

-X

Archives only deleted items in the specified files and projects. Deleted items are still stored in the Visual SourceSafe database unless the Destroy Permanently option is selected when performing a Delete command.

-X-

Archives all items in the specified files and projects.

-Y<user>,<pwd>

Specifies the user name and password (standard Visual SourceSafe parameter). An example is -YAdmin,Bunny.

archive file to create

Specifies the name of the archive file to create during the archive operation.

files/projects to archive

Specifies files and projects to back up.

Examples

SSARC -d- -yadmin,password archive.ssa $/
Backup the entire default Sourcesafe database to archive.ssa, leaving the database exactly as it is.
SSARC -d- "-vlProduction Release" -yadmin,password -olog.txt archive.ssa $/Test
Backup everything since the version labelled ‘Production Release’ and create a log file with the results of the archiving process.
SSARC -d -x -yadmin,password archive.ssa "$/Project Global Domination" $/OtherProject
Archive, and delete the deleted files from two projects.
SSARC -i -yadmin,password -olog.txt "-cArchive Everything" archive.ssa $/
Archive the entire Sourcesafe database, while creating a log file, adding a comment, and running non-interactively, suitable for a scheduled task.

SSRESTOR Utility

Restores information from a previously created archive. If the restore operation attempts to create a duplicate file or project name, the operation fails. Visual SourcSafe also implements restore operations through its Restore wizard, available in Visual SourceSafe Administrator.

Limitation: SSRESTOR cannot restore a project that is larger than 2 GB. A project larger than this cannot be archived.


Syntax:

ssrestor [-C][-I-][-L][-O][-P<project>][-S][-T][-X][-Y]

<archive file to restore> [files/projects]


Utility Options

The following table describes options available with this command.

-C

Specifies a comment (standard Visual SourceSafe parameter). The comment is applied to the history entry for restored item(s).

-C-

Specifies no comment.

-I-

Specifies no input (standard Visual SourceSafe parameter).

-L

Specifies a list only, without any restoration.

-LA

Specifies a list of all files and subprojects listed under a project, for example, project $/A.

-O

Redirects output (standard Visual SourceSafe parameter).

-P<project>

Specifies a project to which to restore content. For instance, if you archive $/A/BAR.C and then restore it, it will be restored as $/A/BAR.C.

-S<srcsafe.ini path><data path>

Specifies a path to Srcsafe.ini and the Data directory.

-T

Tests the archive file for corruption, but does not actually restore from the archive.

-X, -X-

Identifies an item that you want to restore, for example, $/a/b. This option distinguishes between deleted projects and undeleted projects that have the same names. For example, if you have deleted $a/b and specify the -X option, SSRESTOR restores the deleted $/a/b. If you specify -X-, SSRESTOR restores an undeleted $/a/b. Even though they have the same name, note that these are two different projects that the utility treats differently.

-Y<user>,<pwd>

Specifies user name and password (standard Visual SourceSafe parameter). An example is -YAdmin,Moggy.

archive file to restore

Specifies the name of the archive file from which to restore the database.

files/projects

Specifies files and projects to restore.

Examples

SSRESTOR -la -yadmin,password archive.ssa $/
Display a list of all of the files archived in archive.ssa.
SSRESTOR "-p$/Test 2" -sD:\newfolder\ -yadmin,password backup.ssa $/Test
Restores project $/Test to the database to a new location, $/Test 2, from the archive file backup.ssa, in a different Sourcesafe database.

Miscellaneous tips

  • Putting the path to the <VSS PATH>\win32 folder in your PATH environment variable makes shell commands a lot easier
  • If you get a message “Only ADMIN can run this utility”, it means that you are either not specifying the admin account, or the password is incorrect. Use "-yadmin,password" if the admin password is “password”, or "-yadmin," if the admin password is not set (not recommended!).
  • If you are using an option that has a space in the argument, enclose the whole thing with quote marks, i.e. “-p$/Project A”
  • A daily archive is easy to do with a Windows shell script, maybe something like this. Then use Scheduled Tasks to have this run every day.
    function q (str)
    	' to make the command a bit more readable, I hope
    	q = """" & str & """"
    end function

    PROJECT = “$/”
    USERID = “admin”
    PASSWORD = “admin”

    ‘ location of SSARC program
    SSARCPATH = “C:\program files\microsoft visual studio\common\vss\win32\ssarc.exe”
    ‘ folder of srcsafe.ini
    SRCSAFEINIPATH = “”
    ‘ prepended to filename in case you’re doing more than one.
    LABEL = “ARCHIVE”
    ‘ destination of archive files
    BACKUPFOLDER = “C:\BACKUPS\”

    ‘ generate a name based on the time.
    today = now()
    backupfilename = LABEL & “-” & formatdatetime(now,2) & “.ssa”

    cmd = q(SSARCPATH) & ” ” & _
    q(“-s” & SRCSAFEINIPATH & “,”) & ” -i- ” & ” -d- ” & _
    q(“-y” & USERID & “,” & PASSWORD) & ” ” & _
    q(BACKUPFOLDER & backupfilename) & ” ” & q(PROJECT)

    Set WshShell = WScript.CreateObject(“WScript.Shell”)
    wscript.echo cmd
    WshShell.run cmd
    set wsshell = nothing

Tagged : / / / / / / / / / / / / / / / / / / / /

Process to Install CollabNet SVN Command Line Client in Windows

install-collabnet-svn-command-line-client-in-windows

Link: http://www.collab.net/downloads/subversion/

1. Platform and configuration

   Product: CollabNet Subversion server

   Certified platforms: Windows XP SP2, Win 2003(Standard Edition) R2

   Apache version: 2.2.8

   ViewVC: 1.0.5 (requires ActiveState Python 2.5)

   Repository format: fsfs (bdb support not included)

   Prerequisite: The user needs administrative privileges to install

   and uninstall CollabNet Subversion.

2. IMPORTANT: Apache version upgraded from 2.0 to 2.2

   With the CollabNet Subversion 1.5.0 release, we have upgraded the included

   Apache server version from 2.0 to 2.2. This is consistent with the

   packages we provide for other operating systems, and also upgrades our

   package to the best available version of Apache.

   This is important to existing users because your current Apache 2.0 server

   configuration cannot be automatically updated to the format of the Apache

   2.2 configuration file. If you allow the installer to upgrade your existing

   installation, it backs up your Apache conf, logs, and htdocs folders so

   that you can refer to your previous configuration when configuring your new

   server.

3. Installation tips

     If you install an Apache server, the installer asks you for a

     “Repository URL.” This represents the prefix of the URL which users can

     use to connect to Subversion. If you set this URL to ‘/svn’, then users

     can checkout their repository from:

        http://hostname/svn/repos-name

     We recommend that you use ‘/svn’ as your URL prefix, as this is common

     practice.

4. ViewVC installation

   Users of the Apache web server option can now also have ViewVC automatically

   installed and configured as part of the installation. You must have

   ActiveState’s ActivePython 2.5 installed before installing CollabNet Subversion.

   Download a free version of ActivePython from:

   http://www.activestate.com/Products/activepython/index.mhtml

   You must install version 2.5.x.

5. Upgrade procedure

   When the installer detects a previous version, it offers to upgrade your existing

   installation. However, if you want to add ViewVC to your installation, we

   recommend you use the following process for an upgrade. In general, this is

   the best process for any upgrade scenario:

   1. Stop Apache or Subversion Server services, if running.

   2. Copy/back up any customizations that were done to your Apache installation.

     (For example, your httpd.conf file, a password database, any content you

      added to the htdocs folder, and so on.)

   3. Uninstall the currently installed version.

   4. Manually delete the existing folder if the installer did not remove it. The

      uninstall process does not remove files that were added or modified after

      installation.

   5. Follow the normal install instructions for 1.5.

   6. Manually put back your Apache customizations. NOTE:  You cannot simply copy

      back the previous configuration file. You must make the appropriate edits

      to your new Apache 2.2 version of the configuration file.

6. Post-installation instructions

   The installer created a folder to store your repositories. You are not required

   to use this folder, but if you let the installer install the server to run as a

   service, then the server has also been configured to serve repositories from this

   location. It is a good idea to use the location you specified in the installer.

   A. Using svnserve

      ==============

   To use svnserve as your server, follow these steps:

     1. Open a new terminal (command prompt).

        NOTE: If you have an old command prompt open (prior to the Subversion

              installation), remember to open a brand new command prompt.

     2. Create a subversion repository.

        cd <Repository_Path>

        svnadmin create <Repository_Name>

        For example:

        cd \repositories

        svnadmin create my-first-repos

     3. Setup a password database.

        Using notepad, edit the svnserve.conf file inside the conf directory of your

        repository.

        For example:

        If your repository is C:\repositories\my-first-repos

        svnserve.conf is:

        C:\repositories\my-first-repos\conf\svnserve.conf

        Inside svnserve.conf, you see the following information:

         ### The password-db option controls the location of the password

         ### database file.  Unless you specify a path starting with a /,

         ### the file’s location is relative to the conf directory.

         ### Uncomment the line below to use the default password file.

         #password-db = passwd

       Follow the above instructions, and uncomment the “password-db=passwd”

       line, so that it simply says:

          password-db = passwd

     4. Setup usernames and passwords.

       Next, edit the passwd file. This passwd file is located in the

       same directory as svnserve.conf.

       Inside the passwd file, you see the following information:

       ### This file is an example password file for svnserve.

       ### Its format is similar to that of svnserve.conf. As shown in the

       ### example below it contains one section labelled [users].

       ### The name and password for each user follow, one account per line.

       [users]

       #harry = harryssecret

       #sally = sallyssecret

       To add a new user account, add your own username and password

       inside the [users] section. For example, if your name is “joe”,

       and you want to set your password to “super-secret”, add a

       new line like this:

         joe = super-secret

       Add as many users as you like.

     5. Open Port on Windows firewall.

        Before starting the server, the firewall must be notified that

        this particular port is going to be used. To enable this port in the

        Windows firewall, follow the instructions found here:

    http://www.microsoft.com/windowsxp/using/security/internet/sp2_wfexceptions.mspx

        Note: svnserve.exe is the program name which needs to be added to the

        exceptions list. Alternatively, you can also use the port where

        you decide to run the server. By default, svnserve runs on 3690.

     6. Start svnserve.

        If you elected to have the installer setup svnserve as a service, then open

        the Services application, find the entry for the Subversion server, and take

        the Start option. The service has been configured to start automatically

        on reboot. You can also run this command from the command line:

        net start svnserve

        If you did not install svnserve as a service and want to start the server

        manually, run this command:

        svnserve -d -r <Repository_Path>

        For example: svnserve -d -r C:\repositories

     7. To provide read and write access to anonymous users, modify the

        conf/svnserve.conf file inside the repository.

        anon-access = write

        To restrict an anonymous user from the repository:

        anon-access = none

     8. Check out the repository.

        svn co svn://localhost/<Repository_Name>

        For example: svn co svn://localhost/my-first-repos

     Tip: If you check out your Subversion repository from a different computer,

     replace ‘localhost’ with the IP address or hostname of the machine which

     hosts the Subversion repository.

   B. Using Apache

      ============

   To use Apache as your server, follow these steps:

     1. Configure Apache.

        The installer did these steps automatically based on the repository location

        entered in the installer. This information is only presented if you want to

        manually modify the configuration.

        Use notepad to edit the httpd.conf file inside the httpd\conf directory of your

        CollabNet Subversion Server installation.

        Tip: By default, httpd.conf is in the following directory:

             C:\Program Files\CollabNet Subversion Server\httpd\conf\httpd.conf

        At the bottom of the httpd.conf file, you see a location directive that looks

        something like this:

          <Location /svn>

            DAV svn

            SVNParentPath C:\repositories

          </Location>

        Change the above section to look like the following:

          <Location /svn>

            DAV svn

            SVNParentPath C:\repositories

            SVNListParentPath On

            Require valid-user

            AuthType Basic

            AuthName “Subversion repository”

            AuthUserFile C:\repositories\password-file

          </Location>

     2. Open a new terminal (command prompt).

        NOTE: If you have an old command prompt open (prior to the Subversion

              installation), remember to open a new command prompt.

     3. Create Subversion users.

        Now create usernames with passwords that can be used to authenticate with

        Apache. Use the htpasswd command to create usernames and passwords for the

        Apache server.

        Type the following at the command prompt:

          htpasswd -cm <password-file> <username>

        This command prompts you for a password for the user. Enter the

        password and retype the password when prompted.

        For example: If you want to create a user ‘joe’, and the file at

        “C:\repositories\password-file”, type the following at the

         command prompt:

               htpasswd -cm C:\repositories\password-file joe

        Enter the desired password for the user and retype the password

        when prompted.

        For additional users, use the following command at the command prompt:

        htpasswd -m C:\repositories\password-file joe

     4. Create a Subversion repository.

        svnadmin create <Repository_Path>\<Repository_Name>

        For example: svnadmin create C:\repositories\my-first-repos

     5. Open Port on Windows firewall.

        Before starting the server, the firewall must be notified that

        this particular port is going to be used. To enable this port in the

        Windows firewall, follow the instructions found here:

    http://www.microsoft.com/windowsxp/using/security/internet/sp2_wfexceptions.mspx

        Note: apache.exe is the program name which you need add to the

        exceptions list. Alternatively, you can also use the port where

        you decide to run the server. By default, apache is run on 80.

     6. Start Apache.

        If you elected to have the installer set up Apache as a service, then open

        the Services application, find the entry for Apache/2, and take

        the Start option. The service was configured to start automatically

        on reboot. You can also run this command from the command line:

        net start apache2

        To start the server manually, run the following at the command prompt:

        apache

     7. Checkout the repository.

        svn co http://localhost/svn/<Repository_Name>

        For example: svn co http://localhost/svn/my-first-repos

        Tip: If you check out your Subversion repository from a different

        computer, replace ‘localhost’ with the IP address or hostname

        of the machine which hosts the Subversion repository.

7. Known issues

   When trying to access a repository via ViewVC, you might see an error

   trace that ends with this message:

      ImportError: DLL load failed with error code 182

   This error occurs when you have an older version of the OpenSSL DLLs in your

   PATH ahead of the CollabNet Subversion bin folder. Many Windows applications

   ship the OpenSSL DLLs and many of them also use older versions. To fix this

   problem:

      1. Edit your PATH so that the CollabNet Subversion bin folder is at or

         near the beginning of your PATH.

      2. Reboot so that your Apache service can pick up the change.

8. Back-end support

  If you try to access an existing BDB (Berkeley DB) based repository through

  CollabNet Subversion, then you might receive an alert “Failed to load module

  for FS type ‘bdb’.” This is because CollabNet Subversion does not support BDB.

  CollabNet recommends FSFS over BDB for ease of maintenance and supportability.

9. Support for CollabNet Subversion

   Find out about CollabNet Technical Support at

   http://www.collab.net/services/subversion/

   Information about CollabNet Training, Consulting, and Migration

   services is at http://www.collab.net/services/subversion/training.html

   Join openCollabNet for community support: http://open.collab.net

10 About Subversion and CollabNet

   CollabNet launched the Subversion project in 2000 in response to the demand

   for an open standard for Web-based software configuration management that

   could support distributed development. CollabNet continues to be strongly

   involved with the Subversion project and offers CollabNet Subversion Support,

   Training, and Consulting services.

   CollabNet also provides the most widely used collaborative development

   environment in the world. More than 1,400,000 developers and IT projects

   managers collaborate online through CollabNet. The company is transforming

   the way software is developed by enabling organizations to leverage global

   development talents to deliver better products and innovate faster.

   Visit CollabNet at http://www.collab.net for more information.

Tagged : / / / / / / / / / / / / / / / / / / /

How to Install CollabNet SVN Command Line Client in Solaris?

collabnet-svn-command-line

Link: http://www.collab.net/downloads/subversion/solaris.html

1. Platform and configuration

Product: CollabNet Subversion client

Platforms: Solaris 10 SPARC

Prerequisite: You must be a superuser (root) to install and uninstall

CollabNet Subversion.

2. Import/Update CollabNet certificate

CollabNet Subversion Solaris packages are signed. As a one-time task,

import the CollabNet certificate using the command:

    sudo pkgadm addcert -ty certificate.pem

The CollabNet certificate is available for download at:

http://www.collab.net/nonav/downloads/subversion/certificate/certificate.pem

NOTE: the certificate has changed between 1.5.0 and 1.5.1 release.  The

certificate used for 1.5.0 had a short expiration date so we have created

a new certificate.  If you have previously installed the 1.5.0 certificate,

you must remove it before installing the new one:

    sudo pkgadm removecert “Alexander Thomas(AT)”

Once it is removed you can install the new certificate.

3. First installation

The command to install the CollabNet Subversion client, if a previous version

has not already been installed, is:

    sudo pkgadd -d /path/to/client-sparc-local

4. Updating an existing installation

The proper way to update a Solaris package is to remove the current version

and then install the new version.  If you have the CollabNet Subversion server

installed, you will need to remove it first.  Again, refer to the readme for

that package before proceeding.

    sudo pkgrm CSVNclnt

    sudo pkgadd -d /path/to/client-sparc-local

5. Post-installation instructions

A. CollabNet Subversion installs into /opt/CollabNet_Subversion, which is

   probably not on the executable search path for your system. Add the directory

   /opt/CollabNet_Subversion/bin to your $PATH environment variable. In order to

   make this change affect all users of your system and persists across reboots,

   add the following line to /etc/profile:

    PATH=/opt/CollabNet_Subversion/bin:$PATH

B. CollabNet Subversion provides man pages and localizations for several

   languages. To take advantage of these features, update your MANPATH and/or

   LOCPATH environment variables to include the CollabNet Subversion directories.

   For example:

    export MANPATH=/opt/CollabNet_Subversion/share/man:$MANPATH

    export LOCPATH=/opt/CollabNet_Subversion/share/locale:$LOCPATH

6. Support for CollabNet Subversion

Find out about CollabNet Technical Support at

http://www.collab.net/services/subversion/

Information about CollabNet Training, Consulting, and Migration

services is at http://www.collab.net/services/subversion/training.html

Join openCollabNet for community support: http://open.collab.net

7. About Subversion and CollabNet

CollabNet launched the Subversion project in 2000 in response to the demand

for an open standard for Web-based software configuration management that

could support distributed development. CollabNet continues to be strongly

involved with the Subversion project and offers CollabNet Subversion Support,

Training, and Consulting services.

CollabNet also provides the most widely used collaborative development

environment in the world. More than 1,400,000 developers and IT projects

managers collaborate online through CollabNet. The company is transforming

the way software is developed by enabling organizations to leverage global

development talents to deliver better products and innovate faster.

Visit CollabNet at http://www.collab.net for more information

Tagged : / / / / / / / / / / / / / / / / / / / / /