When git bash is open then run this command to create a project name composer create-project –prefer-dist laravel/laravel YOUR_PROJECT_NAME “5.6.*”
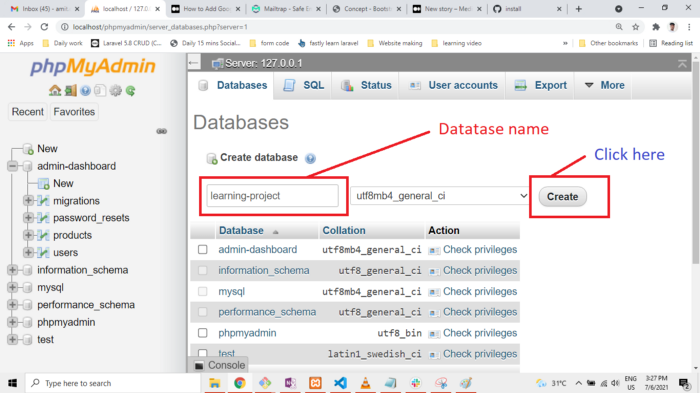
Go to http://localhost/phpmyadmin/ and create a database.
Connect your project with DB using .env file => DB_DATABASE = YOUR_DB_NAME.
Inside syntax “YOUR_PROJECT_NAME” write your own project name like Student, Teacher, Doctor, etc.
It takes time to install laravel so waits, When this installation process is complete, then our path will show.
Then your project will be ready after that go inside the project and open it with git bash.
Write some commands in git bash inside the project name(like here :- /c/xampp/htdocs/SCHOOL) php artisan c:cache press enter. php artisan r:clear press enter. php artisan v:clear press enter.
Open with vscode “project name“.
In vscode go to terminal->new+terminal.
Write command:- php artisan make:auth insert some files in app->http->controllers->auth for user login and register in laravel wlecome.blade.php .
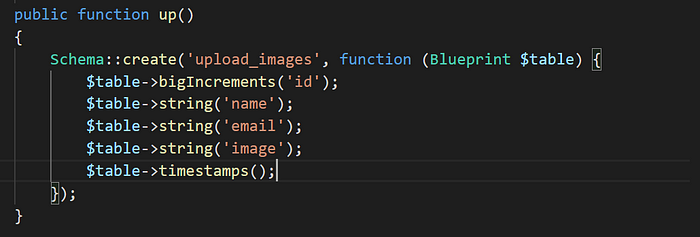
Write command php artisan migrate this will create a predefined table.
Write command php artisan serve “running applications on the PHP development server”,and it gives an URL link or IP no. Run IP no into the browser. It will give users to the welcome.blade.php page of laravel.
A framework is a set of conceptual structures and guidelines, used to build something. A framework may include predefined classes and functions that can be used to process input, manage hardware devices, and interact with system software. The purpose of the framework is to allow developers to focus on building a unique feature for their projects rather than writing code from scratch.
Why use Framework?
Colection of tools
No need to start scratch
Save Time
Improve Productivity
Clean Code
Reusable Code
Testing
Debugging
What is Web Framework?
A Web Framework or web application helps to build Web Applications. A Web framework provides tools and libraries to simplify common web development operations. This can include web services, APIs, and other resources. Web Framework help with a variety of tasks, from templating and database access to session management and code reuse. More than 80% of web app frameworks follow the Model View Controller architecture.
Controllers can group related request handling logic into a single class. Instead of defining all of your request handling logic as Closures in route files, you may wish to organize this behavior using Controller classes.
Controllers are stored in the app/Http/Controllers directory. Controller extends the base Controller class included with Laravel.
Laravel is a free, open-source PHP based Web Framework for building High End Web Applications, following the Model View Controller architectural pattern and based on Symfony. It is created by Taylor Otwell. Laravel Source Code : https://github.com/laravel/framework
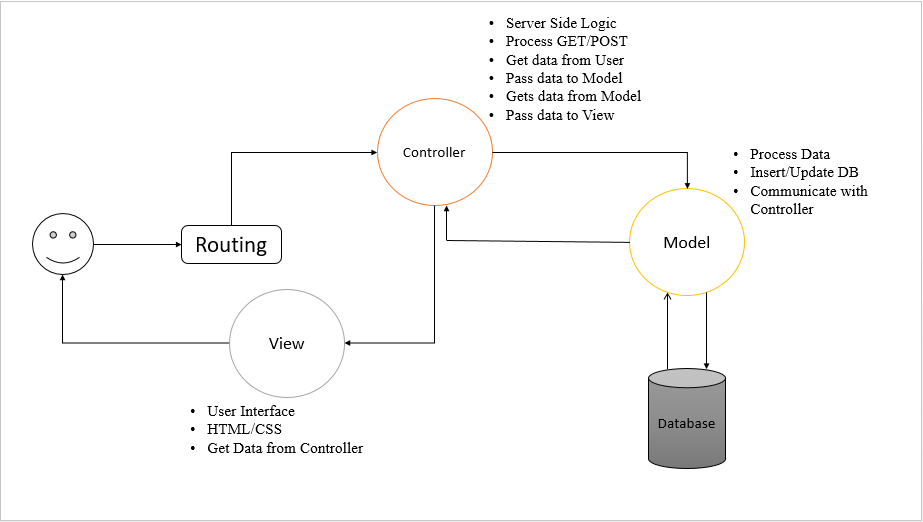
The MVC is an architectural pattern that separates an application into three main logical components Model, View, and Controller. Each of these component has their own role in a Project. MVC model was first introduced in 1987 in the Smalltalk programming language. More than 80% of all web app frameworks rely on the Model View Controller architecture.
Model
The model is responsible for getting data from a database, packaging it in data objects that can be understood by other components, and delivering those objects, most of which will happen in response to input from the controller.
View
It represents how data should be presented to the application user. User can read or write the data from view. Basically it is responsible for showing end user content, we can say it is user interface. It may consists of HTML, CSS, JS.
Controller
The user can send request by interacting with view, the controller handles these requests and sends to Model then get appropriate response from the Model, sends response to View. It may also have required logics. It works as a mediator between View and Model.
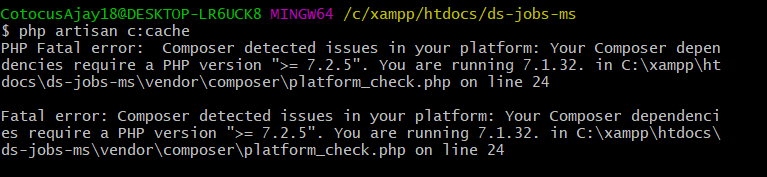
When you using PHP version 7.1.32 within your Laravel project, then showing this type of error in your project. If you want to update the composer still not solve you problem then After that Follow this trick-
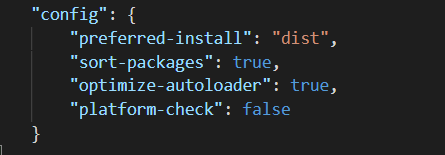
add this line in config object of composer.json file
A Web Framework (WF) or Web Application Framework (WAF) which helps to build Web Applications. Web frameworks provide tools and libraries to simplify common web development operations. This can include web services, APIs, and other resources. Web frameworks help with a variety of tasks, from templating and database access to session management and code reuse. More than 80% of all web app frameworks rely on the Model View Controller architecture.
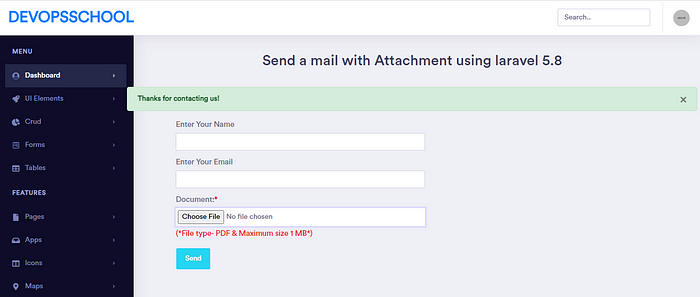
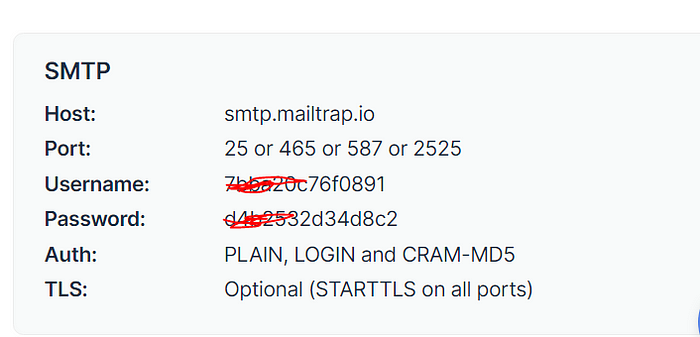
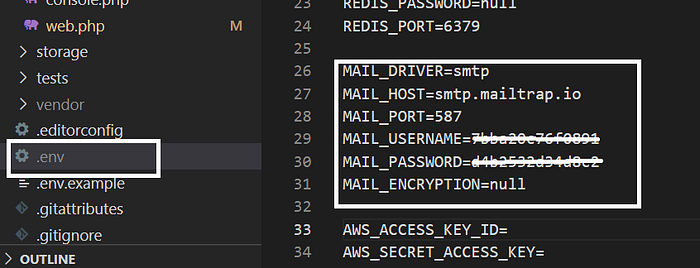
Create a Mailable class first you have to create an account in mailtrap or click this url https://mailtrap.io/ after create account you have to copy Username: XXXXXXXXX and password: XXXXXXXXXX and put in .env file see pic
Now we are ready for make mailable class for this we have to go teminal and write following
Next step make one blade page resources/view/dynamic_email_template.blade.php
<p style="margin-left:10%;">First Name - <b>{{ $data['name'] }} </b></p>
<p style="margin-left:10%;">last Name - <b>{{ $data['email'] }}  </b></p>


<p>It would be appriciative, if you gone through this feedback.</p>
Next one to create SendMail.php file run below code.
php artisan make:mail SendMail
Next step go to App\Mail\SendMail.php and paste below code
<?php

namespace App\Mail;

use Illuminate\Bus\Queueable;
use Illuminate\Mail\Mailable;
use Illuminate\Queue\SerializesModels;
use Illuminate\Contracts\Queue\ShouldQueue;

class SendMail extends Mailable
{
    use Queueable, SerializesModels;
    public $imagesendbymailwithstore;
    /**
     * Create a new message instance.
     *
     * @return void
     */
    public function __construct($imagesendbymailwithstore)
    {
        $this->imagesendbymailwithstore = $imagesendbymailwithstore;
    }

    /**
     * Build the message.
     *
     * @return $this
     */
    public function build()
    {
        return $this->from('info@scmgalaxy.com')
        ->subject('New image from Devops Team')
        ->view('dynamic_email_template')
        ->with('data', $this->imagesendbymailwithstore)
        ->attach($this->imagesendbymailwithstore['image']->getRealPath(),
            [
                    'as' => $this->imagesendbymailwithstore['image']->getClientOriginalName(),
                'mime' => $this->imagesendbymailwithstore['image']->getClientMimeType(),
            ]);

    }
}
Next define routes go to your routes/web.php file and paste below code.
Create a Mailable class first you have to create an account in mailtrap or click this url https://mailtrap.io/ after create account you have to copy Username: XXXXXXXXX and password: XXXXXXXXXX and put in .env file see pic
Now we are ready for make mailable class for this we have to go teminal and write following
Let’s go to create controller
php artisan make:controller PDFController
Go to your PDF controller file and paste below code
<?php
namespace App\Http\Controllers; use Log; use PDF; use Mail;
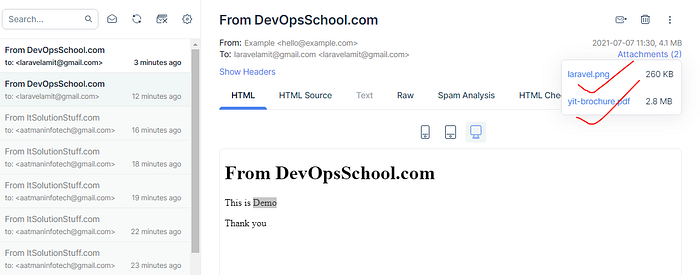
class PDFController extends Controller { /** * Write code on Method * * @return response() */ public function index() { $data["email"] = "laravelamit@gmail.com"; $data["title"] = "From DevOpsSchool.com"; $data["body"] = "This is Demo";
And lastone go to Routes/web.php and paste below code.
<?php
use Illuminate\Support\Facades\Route; use App\Http\Controllers\PDFController;
/* |-------------------------------------------------------------------------- | Web Routes |-------------------------------------------------------------------------- | | Here is where you can register web routes for your application. These | routes are loaded by the RouteServiceProvider within a group which | contains the "web" middleware group. Now create something great! | */
Route::get('/', function () { return view('welcome'); });