Tinker command is used to create a connectivity with the database as it allows us to create the objects, insert the data, etc in the database.
To run the tinker command we should execute:
php artisan tinker
To run the tinker command first of all we need to create table in the database through migration command which we have explained in the previous blog. Please refer that for creating tables.
Once we provide the details in the given table we can migrate it to the database by using php artisan migrate command and we can see the columns in our local database.
After migrating we can run the tinker command and insert data in the table using tinker:
php artisan tinker
-Single Row Insertion
-Multi Row Insertion
These commands will insert the data in the database and you can view these details by running the command given below:
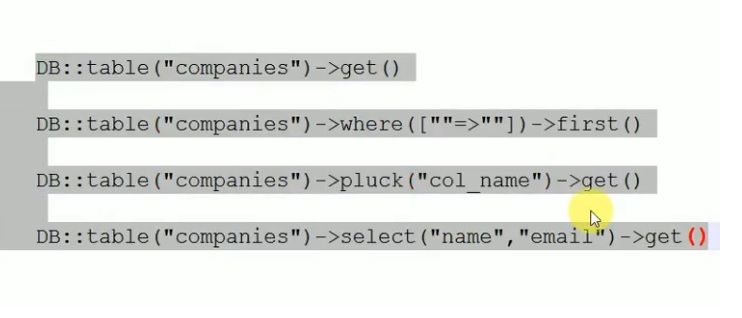
To find a particular value from the database run the following command:
To find a particular column from the database run the following command:
Some of the fetch commands of tinker are given below:
To update any value in the table we can follow the command given below:
To delete any value in the table we can follow the command given below:
To delete the entire table we can follow the command given below:
So there are the commands used in tinker, you can also see the detailed video which is given below:
In Laravel to create a new database table first of all we need to make a migration which we have explained in the previous blog. I recommend you to read that blog, you can refer the link given below:
Once we are done with creating a migration file, to create a new database table we have to use the create method on the Schema facade. The create method accepts two arguments:-
The first is the name of the table, while the second is a closure which receives a Blueprint object that may be used to define the new table:
use Illuminate\Database\Schema\Blueprint;
use Illuminate\Support\Facades\Schema;

Schema::create('users', function (Blueprint $table) {
    $table->id();
    $table->string('name');
    $table->string('email');
    $table->timestamps();
});
In the table we can add number of $table as per our requirement. There are several data type which we can use while creating the $table. Few of them are given below:
bigIncrements()
The bigIncrements method creates an auto-incrementing UNSIGNED BIGINT (primary key) equivalent column:
$table->bigIncrements('id');
bigInteger()
The bigInteger method creates a BIGINT equivalent column:
$table->bigInteger('votes');
id()
The id method is an alias of the bigIncrements method. By default, the method will create an id column; however, you may pass a column name if you would like to assign a different name to the column:
$table->id();
rememberToken()
The rememberToken method creates a nullable, VARCHAR(100) equivalent column that is intended to store the current “remember me” authentication token:
$table->rememberToken();
string()
The string method creates a VARCHAR equivalent column of the given length:
$table->string('name', 100);
text()
The text method creates a TEXT equivalent column:
$table->text('description');
To know more about creating tables and adding columns, you can refer the video given below:
Migration is a way that allows us to create a table in our database, without accessing the database manager such as phpmyadmin or sql lite.
To create a migration we should execute the command:
php artisan make:migration [options] [--] <name>
Here, in the option we have number options to enter depending upon the requirement. We can see all the options given below:
–create[=CREATE]The table to be created –table[=TABLE] The table to migrate –path[=PATH] The location where the migration file should be created –realpath Indicate any provided migration file paths are pre-resolved absolute paths –fullpath Output the full path of the migration -h, –help Display this help message -q, –quiet Do not output any message -V, –version Display this application version –ansi Force ANSI output –no-ansi Disable ANSI output -n, –no-interaction Do not ask any interactive question –env[=ENV] The environment the command should run under -v|vv|vvv, –verbose Increase the verbosity of messages: 1 for normal output, 2 for more verbose output and 3 for debug
Once we create the migration we can see a file under Migration-> database. Migrations are files which contain a class definition with both an up() and a down() method. The up() method helps to apply changes to the database and the down() method is used to rollback the changes in the database.
Example:-

class CreateCustomersTable extends Migration
{
    /**
     * Run the migrations.
     *
     * @return void
     */
    public function up()
    {
        Schema::create('customers', function (Blueprint $table) {
            $table->bigIncrements('id');
            $table->string('name');
            $table->timestamps();
        });
    }

    /**
     * Reverse the migrations.
     *
     * @return void
     */
    public function down()
    {
        Schema::dropIfExists('customers');
    }
}
To run all of our outstanding migrations, we can execute the Artisan command given below:
php artisan migrate
Also once we execute our migrations in the database we do have the option to roll back the latest migration operation, by using the rollback Artisan command. This command rolls back the last “batch” of migrations, which may include multiple migration files:
php artisan migrate:rollback
In Laravel we also have an option to rollback and execute the migration simultaneously with an Artisan command:
php artisan migrate:refresh
To see a video for the topic you can follow the video given below:-
Follow the other blog in which we will learn about creating tables in the database.
JavaScript is a lightweight, interpreted programming language in the world and that makes it a programmer’s great choice. Javascript helps us developing great front-end as well as back-end softwares using different Javascript based frameworks like jQuery, Node.JS etc.\
Here, I would like to talk about the reserved keywords in the Javascript. Keywords are reserved words in JavaScript that we should not use to indicate names for variables, methods, classes, or as any other identifier.
Keyword
Description
abstract
A non-access modifier. Used for classes and methods: An abstract class cannot be used to create objects (to access it, it must be inherited from another class). An abstract method can only be used in an abstract class, and it does not have a body. The body is provided by the subclass (inherited from)
assert
For debugging
boolean
A data type that can only store true and false values
break
Breaks out of a loop or a switch block
byte
A data type that can store whole numbers from -128 and 127
case
Marks a block of code in switch statements
catch
Catches exceptions generated by try statements
char
A data type that is used to store a single character
class
Defines a class
continue
Continues to the next iteration of a loop
const
Defines a constant. Not in use – use final instead
default
Specifies the default block of code in a switch statement
do
Used together with while to create a do-while loop
double
A data type that can store whole numbers from 1.7e−308 to 1.7e+308
else
Used in conditional statements
enum
Declares an enumerated (unchangeable) type
exports
Exports a package with a module. New in Java 9
extends
Extends a class (indicates that a class is inherited from another class)
final
A non-access modifier used for classes, attributes and methods, which makes them non-changeable (impossible to inherit or override)
finally
Used with exceptions, a block of code that will be executed no matter if there is an exception or not
float
A data type that can store whole numbers from 3.4e−038 to 3.4e+038
for
Create a for loop
goto
Not in use, and has no function
if
Makes a conditional statement
implements
Implements an interface
import
Used to import a package, class or interface
instanceof
Checks whether an object is an instance of a specific class or an interface
int
A data type that can store whole numbers from -2147483648 to 2147483647
interface
Used to declare a special type of class that only contains abstract methods
long
A data type that can store whole numbers from -9223372036854775808 to 9223372036854775808
module
Declares a module. New in Java 9
native
Specifies that a method is not implemented in the same Java source file (but in another language)
new
Creates new objects
package
Declares a package
private
An access modifier used for attributes, methods and constructors, making them only accessible within the declared class
protected
An access modifier used for attributes, methods and constructors, making them accessible in the same package and subclasses
public
An access modifier used for classes, attributes, methods and constructors, making them accessible by any other class
requires
Specifies required libraries inside a module. New in Java 9
return
Finished the execution of a method, and can be used to return a value from a method
short
A data type that can store whole numbers from -32768 to 32767
static
A non-access modifier used for methods and attributes. Static methods/attributes can be accessed without creating an object of a class
strictfp
Restrict the precision and rounding of floating point calculations
super
Refers to superclass (parent) objects
switch
Selects one of many code blocks to be executed
synchronized
A non-access modifier, which specifies that methods can only be accessed by one thread at a time
this
Refers to the current object in a method or constructor
throw
Creates a custom error
throws
Indicates what exceptions may be thrown by a method
transient
A non-accesss modifier, which specifies that an attribute is not part of an object’s persistent state
try
Creates a try…catch statement
var
Declares a variable. New in Java 10
void
Specifies that a method should not have a return value
volatile
Indicates that an attribute is not cached thread-locally, and is always read from the “main memory”
while
Creates a while loop
Also, in addition to that we should keep in mind that true, false, and null are not keywords, but they are literals and reserved words that also cannot be used as variables, methods, classes, or as any other identifier.
You can refer the link below to see a video for Reserve keywords in javascript:
HTML provides a way of displaying Web pages with text and images or multimedia content. HTML is not a programming language, but a markup language. An HTML file is a text file containing small markup tags. The markup tags tell the Web browser, such as Mozila Firefox or Google Chrome, how to display the page. An HTML file must have an htm or html file extension. HTML stands for HyperText Markup Language.
HTML pages are of two types:
•Static Pages – Static pages, as the name indicates, comprise static content (text or images). So you can only see the contents of a web page without being able to have any interaction with it.
•Dynamic Pages – Dynamic pages are those where the content of the web page depend on user input. So interaction with the user is required in order to display the web page. For example, consider a web page which requires a number to be entered from the user in order to find out if it is even or odd. When the user enters the number and clicks on the appropriate button, the number is sent to the web server, which in turn returns the result to the user in an HTML page.
Tags
A tag is a bit of text that acts as a point demarcation. To create a tag, HTML gives certain characters special meaning: the angle brackets < and >.
Putting characters within angle brackets creates a tag.
<h1> A heading </h1>
There are two tags:
Start tag or opening tag and End tag or closing tag. An end tag always matches a start tag, except that it has an extra forward slash after the opening angle bracket.
<h1> A heading </h1>
Type of Tag
•Container Tag – Which has opening and closing Tag. Ex: – <html> ……. </html> <head> ……. </head> <body> ……. </body>
•Empty Tag – which has only opening tag. Ex: – <br> <area> <base> <hr> <img> <input>
Element
The combination of a start and end tags define an element. Everything between the two tags is referred to as the contents of the element.
<h1> A heading </h1>
Attribute
Attributes provide additional information about the contents of an element. They appear on the opening tag of the element and are made up of two parts: – a name and a value, separated by an equals sign.
<p lang = “en-us”>Paragraph in English </p>
The attribute name indicates what kind of extra information you are supplying about the element’s content. It should be written in lowercase.
The value is the information or setting for the attribute. It should be placed in double quotes. Different attributes can have different values.
In this example an attribute called lang is used to indicate the language used in this element. The value of this attribute on this page specifies it is in US English.
Note: – HTML5 allows you to use uppercase attribute names and omit the quote marks, but this is not recommended.
HTML Tag
<HTML> is a starting tag. To delimit the text inside, add a closing tag by adding a forward slash “/” to the starting tag. Most but not all tags have a closing tag. It is necessary to write the code for an HTML page between <HTML> and </HTML>. This <HTML> tells the browser is ‘this is the start of an HTML document’ and </HTML> ‘this is the end of an HTML document’.
<html>
……………………..
………………………
………………………….
</html>
Head Tag
Before the <body> element you will often see a <head> element. This contains information about the page, rather than information that is shown within the main part of the browser. You will usually find a <title> element inside the <head> element. <head> is opening head tag and </head> is closing head tag.
<html>
<head>
<title> Hello </title>
</head>
</html>
Title Tag
The contents of the <title> element are either shown in the top of the browser, above where you usually type in the URL of the page you want to visit, or on the tab for that page (if your browser uses tabs to allow you to view multiple pages at the same time). <title> is opening title tag and </title> closing title tag.
<html>
<head>
<title> Hello </title>
</head>
</html>
Body Tag
Everything inside this element is shown inside the main browser window. <body> is opening body tag and </body> is closing tag.
<html>
<head>
<title> Hello </title>
</head>
<body>
<h1> Body of Page </h1>
</body>
</html>
HTML
Version
Year
HTML
1991
HTML 2.0
1995
HTML 3.2
1997
HTML 4.01
1999
XHTML
2000
HTML 5
2014
HTML 4.01
HTML 4.01 Strict
<!DOCTYPE HTML PUBLIC “-//W3C//DTD HTML 4.01//EN” “http://www.w3.org/TR/html4/strict.dtd”>
HTML 4.01 Transitional
<!DOCTYPE HTML PUBLIC “-//W3C//DTD HTML 4.01 Transitional//EN” “http://www.w3.org/TR/html4/loose.dtd”>
HTML 4.01 Frameset
<!DOCTYPE HTML PUBLIC “-//W3C//DTD HTML 4.01 Frameset//EN” “http://www.w3.org/TR/html4/frameset.dtd”>
HTML 5
HTML 5 enables to create more interactive websites by embedding audio, video and graphics on the web page.
The purpose of HTML5 is primarily to make it easier for web developers.
New features: –Browser Support –Geolocation –Offline Application Cache –Web Storage –Error Handling –New Application Programming Interface (API) –New Structure
Application Programming Interface
•2D drawing on a web page
•Drag and Drop
•Timed Media Playback
•Browser History Management
New Structure
•<article>
•<aside>
•<header>
•<details>
DOCTYPE declaration
<!DOCTYPE html>
It is an instruction to the web browser about what version of HTML the page is written in.
The <!DOCTYPE> declaration is not case sensitive.
<br>
The <br> tag in the HTML code inserts a line break in the text.
Headings
Heading defines the format and structure of a document. There are six heading tag: – •<h1> …… </h1> •<h2> …… </h2> •<h3> …… </h3> •<h4> …… </h4> •<h5> …… </h5> •<h6> …… </h6>
Any text inside these tags is displayed differently depending on the heading number.
Note : – 1.<h1>…… </h1> is largest heading tag and <h6>……. </h6> is smallest. 2.Heading get their own line on the web pages by starting from a new line.
Paragraph
The <p> tag is used to create new paragraph on web page. It has a closing tag </p> which is optional because a paragraph automatically ends when we start another paragraph.
<p> ………………………. </p>
Note : – –Number of line in a paragraph depends on the size of web browser window. –If we resize the browser window, the number of lines in this paragraph will change.
Subscript
A subscript is a text that appears smaller than a regular text.
The <sub>….. </sub> tag is used to create a subscript on a web page.
Superscript
A Superscript is a text that appears smaller size above the regular text.
The <sup>…… </sup> tag is used to create a subscript on a web page.
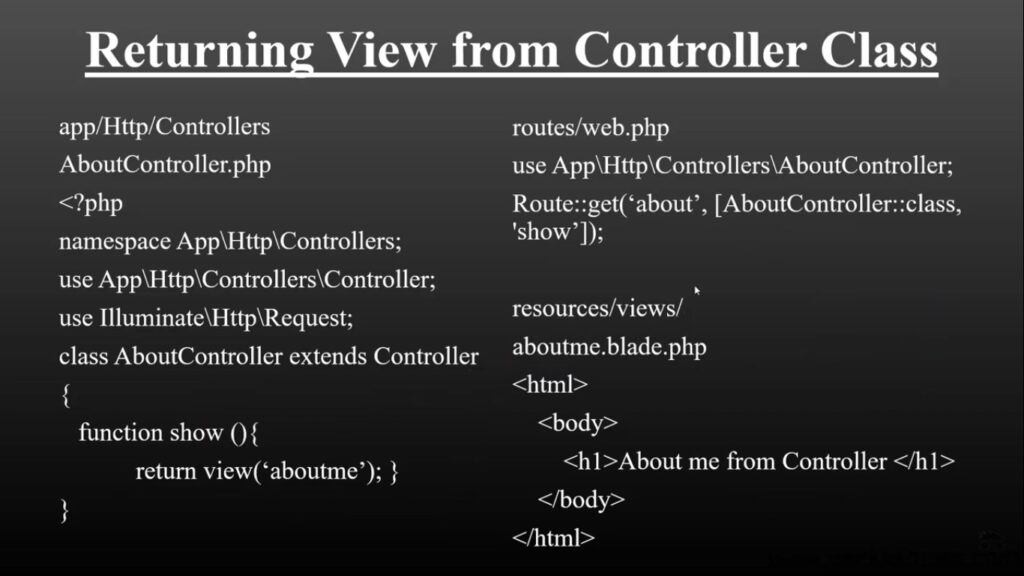
-We should create view in structured way(inside folder) that means all the views should not be in the view folder and we can make it in structured way by making folderin views.
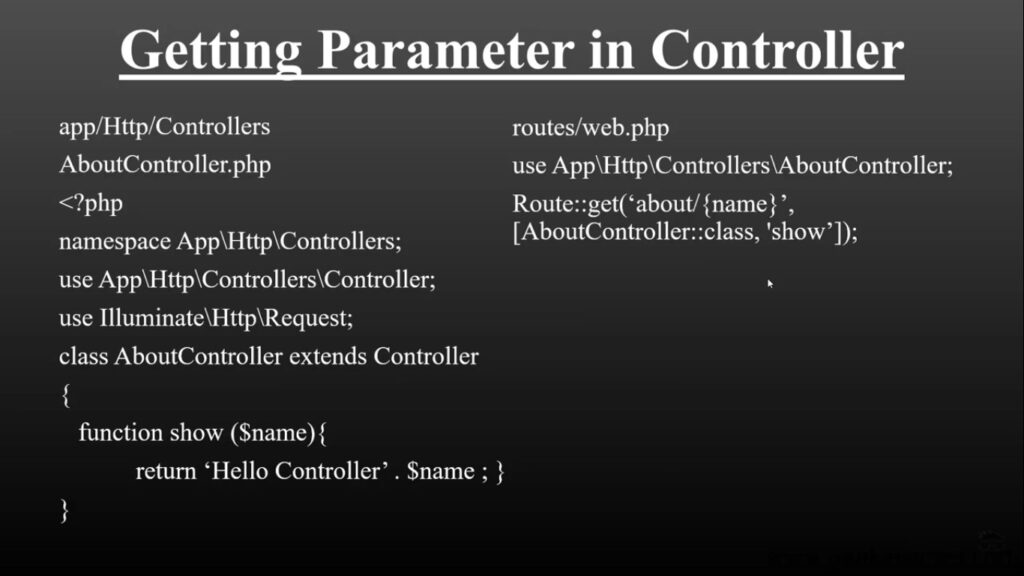
For calling this in the server we can type 127.0.0.1.8000 or 127.0.0.1.8000/name and it will display the content in both scenario without giving error. Though it will not return any name if we do not enter /name.
Controllers can group related request handling logic into a single class. Instead of defining all of your request handling logic as closures in route files, you may wish to organize this behaviour using controller classes.
– Controllers are stored in the app/Http/Controllers
-Controller extends the base controller class included with Laravel.
Defining Controller Class
Run command: php artisan make:controller controller_name
Laravel is an open source PHP framework. Framework is a tool which is used to make modern, fast and scalable products. Laravel is based on model–view–controller (MVC) architectural pattern. Some of the features of Laravel are a modular packaging system with a dedicated dependency manager, different ways for accessing relational databases, utilities that aid in application deployment and maintenance, and its orientation toward syntactic sugar.
MVC
The Model-View-Controller (MVC) is an pattern which separates an application into three main logical components: the model, the view, and the controller. Each of these components are built to handle specific development aspects of an application. MVC is one of the most frequently used industry-standard web development framework to create scalable and extensible projects.
MVC Structure
Basic MVC Architecture. Model View Controller or MVC as it is popularly called, is a software design pattern for developing web applications.
A Model View Controller pattern is made up of the following three parts −
Model − The lowest level of the pattern which is responsible for maintaining data.
View − This is responsible for displaying all or a portion of the data to the user.
Controller − Software Code that controls the interactions between the Model and View.
MVC isolates the application logic from the user interface layer and supports separation of concerns.
Here the Controller receives all requests for the application and then works with the Model to prepare any data needed by the View.
The View then uses the data prepared by the Controller to generate a final presentable response.
The MVC abstraction can be graphically represented as follows:-
Setting up Laravel
For setting up a laravel we need to install composer in our device and then we have to open a terminal and run the following command:
composer global require laravel/installer
Once it’s done, you can create a fresh Laravel project with the laravel new command in the directory you’re in.
In your terminal go to the root of your webserver and run
laravel new your_project_name
Artisan Command
Artisan is the command line interface included with Laravel. Artisan exists at the root of your application as the artisan script and provides a number of helpful commands that can assist you while you build your application. To view a list of all available Artisan commands, you may use the list command:
php artisan list
Laravel Framework 5.8.38
Usage: command [options] [arguments]
Options: -h, –help Display this help message -q, –quiet Do not output any message -V, –version Display this application version –ansi Force ANSI output –no-ansi Disable ANSI output -n, –no-interaction Do not ask any interactive question –env[=ENV] The environment the command should run under -v|vv|vvv, –verbose Increase the verbosity of messages: 1 for normal output, 2 for more verbose output and 3 for debug
Available commands:
clear-compiled – Remove the compiled class file down – Put the application into maintenance mode dump-server – Start the dump server to collect dump information. env – Display the current framework environment help – Displays help for a command inspire – Display an inspiring quote list – Lists commands migrate – Run the database migrations optimize – Cache the framework bootstrap files preset – Swap the front-end scaffolding for the application serve – Serve the application on the PHP development server tinker – Interact with your application up – Bring the application out of maintenance mode
cache cache:clear Flush the application cache cache:forget Remove an item from the cache cache:table Create a migration for the cache database table
config config:cache Create a cache file for faster configuration loading config:clear Remove the configuration cache file
db db:seed Seed the database with records
event event:cache Discover and cache the application’s events and listeners event:clear Clear all cached events and listeners event:generate Generate the missing events and listeners based on
registration event:list List the application’s events and listeners
key key:generate Set the application key
make make:auth Scaffold basic login and registration views and routes make:channel Create a new channel class make:command Create a new Artisan command make:controller Create a new controller class make:event Create a new event class make:exception Create a new custom exception class make:factory Create a new model factory make:job Create a new job class make:listener Create a new event listener class make:mail Create a new email class make:middleware Create a new middleware class make:migration Create a new migration file make:model Create a new Eloquent model class make:notification Create a new notification class make:observer Create a new observer class make:policy Create a new policy class make:provider Create a new service provider class make:request Create a new form request class make:resource Create a new resource make:rule Create a new validation rule make:seeder Create a new seeder class make:test Create a new test class
migrate migrate:fresh Drop all tables and re-run all migrations migrate:install Create the migration repository migrate:refresh Reset and re-run all migrations migrate:reset Rollback all database migrations migrate:rollback Rollback the last database migration migrate:status Show the status of each migration notifications notifications:table Create a migration for the notifications table optimize optimize:clear Remove the cached bootstrap files
package package:discover Rebuild the cached package manifest queue queue:failed List all of the failed queue jobs queue:failed-table Create a migration for the failed queue jobs database table queue:flush Flush all of the failed queue jobs queue:forget Delete a failed queue job queue:listen Listen to a given queue queue:restart Restart queue worker daemons after their current job queue:retry Retry a failed queue job queue:table Create a migration for the queue jobs database table queue:work Start processing jobs on the queue as a daemon
route route:cache Create a route cache file for faster route registration route:clear Remove the route cache file route:list List all registered routes
schedule schedule:run Run the scheduled commands
session session:table Create a migration for the session database table
storage storage:link Create a symbolic link from “public/storage” to “storage/app/public”
vendor vendor:publish Publish any publishable assets from vendor packages
view view:cache Compile all of the application’s Blade templates view:clear Clear all compiled view files