DOCTYPE Declaration HTML5

<!DOCTYPE html>

HTML 5 Tags

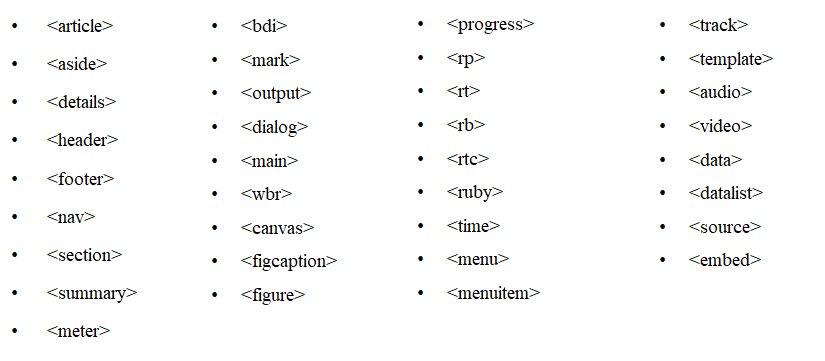
  • Header – It specifies a header for a document or section.
  • Nav – It defines navigation links.
  • Section – It defines a section in a document.
  • Article – It defines an article. For example a blog post or forum post etc.
  • Aside – It can define content aside from the page content like a sidebar.
  • Details – It is used to defines additional details that the user can view or hide. It has one attribute-value pair which is open = “open” and that means by default the data will be visible for users/viewers. By default it has False value so the details will be hidden.
  • Summary – It is used to defines a visible heading for a <details> element.
  • Footer – It specifies a footer for a document or section.

Meter Tag

It defines a scalar measurement within a known range or a fraction value. This is also known as a gauge. It should not be used to indicate the progress bar. If the browser doesn’t support the meter tag then it will show text written between the opening meter tag and the closing meter tag.

Ex:-

<meter value=“20” max=“100” min=“10”>Range</meter>

<meter low=”60″ high=”80″ value=”100″ max=”100″>Range</meter>

Meter Tag Attributes

AttributeValueDescription
valueNumberSpecifies the current value of the meter. This must be between the min and max values.
formForm_idIt associates the <meter> with a <form>
highNumberIt specifies the range that is considered to be a high value. This must be less than the max value.
lowNumberIt specifies the range that is considered to be a low value. This must be greater than min value.
maxNumberIt specifies the max value of the range.
minNumberIt specifies min value of the range.
optimumNumberIt specifies what value is the optimal value for the meter.
  • Mark – This tag is used to highlight text or part of the text. Ex: – <p>This is <mark>Geekyshows</mark></p>
  • Dialog – This tag defines a dialog box or window. It can be used to create popup dialogs. It has one attribute-value pair which is open = “open” and that means by default the data will be visible for users/viewers. By default it has False value so the data will be hidden. Ex: – <dialog>Click Here</dialog>
  • Main – This tag specifies the main content of a document. The content inside the <main> element should be unique to the document. It should not contain any content that is repeated across documents such as sidebars, navigation links, copyright information, site logos, and search forms. There must not be more than one <main> element in a document. The <main> element must NOT be a descendant of an <article>, <aside>, <footer>, <header>, or <nav> element. Ex: – <main><article>This is art</article></main>
  • wbr – The <wbr> (Word Break Opportunity) element specifies a position within text where the browser may optionally break a line if necessary. Ex: – <p>Hello worldddddddddddddddddd<wbr>welcome</wbr></p>
  • Figure – The <figure> tag specifies self-contained content, like illustrations, diagrams, photos, code listings, etc.  Ex: – <figure> <img src=“image.jpg“ width=”304″ height=”228″> </figure>
  • figcaption – The <figcaption> tag defines a caption for a <figure> element. The <figcaption> element can be placed as the first or last child of the <figure> element. Ex: –
     <figure>
       <img src=“image.jpg" width="304" height="228">
       <figcaption>Picture One</figcaption>
     </figure>
  • Progress – The <progress> element represents the completion progress of a task. It has two attributes max which Specifies how much work the task requires in total and value which Specifies how much of the task has been completed. It must be a valid floating point number between 0 and max, or between 0 and 1 if the max attribute is not present. Ex: –  <progress id=”bar” value=”0″ max=”100″> </progress>
Tagged : / / / / / / / /

HTML: Class Attribute

The HTML class attribute makes it possible to define equal styles for elements with the same class name. The class attribute specifies one or more class names for an element. The class attribute is mostly used to point to a class in a style sheet. However, it can also be used by JavaScript (via the HTML DOM) to make changes to HTML elements with a specified class.

In HTML5, the class attribute can be used on any HTML element.

Rules

  • Must begin with a letter A-Z or a-z.
  • A class name cannot start with a number.
  • Must not contain any space characters.
  • Can be followed by: letters (A-Za-z), digits (0-9), hyphens (“-“), and underscores (“_”).
  • In HTML, all values are case-insensitive.
<html>
	<head>
		<title>class tag</title>
		<style>
			.red {color: #FF0000; font-size: 60px;}
		</style> 
	</head>
	<body>
	<h2 class=red> Heading line </h2>
	<p class =red>1st paragraph line</p>
	<p> paragraph tag </p>
	</body>
</html>

More than one class name

To specify multiple classes, separate the class names with a space. This allows you to combine several CSS classes for one HTML element. Syntax:- class=“class_name1 class_name2 class_nameN” Ex:- <p class =“red look”>I am first paragraph</p>

<html>
	<head>
		<title>class name twice or max </title>
		<style>
			p.red {color: #FF0000;}
			p.look{font-size: 100px;}
			.algn{text-align: center;}
		</style> 
	</head>
	<body>
	<h2>I am Heading</h2>
	<p class ="red look"> first paragraph</p>
	<p class="red algn">second paragraph</p>
	
	</body>
</html>

Tagged : / / / / / / /

HTML: Style Attribute

The style attribute is used to set the style of an HTML element. In HTML5, the style attribute can be used on any HTML element. Syntax: –

style=“property1: property1-value; property2: property2-value;” Where property is CSS property and Property-value is CSS value.

<html>
	<head>
		<title>Hello CSS</title>
	</head>
	<body>
	<h1 style= color:blue  font-size: 45em; >
                   I am Heading
        </h1>
	<p style= color:rgb(38,226,85) font-size: 40px; > 
                  I am 1st Para
        </p>
	<p>I am second Paragraph</p>
	</body>
</html>
Tagged : / / / / / /

HTML: Style Tag

The <style> tag is used to declare style sheets within the head of  HTML document. Inside the <style> element you specify how HTML elements should render in a browser. Each HTML document can contain multiple <style> tags.

AttributeValueDescription
mediamedia_querySpecifies what media/device the media resource is optimized for
scopedscopedSpecifies that the styles only apply to this element’s parent element and that element’s child elements
typetext/cssSpecifies the media type of the <style> tag
<html>
	<head>
		<title>html_style</title>
		
		</style>
	</head>
	<body style="background-color: rgb(180, 221, 67);">
	<h1 style="text-align: center;">Style tag</h1>
	<p style="margin-bottom: auto;">Lorem ipsum dolor sit amet, consectetur adipisicing elit. Ullam, nobis.</p>
  <hr>
  <br>
	<p style="color: blue;">Lorem ipsum dolor sit amet consectetur adipisicing elit. Fuga, eligendi?</p>
	</body>
</html>
Tagged : / / / / / / /

HTML: Link Tag

The <link> tag defines a link between a document and an external resource.

The <link> element is an empty element, it contains attributes only. This element goes only in the head section, but it can appear any number of times.

AttributeValueDescription
crossoriginanonymous
use-credentials
Specifies how the element handles cross-origin requests
hrefURLSpecifies the location of the linked document
hreflanglanguage_codeSpecifies the language of the text in the linked document
mediamedia_querySpecifies on what device the linked document will be displayed
relalternate
archives
author
bookmark
external
first
help
icon
last
license
next
nofollow
noreferrer
pingback
prefetch
prev
search
sidebar
stylesheet
tag
up

Required. Specifies the relationship between the current document and the linked document
sizesHeight X Width
any
Specifies the size of the linked resource. Only for rel=”icon”
typemedia_typeSpecifies the media type of the linked document

html code

<!DOCTYPE html>
<html>

<head>
  <title>
    link with css
  </title>
  <link rel="stylesheet" href="css/this is css.css">

</head>

<body class="design">
<h1> link tag </h1>
<p>
  Lorem, ipsum dolor sit amet consectetur adipisicing elit. Eos quibusdam obcaecati fugit sunt accusantium placeat maxime enim suscipit voluptate nam.
</p>
</body>

</html>

css code

.design{
    background-color: aqua;
    border-radius: 20px;
    text-align: center;
    border-style:solid ;
}
    h1{
       color:yellow;
    }
p{
    color:beige;
}
Tagged : / / / / / / /

HTML: Optgroup Tag

The …. tag helps to group related choices when we have a long list of options to select from the drop-down list created using the tag.

<select>
	<optgroup>
		<option>……</option>
	</optgroup>

	<optgroup>
		<option>……</option>
	</optgroup>

</select>
AttributeValueDescription
disableddisabledSpecifies that an option-group should be disabled
labeltextSpecifies a label for an option-group
Tagged : / / / / /

HTML: Button tag

We can customize the appearance of button using the <button> tag.

 <button>…..</button>
AttributeValueDescription
autofocusautofocusSpecifies that a button should automatically get focus when the page loads
disableddisabledSpecifies that a button should be disabled
formform_idSpecifies one or more forms the button belongs to
formactionURLSpecifies where to send the form-data when a form is submitted. Only for type=”submit”
formenctypeapplication/x-www-form-urlencoded
multipart/form-data
text/plain
Specifies how form-data should be encoded before sending it to a server. Only for type=”submit”
formmethodget
post
Specifies how to send the form-data (which HTTP method to use). Only for type=”submit”
formnovalidateformnovalidateSpecifies that the form-data should not be validated on submission. Only for type=”submit”
formtarget_blank
_self
_parent
_top
framename
Specifies where to display the response after submitting the form. Only for type=”submit”
namenameSpecifies a name for the button
typebutton reset submitSpecifies the type of button
value textSpecifies an initial value for the button
Tagged : / / / /

HTML: Option Tag

The <option>…</option> tags inside the <select>….</select> element define an option in the drop-down list.

<select>
	<option>………..</option>
	<option>………..</option>
</select>
AttributeValueDescription
disableddisabledSpecifies that an option should be disabled
labeltextSpecifies a shorter label for an option
selectedselectedSpecifies that an option should be pre-selected when the page loads
valuetextSpecifies the value to be sent to a server

Tagged : / / / / /

HTML: Select Tag

The <select>….</select> tag creates a drop-down list to accept user input from a list of items.

AttributeValueDescription
autofocusautofocusSpecifies that the drop-down list should automatically get focus when the page loads
disableddisabledSpecifies that a drop-down list should be disabled
formform_idDefines one or more forms the select field belongs to
multiplemultipleSpecifies that multiple options can be selected at once
namenameDefines a name for the drop-down list
requiredrequiredSpecifies that the user is required to select a value before submitting the form
sizenumberDefines the number of visible options in a drop-down list
Tagged : / / / / /