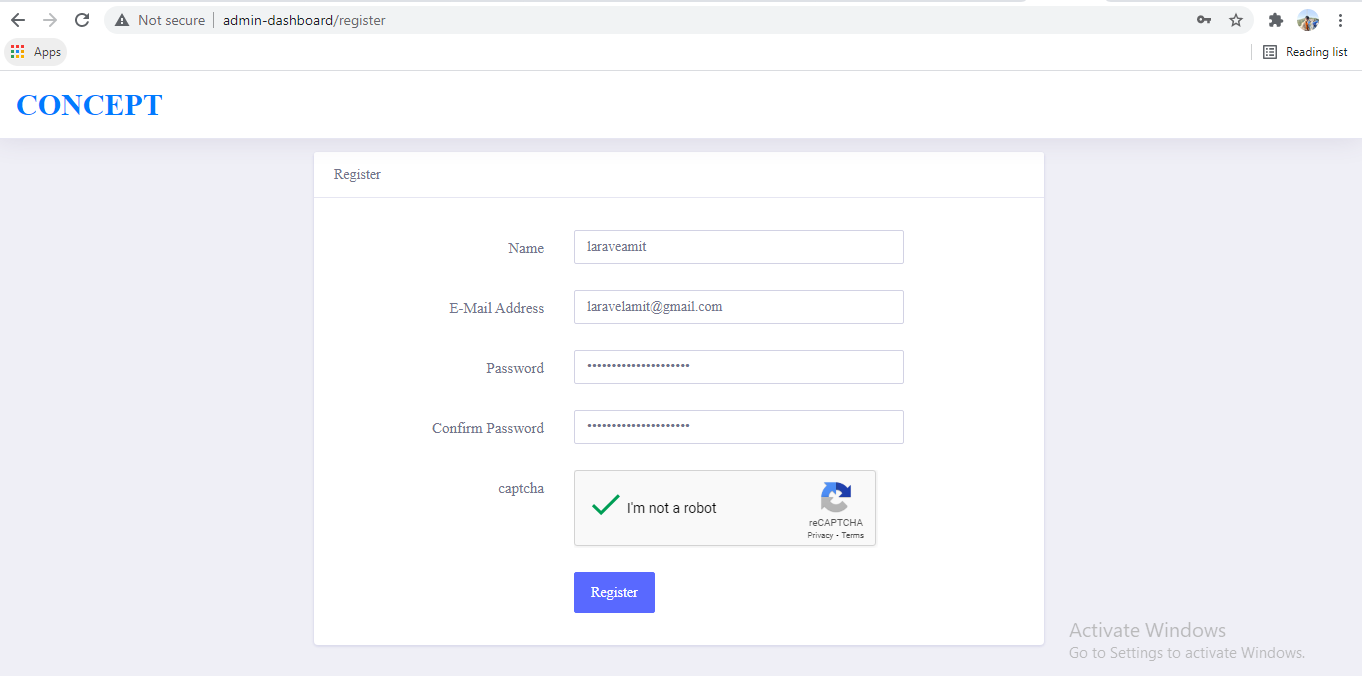
In this tutorial I’m going to learn how to add captcha features in on register blade and login page. Nowadays captcha is very useful because its very important for security reason.
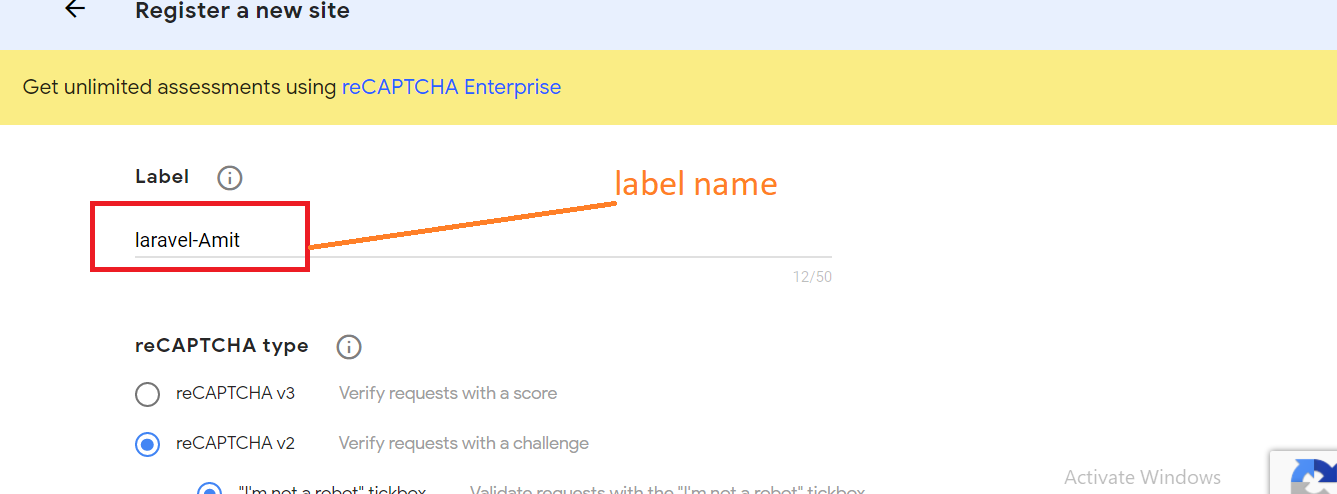
There are several library to generate captcha image in Laravel. In this example I’m going to use Google reCaptcha for generate captcha using anhskohbo/no-captcha package. anhskohbo/no-captcha is very popular package.
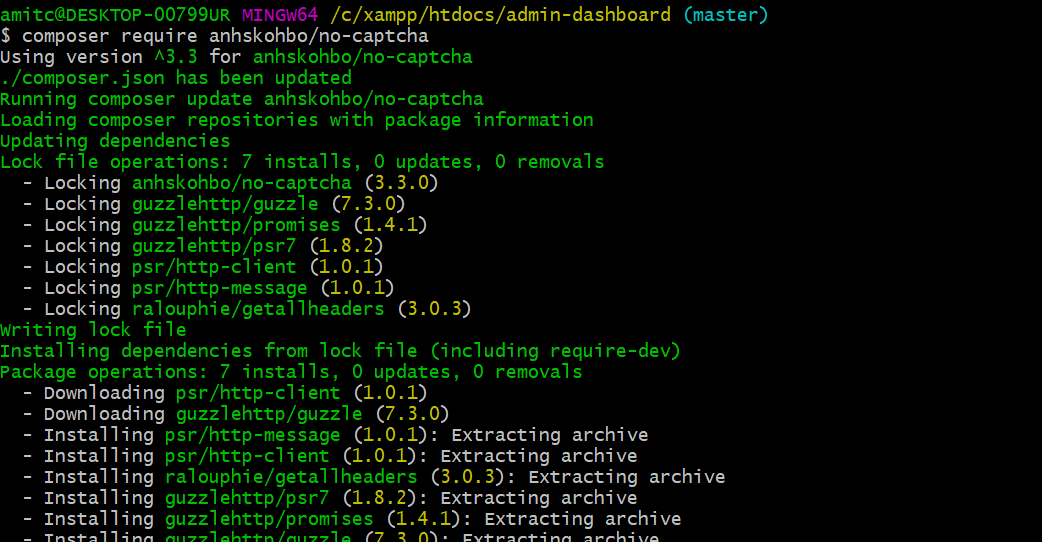
Next step we have to install anhskohbo/no-captcha package for Google reCaptcha code, after install these package we able to generate captcha code in our register and login page. copy below code and paste in your terminal
composer require anhskohbo/no-captcha
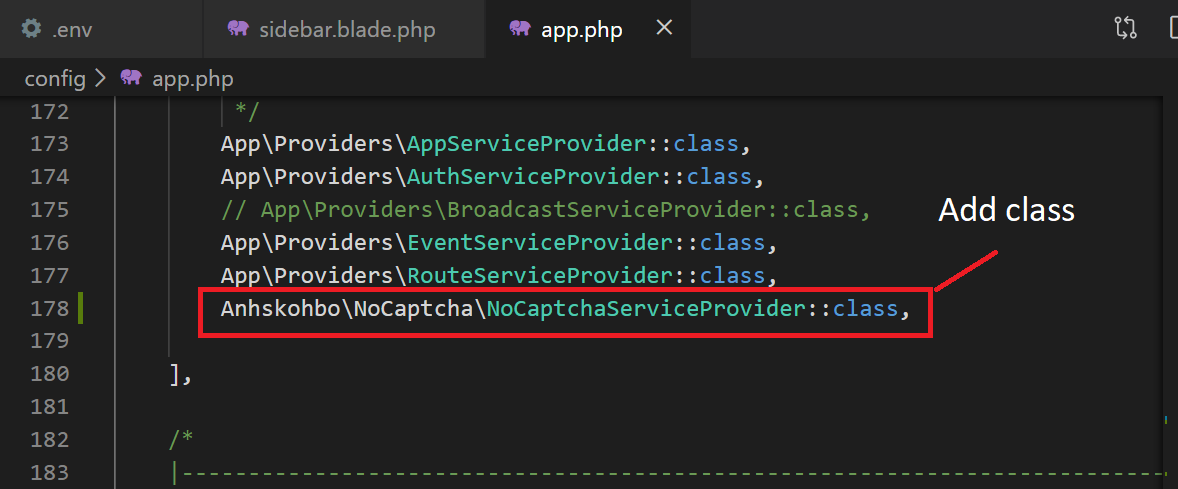
Next add below code in provider path in config/app.php path
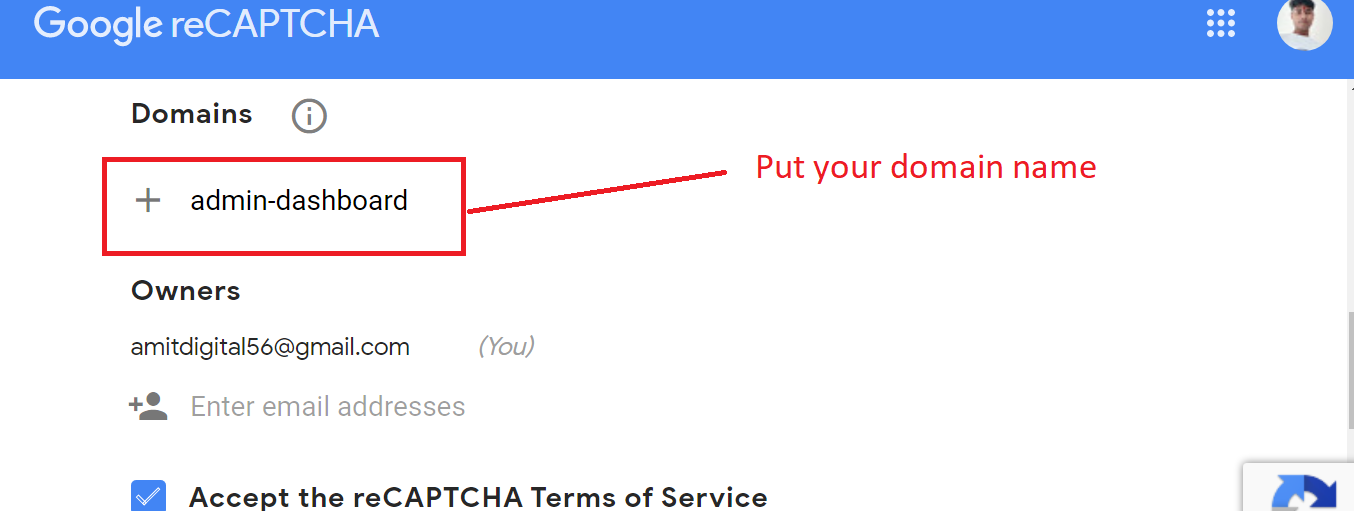
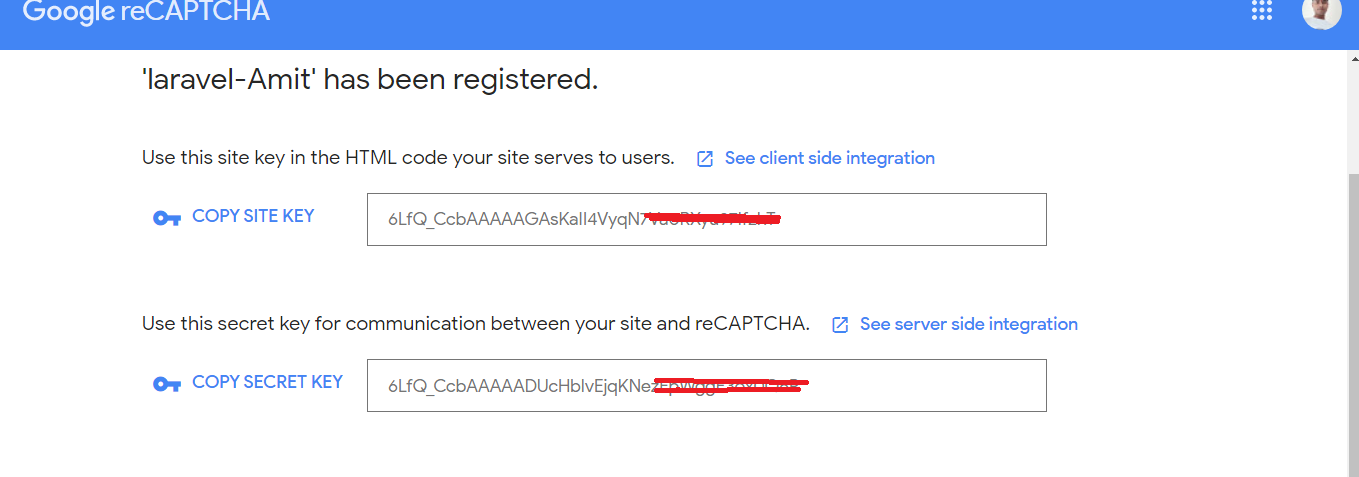
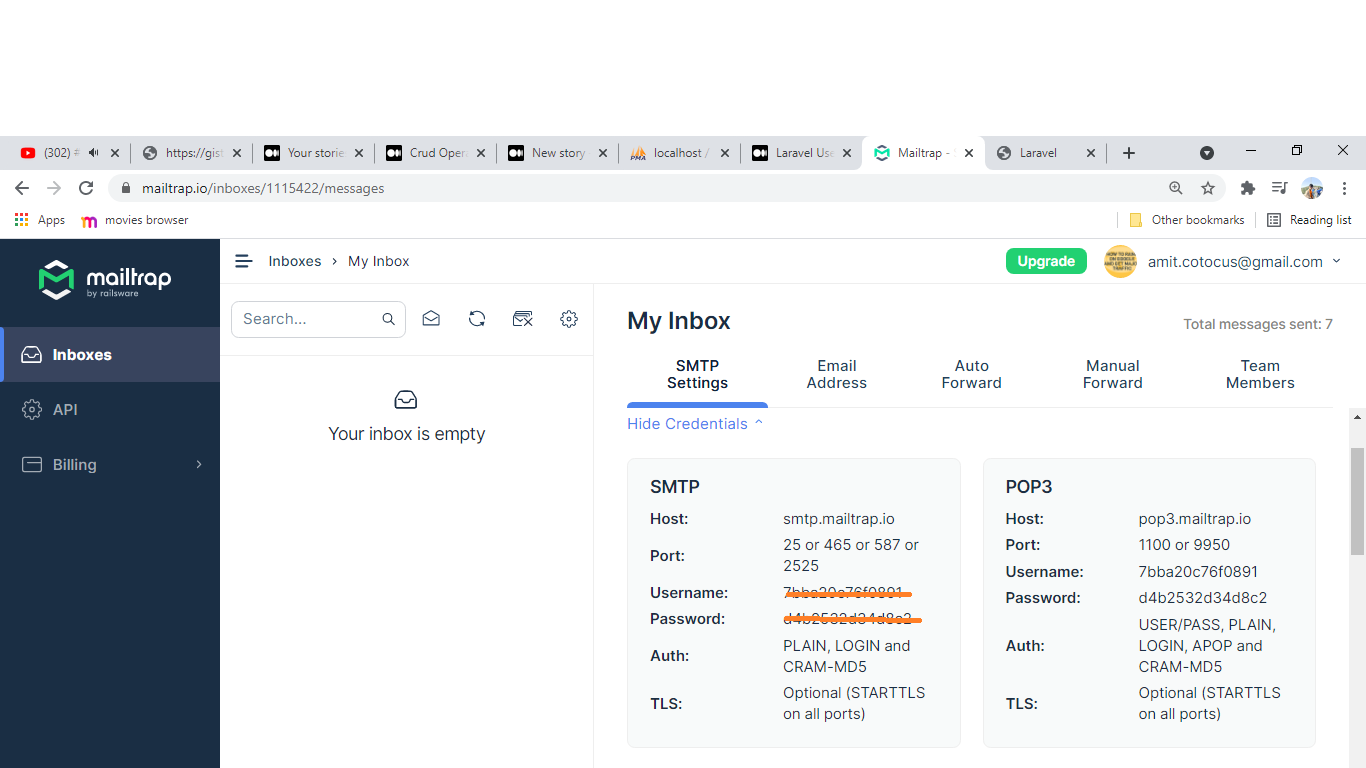
After submit this form you’ll get site key and secret key
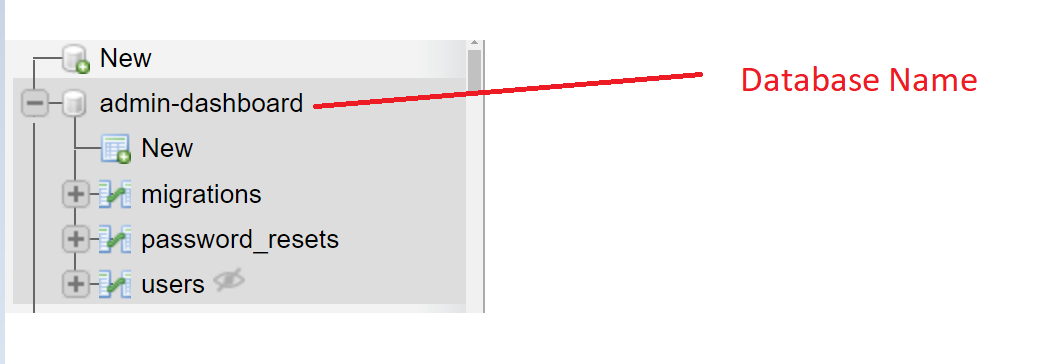
Now go to .env file and add this two variable
.env
#########Google Recaptcha
 NOCAPTCHA_SITEKEY=your site key
 NOCAPTCHA_SECRET=your secret key
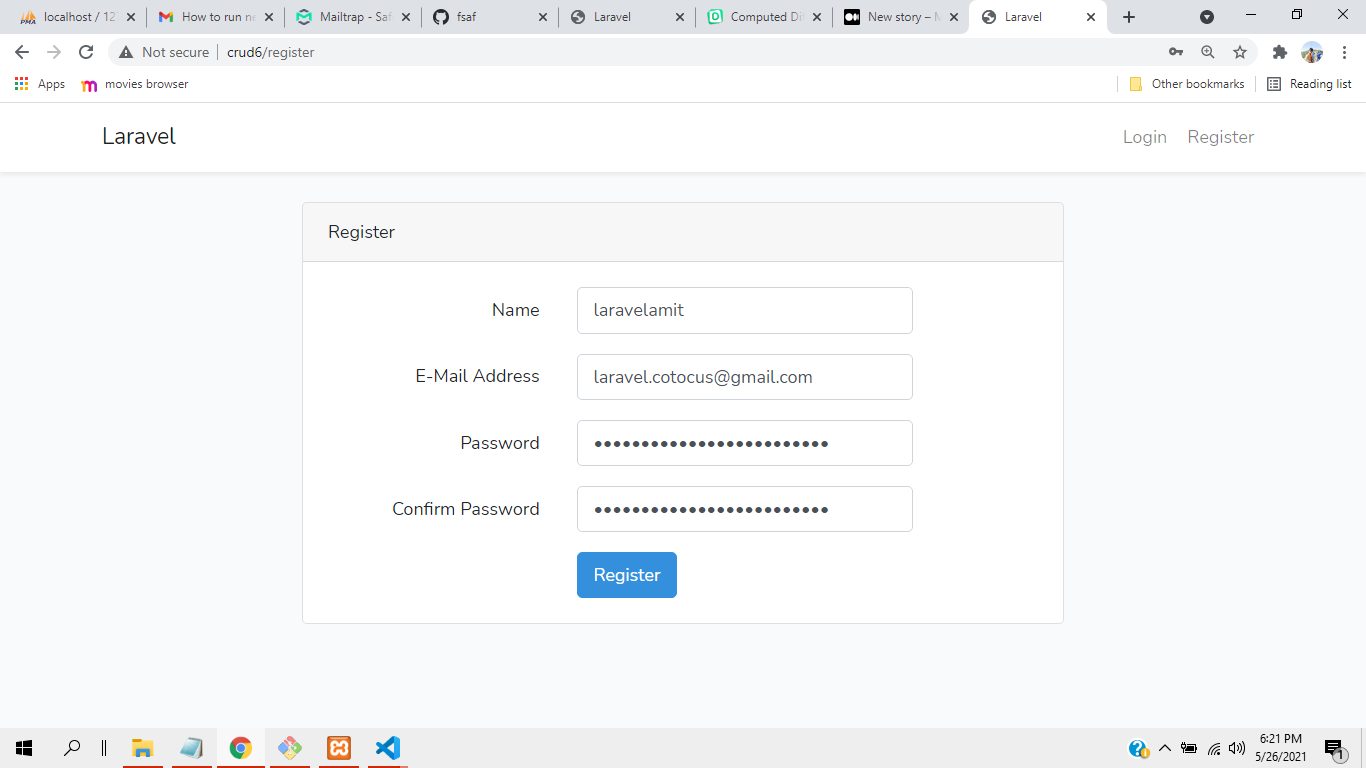
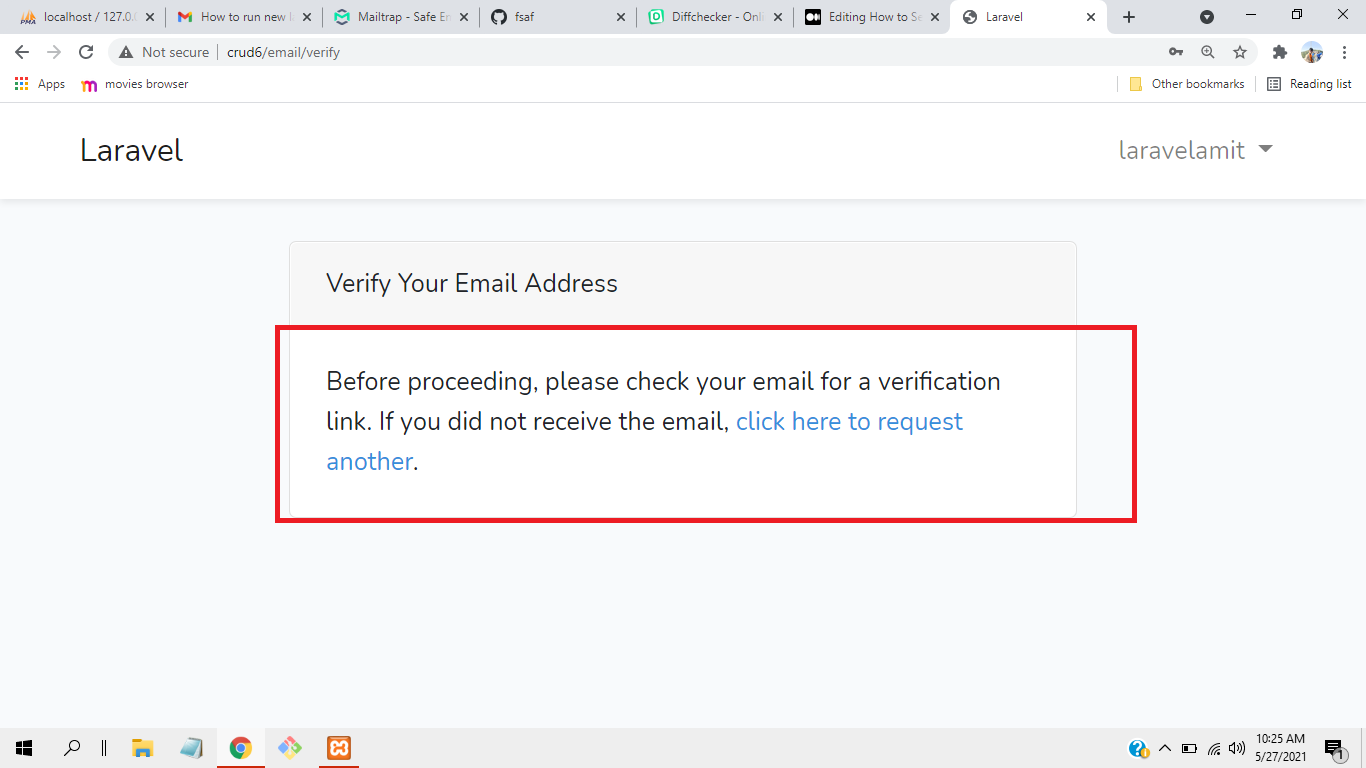
Next go to Route/web.php and add Auth::routes();
Auth::routes();
Go to Route/web.php
<?php
/* |-------------------------------------------------------------------------- | Web Routes |-------------------------------------------------------------------------- | | Here is where you can register web routes for your application. These | routes are loaded by the RouteServiceProvider within a group which | contains the "web" middleware group. Now create something great! | */
Route::get('/', function () { return view('welcome'); });
The HTTP response status code 302 Found is a common way of performing URL redirection. A 302 Found message is an HTTP response status code indicating that the requested resource has been temporarily moved to a different URI. All HTTP response status codes that are in the 3xx category are considered redirection messages.
Diagnosing a 302 Found Response Code
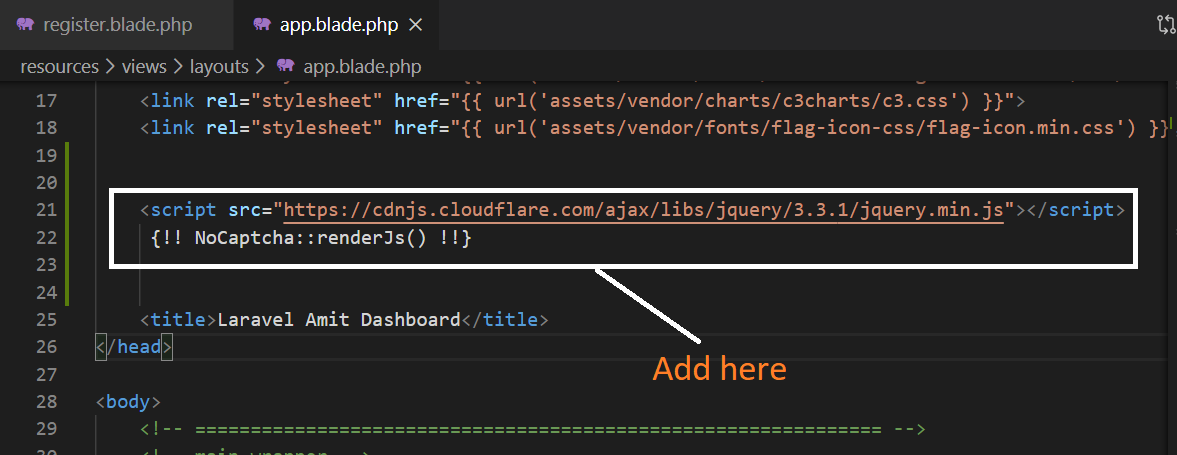
it’s entirely possible that the server is misconfigured, causing it to improperly respond with 302 Found codes, instead of the standard and expected 200 OK code of a normal, functional request.
If your application is responding with 302 Found codes, this is an issue that many other visitors may be experiencing as well, dramatically hindering your application’s ability to service users.
if you want to dig out on above topic then follow below references :
so friends here I am describing all above things for understanding about 302. because i am facing this issue in my Laravel application so let’s check out to solve these issues in your Laravel application. below is the attached urls for common issue in Laravel related to 302.
Next go to post migration table and paste below code
<?php
use Illuminate\Database\Migrations\Migration; use Illuminate\Database\Schema\Blueprint; use Illuminate\Support\Facades\Schema;
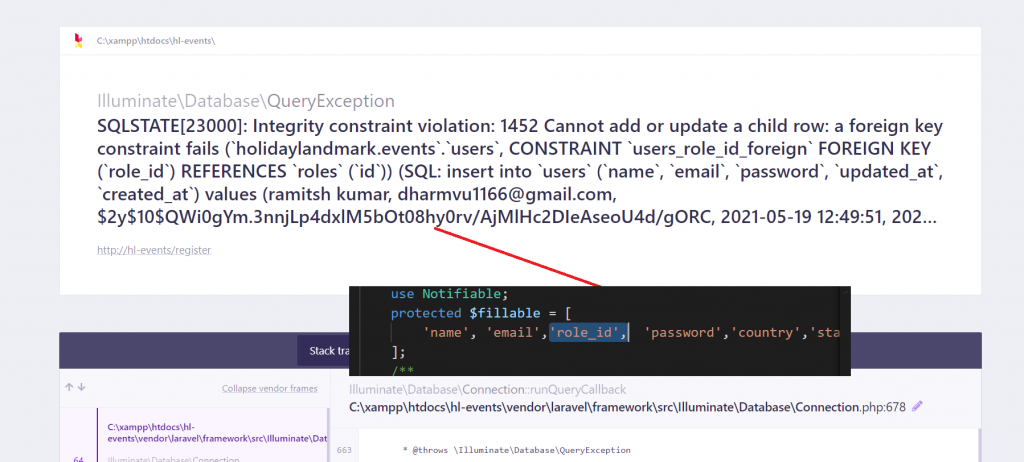
class CreatePostsTable extends Migration { /** * Run the migrations. * * @return void */ public function up() { Schema::create('posts', function (Blueprint $table) { $table->id(); $table->string('title'); $table->string('description'); $table->timestamps(); }); }
/** * Reverse the migrations. * * @return void */ public function down() { Schema::dropIfExists('posts'); } }
Next go to Post model and paste below code
<?php

namespace App;

use Illuminate\Database\Eloquent\Model;

class Post extends Model
{
    protected $fillable=[
        'title',
        'description'
    ];
}
Now migrate the table run below command
php artisan migrate
Step 4 — Create Routes
<?php
use Illuminate\Support\Facades\Route;
/* |-------------------------------------------------------------------------- | Web Routes |-------------------------------------------------------------------------- | | Here is where you can register web routes for your application. These | routes are loaded by the RouteServiceProvider within a group which | contains the "web" middleware group. Now create something great! | */
Route::get('/', function () { return view('welcome'); });
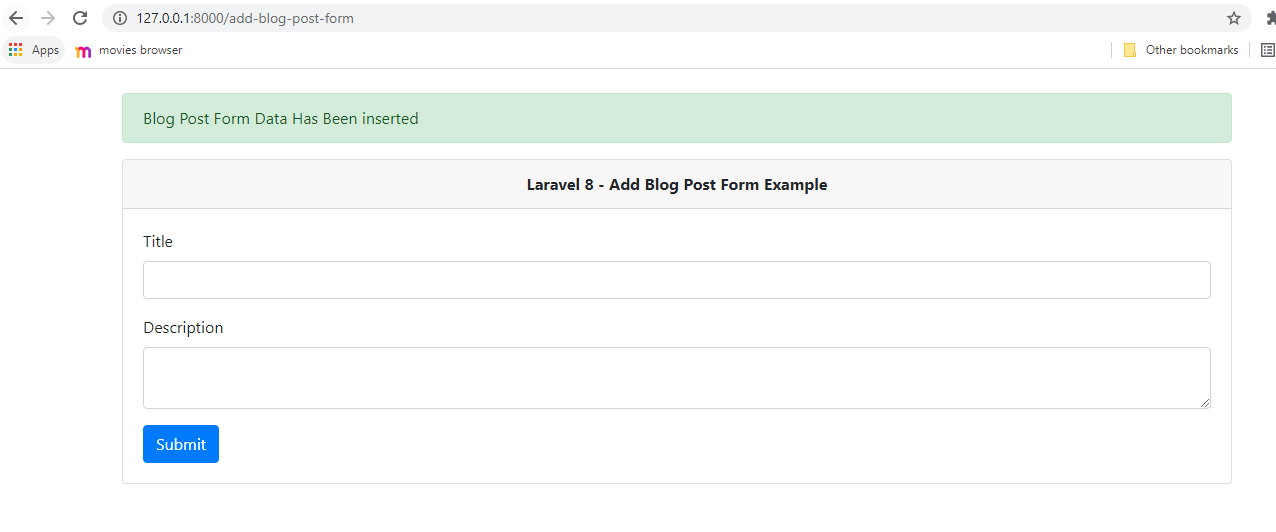
Go to your Post controller file and paste below code
<?php
namespace App\Http\Controllers;
use Illuminate\Http\Request;use App\Post;class PostController extends Controller { /** * Display a listing of the resource. * * @return \Illuminate\Http\Response */ public function index() { return view('add-blog-post-form'); }
/** * Show the form for creating a new resource. * * @return \Illuminate\Http\Response */ public function create() { // }
/** * Store a newly created resource in storage. * * @param \Illuminate\Http\Request $request * @return \Illuminate\Http\Response */ public function store(Request $request) { $post = new Post;
In this tutorial I’m going to describe about crud operation how to install project and setup and create controller, models, migration and all the things please read it carefully and follow some easy steps.
Lets go to download project and set up to
composer create-project laravel/laravel form "5.8.*"
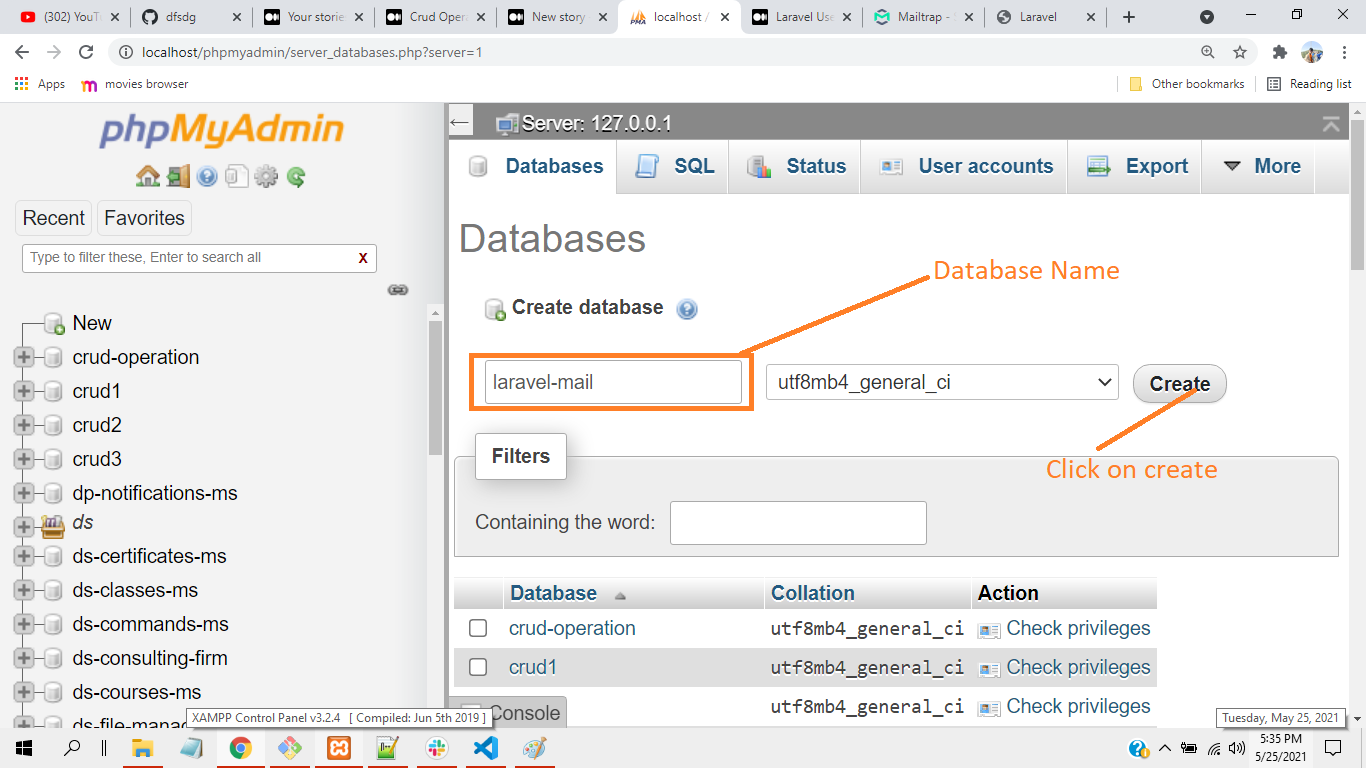
Next go to .env file and put your database name -> form
Next step create database in PhpMyAdmin Database name 👇
form
Now migrate the table run this command 👇
php artisan migrate
Table has been migrated successfully.
let’s go to create model, migration and controller in one command copy below code and paste in your terminal.
php artisan make:model product -mcr
Now migrate the table
php artisan migrate
Step 4: Add Resource Route
<?php
use App\Http\Controllers\ProductController;
/* |-------------------------------------------------------------------------- | Web Routes |-------------------------------------------------------------------------- | | Here is where you can register web routes for your application. These | routes are loaded by the RouteServiceProvider within a group which | contains the "web" middleware group. Now create something great! | */
Route::get('/', function () { return view('welcome'); });
Step 5: Go to Your Controller and paste below code in your controller file
<?php
namespace App\Http\Controllers;
use App\Product; use Illuminate\Http\Request;
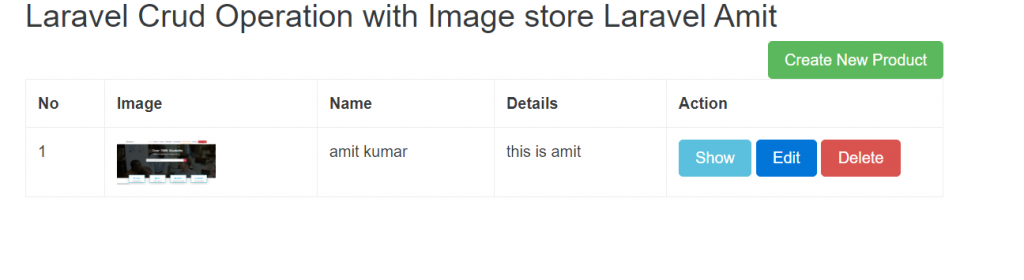
class ProductController extends Controller { /** * Display a listing of the resource. * * @return \Illuminate\Http\Response */ public function index() { $products = Product::latest()->paginate(5);
return redirect()->route('products.index') ->with('success','Product created successfully.'); }
/** * Display the specified resource. * * @param \App\Product $product * @return \Illuminate\Http\Response */ public function show(Product $product) { return view('products.show',compact('product')); }
/** * Show the form for editing the specified resource. * * @param \App\Product $product * @return \Illuminate\Http\Response */ public function edit(Product $product) { return view('products.edit',compact('product')); }
/** * Update the specified resource in storage. * * @param \Illuminate\Http\Request $request * @param \App\Product $product * @return \Illuminate\Http\Response */ public function update(Request $request, Product $product) { $request->validate([ 'name' => 'required', 'detail' => 'required' ]);
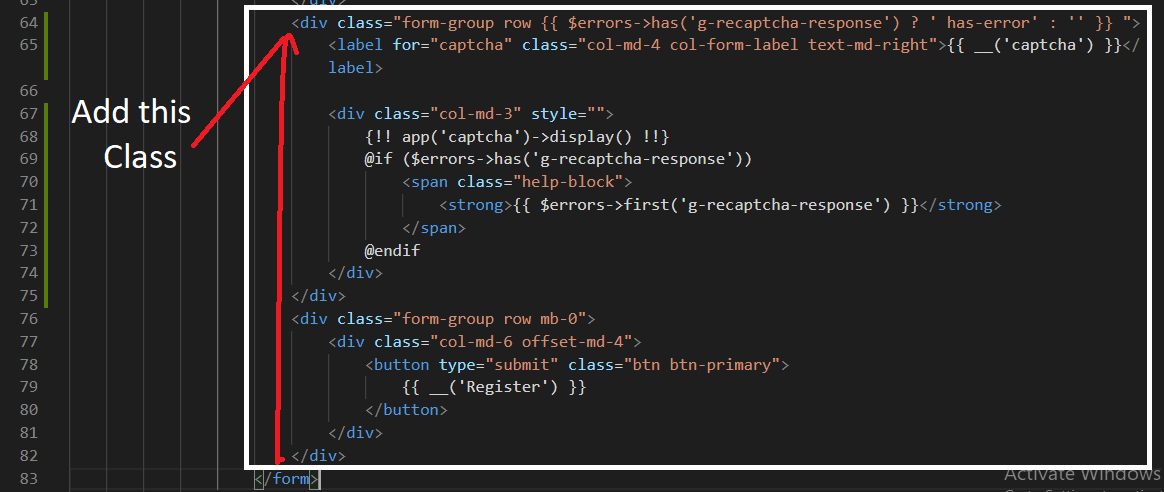
@if ($errors->any()) <div class="alert alert-danger"> <strong>Whoops!</strong> There were some problems with your input.<br><br> <ul> @foreach ($errors->all() as $error) <li>{{ $error }}</li> @endforeach </ul> </div> @endif
@if ($errors->any()) <div class="alert alert-danger"> <strong>Whoops!</strong> There were some problems with your input.<br><br> <ul> @foreach ($errors->all() as $error) <li>{{ $error }}</li> @endforeach </ul> </div> @endif
Laravel is a free and open-source PHP framework that is utilized to developed wide variety of web applications. Laravel is an accessible language for new programmers because the laravel community provides lots of modules resources are free available. Laravel provides a simple way to authorization logic and control access to resources with a simple ActiveRecord implementation that makes their interaction with databases.
Q #2) Define Composer.
Composer is a dependency manager for php framework. Composer runs through the command line. The main purpose of the composer is to install the dependencies or libraries for an application. Composer help to install required package component whatever you want to install in your application.
Q #3) What is Routing?
Route is a way to create request URL of your application, Route is a method of accepting a request and sending it to the relevant function in the controller.
What are the two main routing files in Laravel?
1. web.php 2. api.php
Q #4) What is a CSRF token?
Answer: CSRF is an abbreviation for Cross-Site Request Forgery that is generated by the server-side application and transmitted to the client. A CSRF token is a unique value that is generated by the server-side of the application and sent to the client
CSRF token helps to protect web applications from attacks which force a user to perform an unwanted action (commonly known as CSRF attacks).
Q #5) What is an artisan?
Artisan is the command-line tool for Laravel to help the developer build the application use while developing your application. You can enter the below command to get all the available commands:
example of commands
php artisan make:controller — Make Controller file php artisan make:model
Q #6) How to put Laravel applications in maintenance mode?
php artisan down
And can put the application again on live using the below command:
php artisan up
Q #7) How to put Laravel applications in maintenance mode?
What are the default route files in Laravel?
web.php — For registering web routes. api.php — For registering API routes. console.php — For registering closure-based console commands. channel.php — For registering all your event broadcasting channels that your application supports.
Q #8) What are seeders in Laravel?
Seeders in laravel are used to put dummy data in the database tables automatically. After running migrations to create the tables, we can run `php artisan db:seed` to run the seeder to populate the database tables.
We can create a new Seeder using the below artisan command:
php artisan make:seeder [className]
Q #9) List out common artisan commands used in Laravel.
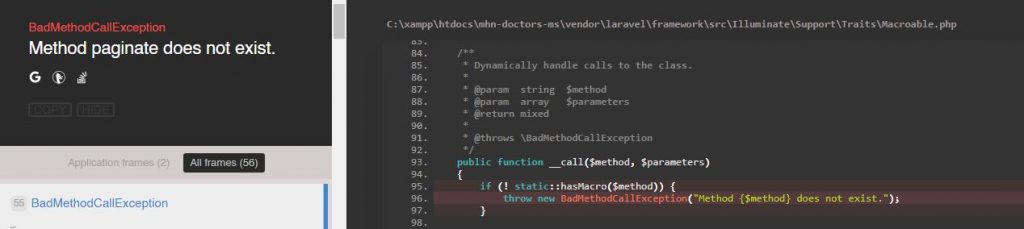
When I am trying to put some value in my input search box and after pressing enter button showing above issue. But when I am trying to filter data with my search button then it’s working fine. so i dig into it. i found one solution on it.